Table of Contents
Hi,everyone! I’m Camille. Have you ever printed a perfectly decent photo — good light, nice expression, clean background — and still had it rejected at the counter? That specific kind of frustration is what this guide is for.
Indonesian passport photo requirements are actually pretty straightforward once you see them laid out clearly. The problem is that specs for passport photos, visa photos, and e-visa uploads are slightly different, and it’s easy to mix them up. I’ve been through this process enough times (and made a few quiet errors along the way) to know exactly where people trip up.
Let’s walk through the whole thing — from physical dimensions to export settings to the actual workflow — so you can get it right on the first try.
Size & Resolution Basics
Here’s where most people get confused: Indonesia uses different photo sizes depending on the document type.
For a standard Indonesian passport (physical submission):
- Print size: 51 × 51 mm (2 × 2 inches) — square format
- Background color: red (yes, red — not white, not blue)
- This is the standard format used at Kantor Imigrasi offices nationwide
For Indonesia visa applications (including e-VOA):
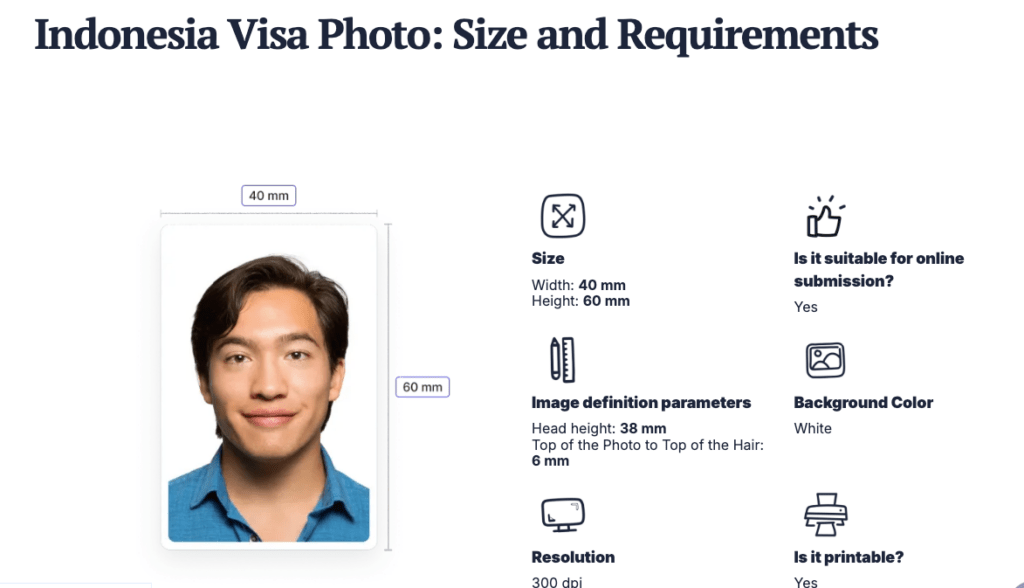
- Print size: 35 × 45 mm (portrait format)
- Background: plain white, no shadows, no patterns
- Digital file: minimum 400 × 600 pixels, maximum file size 2 MB
- Accepted formats: JPEG, JPG, or PNG (color only — no black and white)
According to the official Indonesian e-Visa portal, the photo must use JPEG, JPG, or PNG format in color, with a minimum resolution of 400×600 pixels and a maximum file size of 2 MB.
Quick note on that pixel minimum: 400 × 600px is the floor, not the target. If you’re working from a phone photo, you’ll have plenty of resolution to work with — modern smartphones shoot at several megapixels, so downscaling to the right dimensions is much easier than trying to upscale a tiny image.
Background Rules
This is the detail that surprises people most: the background requirements differ by document.
Passport photo (physical): Red background, uniform and plain with no shadows or gradients.
Visa / e-visa photo: White background, absolutely plain. The background must be uniform, plain, and white, with no shadows. Good lighting ensures the right contrast between the background and the person in the photo — the photo cannot be overexposed or underexposed, and the face must be illuminated evenly, without shadows.
A few things that cause quiet rejections:
- Shadows on the background. Even a soft shadow behind your shoulder counts. Stand a little away from the wall, or use even lighting from both sides.
- Off-white walls. That warm cream-colored wall in your living room looks white in person but photographs yellow. True neutral white is what you need.
- Cluttered backgrounds. Any object, pattern, or texture visible behind you will get the photo flagged.
If you’re using an AI-powered photo tool to remove and replace the background, just double-check the output before downloading. Most tools default to white, which is correct for visa purposes — but you’ll need to switch to red for the physical passport format.
Face Position Requirements
This is where biometric compliance really matters. The positioning rules exist so that automated facial recognition software can do its job accurately.
Per the official Indonesian immigration e-Visa portal, the top of the head (including hair) to the bottom of the chin must occupy between 50% and 60% of the image’s total height. Eye height — measured from the bottom of the image to the level of the eyes — should also fall between 50% and 60% of the image’s height.
In practical terms, that means:
- Face centered in the frame, not tilted or rotated
- Eyes level with the camera, roughly midframe
- Mouth closed, neutral expression — no smiling, no frowning
- Both eyebrows visible — if you have a fringe, move it aside
- Jawline visible on both sides
- No glasses — this is a firm rule now for Indonesian immigration photos
- Head coverings only permitted for verified medical or religious reasons, and even then, the full face from chin to forehead must remain clearly visible
One thing worth knowing: Indonesia began phasing out non-biometric passports in December 2024, with the phase-out expanding to more provinces across the country as of May 2025. This means biometric compliance in your photo isn’t just a technicality anymore — it’s essential for the system to process your application.
For children’s photos, the child must be photographed alone (no toys, no adults in frame), face forward and clearly visible. For babies under one year, eyes don’t need to be fully open — but the face still needs to be in focus and unobstructed.
Export & Print Tips
DPI and Print Quality
A resolution of at least 300 DPI is recommended for Indonesian passport photos. For higher-quality printing, 600 DPI gives you noticeably sharper results — especially important if you’re printing at home rather than at a print shop.
A practical note: DPI matters at the moment of printing, not necessarily in the digital file itself. A 600 × 750 pixel image printed at 2×2 inches will render at 300 DPI — which is the minimum you want for anything going into an official document.
If your photo tool exports at 72 DPI (common for web-use images), don’t panic — you can resample the image in your editing software to 300 DPI before printing. The key is that the pixel dimensions are sufficient to support that resolution at the target print size.
File Format Choice
For digital submissions (e-visa portal, online applications), JPEG is the safest choice. It’s universally accepted, compresses well, and plays nicely with the file-size limits the Indonesian immigration portal enforces. PNG works too, but the file sizes can run larger — worth checking before you upload.
A few things to keep in mind for digital export:
- File size limit: Maximum 2 MB for e-visa submissions. A well-compressed JPEG at the correct dimensions will come in well under this.
- Color mode: RGB only. If your editing software is set to CMYK (common in print design workflows), convert before exporting.
- No filters or retouching: The photo must represent your current, unaltered appearance. Skin smoothing, color correction, and contrast adjustments that change how you look are not permitted. Basic exposure correction for a properly lit shot is fine.
Maker Workflow
If you’re using an AI photo tool to prepare your passport or visa image, here’s the workflow that keeps things clean and rejection-free:
Upload
Start with the best source photo you can manage — well-lit, face centered, neutral background if possible (makes background removal cleaner). A photo taken near a window with natural daylight from the side tends to give the most even skin tones and the least shadow.
Upload your image to the tool. Most AI tools handle JPEG and PNG without issues. If your original is in a camera RAW format, convert it first.
Confirm Specs
Before downloading, verify:
- Correct dimensions for your document type (51×51mm for passport, 35×45mm for visa)
- Background color is accurate (red for passport, white for visa)
- Face coverage meets the 50–60% image height guideline
- No shadows on face or background in the processed output
- File format and size are within the upload limits
This two-minute check is worth it. Discovering the background is slightly off-white after you’ve already printed four copies is… not a fun morning.
Download / Print
For physical printing, order from a proper photo lab or use a printer that supports photo paper — the finish matters for immigration counters, and a pixelated home inkjet print on regular paper can get a quiet side-eye even when the specs are technically correct.
For digital submissions, keep the original high-resolution file. You may need to resubmit or use the same photo for a different application later.
According to Indonesia’s Directorate General of Immigration, online passport applications and appointments can be made through the M-Passport app, and all document photos submitted through official channels must meet the biometric specifications outlined above.
For travelers applying for an e-VOA or visa through the official Indonesian e-Visa portal, the photo upload interface will flag obvious issues like incorrect aspect ratio or file size — but it won’t catch subtler problems like a slightly gray background or eyes positioned too low in the frame.
FAQ
What size is an Indonesian passport photo? For physical passport applications at immigration offices, the size is 51 × 51 mm with a red background. For visa applications (including e-VOA), the size is 35 × 45 mm with a white background.
Can I use a white background for my Indonesian passport photo? For visa photos, yes — white is required. For the physical passport photo, the standard background is red. Using the wrong background color is one of the most common reasons for rejection.
What resolution do I need for an Indonesian passport photo? For digital submissions, minimum 400 × 600 pixels. For printing, aim for at least 300 DPI at the final print size. For best results, shoot at 600 DPI or higher.
Are glasses allowed in Indonesian passport photos? No. Glasses are not permitted in Indonesian immigration photos under current biometric guidelines.
How recent does my passport photo need to be? The photo should have been taken within the last 6 months and must accurately reflect your current appearance.
What file format should I use for the e-visa photo upload? JPEG, JPG, or PNG are accepted. JPEG is recommended for keeping file sizes manageable under the 2 MB limit.
Can I take my own passport photo at home? Yes. Use a plain white or red background (depending on document type), ensure even lighting with no shadows, and have someone else take the photo rather than using a selfie — holding the camera at arm’s length affects the angle and head positioning. For full international biometric photo standards, the ICAO publishes portrait quality guidelines that Indonesia’s system aligns with.
What happens if my photo gets rejected? You’ll need to resubmit with a corrected photo. For online applications, this usually means reuploading through the portal. For in-person applications, you’ll need new prints. It delays your application but is not a denial — just an extra step.
Where can I check official current requirements? The most reliable sources are the official Indonesian immigration website and the e-Visa application portal. Requirements do occasionally update, so it’s worth a quick check before your application rather than relying on information from a previous trip.
There — that’s genuinely everything you need to get the photo right on the first attempt. The specs aren’t complicated once they’re laid out without all the noise. Print at the right size, match the background to the document type, keep the face centered and eyes clear, export clean.
For a broader look at how Indonesia’s photo requirements compare internationally, the US Department of State country information page for Indonesia also references current entry documentation standards worth bookmarking if you travel frequently.
“Off you go, little one.” Your passport application is already in better shape than you think.
Previous Posts:
Background Remover for IDs: When It’s Allowed and When It’s Not
How to Remove Background from a Photo — Hair, Glass & Tricky Edges Done Right
Best Free AI Photo Editors Online: 5 Tools That Actually Work (2026)