Table of Contents
Hi,everyone! I’m Camille. There’s a certain feeling when you pull up a photo you love—only to notice it’s soft around the edges, a little grainy, or just… not quite there. Sound familiar? Let me walk you through what a photo enhancer actually does under the hood, and when it can (and honestly can’t) save your image.
Enhancer vs Filters: What’s Actually Different
This is something that confused me for a while, and I think it trips up a lot of people.
Filters are cosmetic. They lay a color grade or effect on top of your image—think warmer tones, a vintage wash, a moody contrast boost. They don’t care about your photo’s underlying quality. A grainy photo with a filter on it is still a grainy photo. Just with nicer vibes.
A photo enhancer works differently. It analyzes the actual pixel data and tries to reconstruct what was lost—sharpness that blur stole, detail that compression crushed, clarity that low light buried. It’s restoration, not decoration.
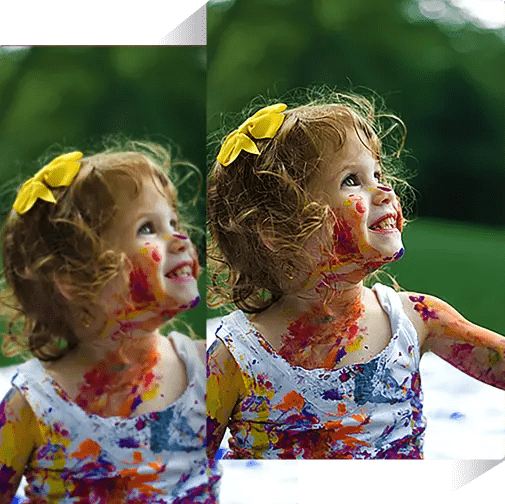
AI-powered enhancers take this further. They’re trained on massive datasets of image pairs, so they can predict what a sharper, cleaner version of your photo should look like—not just apply a blanket adjustment. That’s why the results often feel more natural than old-school sharpening sliders, which tended to create that crunchy, over-processed look we all know too well.
“Ahh, that’s nicer” is honestly my reaction every time I see a well-enhanced portrait come through. It just settles into clarity. If you’re exploring broader tools beyond simple enhancement, this guide to the best AI photo editors for improving image quality and clarity breaks down several options and how they handle sharpening, noise reduction, and restoration.
What It Can Fix (and What It Can’t)
Blur vs Noise vs Compression
These three are often lumped together as “bad quality,” but they’re genuinely different problems—and a good enhancer treats them differently.
Blur happens when the image is physically soft. Focus blur (camera missed the subject), motion blur (you or the subject moved), or camera shake—each leaves a different kind of softness. As Google’s research team explains, image blur and noise are often intertwined: reducing noise can remove fine structures, while sharpening tries to restore them. It’s a genuine balancing act.
Noise is a different beast. It appears as that random grain, colored specks, or gritty texture—especially in low-light shots. According to Wikipedia’s thorough breakdown of image noise, this is essentially random variation in pixel brightness or color, often caused by high ISO settings or sensor limitations. Luminance noise (the gray-toned grain) tends to look more like film and can sometimes even be stylistically okay. Color noise—those blotchy red, green, or blue splotches—is much harder to love.
Compression artifacts are what happen when a JPEG gets saved at low quality too many times—blocky regions, halos around edges, weird banding. These are introduced after the shot was taken, not during it.
An AI photo enhancer handles each with different internal logic. That’s why results vary: if a tool is tuned for noise reduction but you hand it a motion-blurred image, it might smooth the grain while the blur stays stubbornly in place. Knowing which problem you have helps you pick the right approach.
“Unrecoverable” Cases
Here’s where I’ll be honest with you, because I think some tools oversell this.
If a photo is severely motion-blurred—a total smear, not just softness—an AI enhancer can make it look slightly better, but it won’t give you back crisp detail that simply wasn’t captured. The information isn’t there to recover.
Same story with extreme compression damage. Heavy JPEG artifacts can be softened, but the original pixel data is gone. The AI is essentially guessing at what probably was there, and sometimes that guess produces textures that look slightly too smooth or artificially sharpened.
Research published by Springer confirms what photographers know intuitively: in low-light conditions, there’s always a tradeoff between motion blur and noise. Long exposures reduce noise but increase blur risk. Fast shutter speeds freeze motion but introduce grain. A photo enhancer is working within the constraints of whatever tradeoff was made at capture.
The honest sweet spot for enhancement? Images that are slightly soft, mildly grainy, or compressed but not destroyed. Those come out beautifully. Truly damaged photos will improve, just not magically.
Step-by-Step Enhancement Workflow
Upload and Auto Enhance
Most AI photo enhancers these days start with an auto-enhance pass the moment you upload. This is actually more useful than it sounds—it gives you a baseline to judge against, and the processing usually takes just a few seconds.
Upload your image. Let auto-enhance do its thing. Then look critically at the result before you adjust anything.
I used to skip straight to the manual sliders (bless my fiddly heart) and wonder why I kept over-processing. Starting with the auto pass first saves a lot of unnecessary tinkering.
Compare Before/After
This step is non-negotiable—and a lot of people rush past it.
Most enhancers offer a split-screen or toggle comparison. Use it. Zoom in to areas that matter: eyes in portraits, edges of products in e-commerce shots, background textures in landscape photos.
What you’re checking: Is the sharpening adding real edge definition, or just adding a halo? Does skin still look like skin, or does it have that plasticky AI smoothness? Are fine textures (fabric, fur, hair) preserved or blended out?
Canon’s imaging specialists describe this challenge well: noise reduction always involves a tradeoff between removing unwanted grain and preserving the fine detail that could look like grain. The before/after compare is how you spot when that balance has tipped the wrong way.
Export Settings
A few things worth knowing before you hit download:
Format matters. Export as PNG for anything that needs crisp edges or transparency. Use high-quality JPEG (80–90%) for photos that are just going on a website or social. Avoid re-saving low-quality JPEGs on top of each other—that’s how compression artifacts stack up.
Resolution. If you’ve upscaled, double-check the final dimensions match your actual use case. Upscaling a 500px image to 4K for a social post is unnecessary and won’t add real detail. Upscaling that same image for print? That’s exactly the right call.
Don’t over-process it for the sake of it. A subtly enhanced photo almost always looks better than an aggressively “enhanced” one. There we go—done and dusted.
Quality Checklist
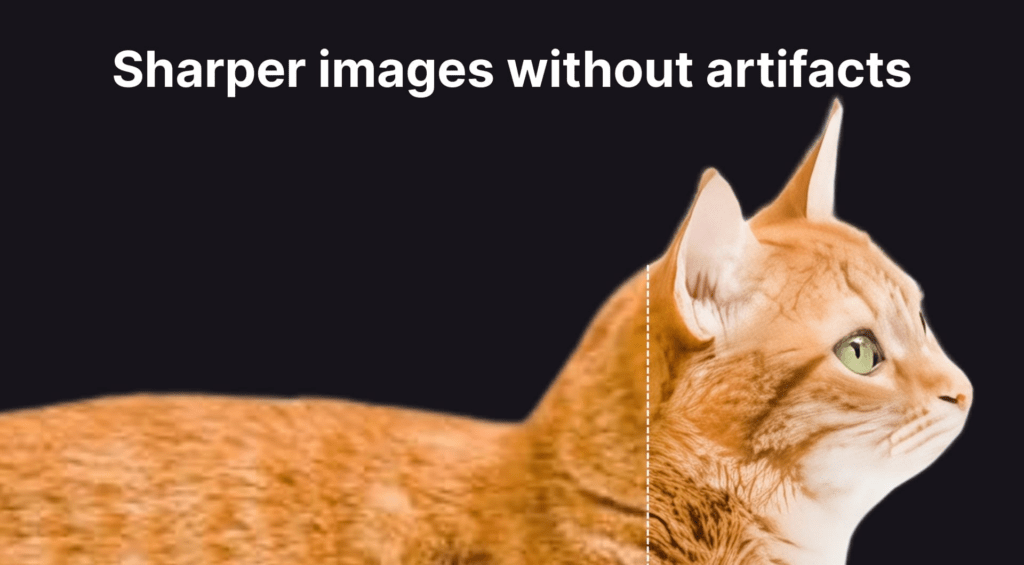
Over-sharpening Signs
These are the things I’ve learned to look for (usually after I’ve already over-done it, I’ll admit):
- Edge halos: A bright or dark fringe tracing the outline of objects. Dead giveaway. Easy to spot when you zoom into high-contrast edges.
- Texture that looks embossed: Fine surfaces start looking almost three-dimensional in an uncanny way—like they’ve been stamped rather than photographed.
- Noise that got louder: Over-sharpening amplifies existing grain. If your noise looks worse after sharpening, you’ve pushed too far.
- Crispy hair or fur: These organic textures are the first to show AI over-processing. They start looking like they were drawn rather than photographed.
Skin and Texture Naturalness
Portraits are where enhancement either shines quietly or fails loudly.
Good enhancement preserves pore structure and natural skin tone variation. Bad enhancement produces a wax-figure smoothness—that over-processed look that signals “this has been heavily edited” immediately.
Image Engineering’s research on image quality factors notes that noise reduction algorithms face a fundamental challenge: they can’t always distinguish between “noise” and “fine low-contrast detail.” Skin texture sits right in that tricky gray zone. Fine details like hair strands or transparent edges are especially sensitive to over-processing, which is why techniques used in removing backgrounds from hair and glass edges often rely on similar edge-preserving AI models.
My practical test: zoom into the jawline and eyelashes. If eyelashes look defined and separated (not merged into a blob), and if the jaw shows some natural texture rather than airbrushed smoothness, the enhancement has done its job tastefully. If not—dial it back.
FAQ
Does a photo enhancer fix motion blur? It can soften the appearance of mild motion blur, but severe motion blur—where the subject is a streak—is generally not recoverable. The information wasn’t captured to begin with.
Can I enhance an image that’s already been compressed a lot? Yes, but with limitations. The AI can reduce artifact visibility and add some apparent sharpness. It won’t restore pixel data that was discarded during compression.
Will upscaling a small image make it print-ready? AI upscaling can genuinely help bridge the gap—adding detail intelligently rather than just stretching pixels. That said, results vary depending on the original quality. A sharp 500px image will upscale better than a blurry 500px image.
How do I know if I’ve over-sharpened? Zoom into a high-contrast edge (like hair against a light background). If you see a bright halo tracing that edge, you’ve gone too far. Ease back on the sharpening intensity.
Is there a difference between enhancing portraits vs. product photos? Yes, meaningfully so. Portraits need to preserve organic skin texture and avoid plasticity. Product shots can often take a slightly more aggressive approach to sharpening and clarity since the goal is edge definition and detail rather than naturalness of organic texture.
What file format should I export enhanced photos as? PNG for graphics, logos, or anything with transparency. High-quality JPEG for photography going online. TIFF or PNG if you’re sending it to print.
Here’s to more moments where the work feels like play. One good enhancement, done well, on the right image—and suddenly a photo that felt like a throwaway becomes something worth keeping.
Until next time, dears.
Previous Posts:
7 Best AI Photo Editors in 2026 (Tested & Compared)
Best Free AI Photo Editors Online: 5 Tools That Actually Work (2026)
How to Remove Background from a Photo — Hair, Glass & Tricky Edges Done Right