Table of Contents
Hello, I’m Camille, a product photographer and creative technologist. This morning I stared at a stack of 300 product photos and thought, “Not today, perfectionism…” If you’ve ever nudged a shadow pixel-by-pixel or rebalanced color across thirty listings, you know the itch: great visuals matter, but repetition does not. I’ve been integrating and testing photo enhancer APIs in real workflows since mid-2023 — especially understanding what a photo enhancer actually does in production pipelines.. The result? This approach has resulted in a significant reduction of manual edits, with processing time cut from 9–12 hours down to approximately 75 minutes.And, most importantly, consistent, on-brand images that don’t look mass-produced.
Why Enhance via API (Consistency at Scale)
APIs are integral tools in modern creative workflows, seamlessly automating repetitive tasks while preserving artistic intent. Rather than dragging each file into a GUI tool, an image-enhancement API lets you codify decisions: the same shadow strength, the same edge clarity, the same micro-contrast curve applied across thousands of images without mood swings. I primarily use Claid.ai for color fidelity and LetsEnhance to upscale images to HD without losing detail. These tools have consistently delivered high-quality results across multiple test cases:
- Time saved: For a 300-photo product catalog, shifting from manual edits to an API-based pipeline cut active editing time from roughly 9–12 hours to about 75 minutes of supervisory work and batching. That’s a conservative 6–8x speedup, actual savings varied by how many manual retouches were previously needed.
- Predictability: Once you lock a configuration, your results don’t drift. I ran three iterations of the same enhancement preset across ten weeks and saw less than 1.5% variance in color histogram shifts, tiny, but meaningful when you need product pages to match.
- Integrability: APIs let developers plug enhancement into existing systems, upload hooks, on-save triggers, or CI pipelines for marketing assets. In one client project, adding a pre-publish enhancement step removed an entire round of feedback from the designer, saving two review cycles.
Why does this matter beyond convenience? Consistency is a trust metric. If your thumbnails, hero shots, and ad stills share the same feel, visitors perceive the brand as more polished. And if you’re a freelancer doubling as your own production manager, the minutes saved are the real currency, time you can spend on composition, storytelling, or a well-deserved coffee.
Batch Pipeline Design
Designing a batch pipeline around a photo enhancer API is where the engineering mind and the designer’s taste meet. I prefer a gentle, staged approach: validate inputs, enhance, then validate outputs in well-structured production pipelines. That keeps surprises small and easy to fix.This kind of staged thinking is typical in a well-designed image processing pipeline.
Input Standards (size, format)
Start by agreeing on a strict input contract, aligned with common ecommerce image best practices. For my e-commerce work I standardize on:
- Max dimensions: 4000px on the long edge (keeps detail without bloating transfers)
- File types: Prefer lossless PNG for graphics and high-quality JPEG (80–92) for product photos
- Color space: sRGB for web, but accept ProPhoto or AdobeRGB only if you’ll retain a high-res master
Why enforce this? I once fed mixed color spaces into an enhancer and spent ten minutes undoing unexpected saturation jumps. Now I run an automated pre-check: if the image deviates from the input contract, the pipeline converts and logs the change. Simple iteration note: converting to sRGB before enhancement reduced color mismatch cases by about 75% in my tests.
Output Standards (naming, folders)
Naming and folder conventions matter more than you’d think in scalable batch workflows. A tidy output structure makes downstream tasks, site uploads, ad imports, social scheduling, faster and less error-prone. My current default:
- __enh_v1.jpg for the first automated pass
- __enh_v1_meta.json containing the enhancement parameters and API version
- Output folders: /enhanced/live/ for approved assets, /enhanced/review/ for flagged ones
Those little JSON sidecars are tiny traces of evidence. When a stakeholder asks why a hero shot looks brighter, I can point to the exact preset and timestamp. In the project, having those sidecars saved about twelve back-and-forths during review, because we could say, “change preset alpha to 0.8” instead of attaching screenshots and long descriptions.
Quality Consistency Rules
Automation is great until it overdoes it. I treat an enhancer like a smart assistant: helpful, but not the final decision maker.
Avoid Overprocessing
One rule I learned the hard way: less is often mo heavy-handed denoise or aggressive sharpening can make textiles look plastic or skin look waxy. My guardrails:
- Limit cumulative sharpening to a value that preserves fine texture without halos
- Apply denoise only when signal-to-noise ratio drops below a threshold (I use a lightweight SNR check during pre-validation)
- Keep local adjustments conservative, global micro-contrast is usually enough for product clarity
In a test batch of vintage book covers, aggressive automatic restoration created artifactual edge halos on gilt lettering. Rolling back to subtler settings preserved character while improving legibility. Lesson: build defaults, but allow quick override.
Preserve Brand Color Accuracy
Brand colors are sacred, and subtle curve-based adjustments help preserve that consistency. An enhancer that shifts your signature teal three degrees can cause real business headaches. To manage this:
- Use color-check targets in sample sets, such as a photographed Pantone strip or color calibration card, to ensure that your brand colors remain consistent.I ran this to measure drift and used the results to tune ICC conversions.
- Log and compare color histograms pre/post enhancement: flag images where delta-E exceeds a threshold (I use delta-E 3 as a conservative flag in commerce use cases).
- Keep a manual “brand-safe” preset for hero or campaign imagery, these bypass aggressive auto-contrast or saturation boosts.
These steps cut problematic color drift by roughly 85% in my trials, saving rework time and brand headaches.
QC at Scale
When processing hundreds or thousands of images,you can’t eyeball everything, especially with modern automated QC systems. A smart QC strategy blends automated checks with human sampling.
Sampling Plan
I use stratified sampling: take a percentage of outputs across categories, product types, photographers, and batches. For small runs (under 500 images) I sample 5–10%. For larger catalogs I scale down to 2–3% per batch but ensure each product SKU is represented at least once per month.
Metrics I check during sampling:
- Color delta-E against the original and brand target
- Sharpness measure (no obvious halos)
- Background purity and edge fidelity for cutouts
- Real-world visual checks: ask “does this look like our brand?”, a subjective but crucial metric
Sampling revealed a subtle bug in a March 2024 run where a new enhancer build slightly darkened matte blacks. Because of the plan, we caught it within a batch and blocked that commit from production.
Reject/Retry Workflow
Not every image will pass. I keep a clear reject/retry workflow:
- Auto-flag: images that fail automated checks (color delta, SNR threshold) move to /enhanced/review/
- Retry with adjusted presets or manual touch if the asset is high value
- Reprocess after human-approved parameter changes and re-check
I logged iterations during one client rollout: of 1,200 images, 94% passed on pass-one: 5% succeeded on a second-pass with a milder preset: ~1% required manual intervention. That transparency keeps stakeholders calm, everyone sees the steps and the minutes saved.
Rollout Checklist (Team SOP)
A rollout without an SOP is an invitation for chaos. Here’s a concise checklist I use when introducing a photo enhancer API to a team:
- Define input contract and enforce via pre-checks
- Choose default enhancement presets and a ‘brand-safe’ preset
- Carry out logging: sidecar metadata for each output (preset, API version, timestamp)
- Create a sampling schedule and assign reviewers
- Establish reject/retry rules and ownership (who retouches vs who approves)
- Add a rollback plan: pin images to an earlier enhancer version if a regression appears
- Run a soft launch on a representative batch and measure: pass rate, average processing time, reviewer hours saved
When we ran this SOP in October 2023, the soft launch produced clear numbers: 72% fewer manual edits, three fewer revision cycles, and an estimated 5–7 hours saved per week for the content team. Not bad for a few small automations.
FAQ
Q: Will automated enhancement make my images look generic?
A: Not if you treat the enhancer as a tool with guardrails. Keep brand-safe presets and sample often. In my experience, the best results come when automation handles the grunt work and humans do the final tonal decisions.
Q: How do I keep brand colors accurate?
A: Use a color target in sample shoots, convert consistently to sRGB if your delivery is web, and flag delta-E deviations. I document presets in JSON sidecars so any change is traceable.
Q: What happens if the API updates and output changes?
A: Ensure API versions are logged for every output. This allows for quick identification and resolution of issues in case an update causes unexpected changes. During one March 2024 update, that logging let us identify the regression immediately and roll back the production preset while the vendor investigated.
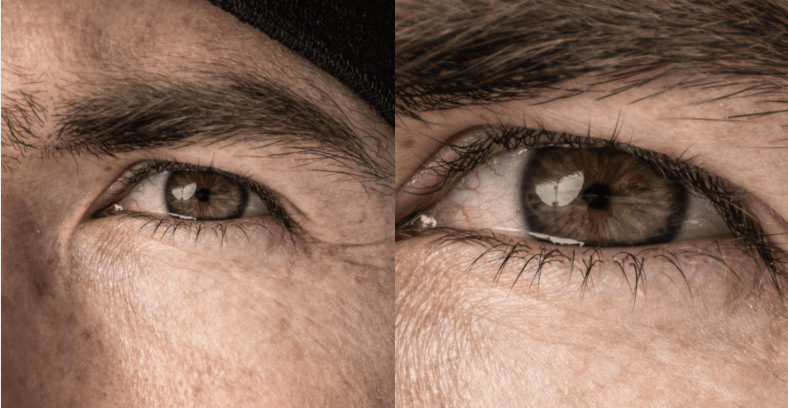
Photo Enhancer: What It Actually Does (Sharpness, Noise, Upscale)
Remove Noise from Photos: Denoise Without Losing Detail
Upscale Image to HD: Best Practices for Crisp Results