Table of Contents
This morning I stared at a fuzzy product cutout and whispered, “Not today, perfectionism… but also, not today, halo frizz.” If you’ve ever run an AI video prompt and wondered why the motion looks clever but the edges feel… crunchy, this is for you. Clean Assets AI Video isn’t a buzz phrase, it’s the quiet difference between a clip that looks high-end and one that looks a little off.
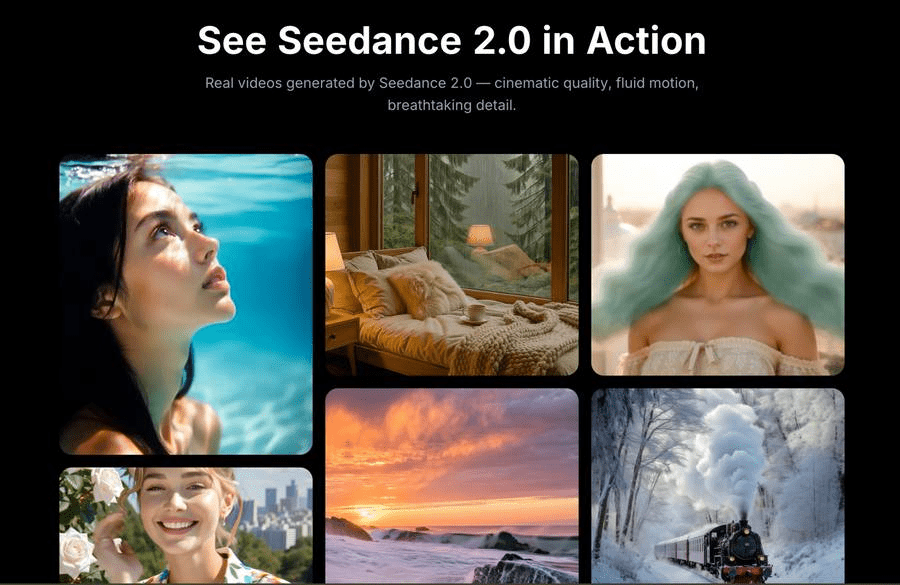
I’m Camille. Over the last few weeks, I’ve been testing Seedance 2.0 with my everyday assets: skincare jars, soft-fabric apparel flats, and a small parade of ceramic mugs. Same prompts, different prep. And then, poof, the lighting and motion just clicked when the source files were tidy. Ooh, look at that. Here’s what “clean” really means, why it matters, and the simple 3-step prep that’s been saving me 8–12 minutes per asset, steady.

The Uncomfortable Truth — Generation Quality Is an Asset Quality Problem
I used to think better prompts would fix everything. With Seedance 2.0, my best outputs consistently started with better inputs, sharper crops, balanced alphas, and no accidental background shadows sneaking in.
Here’s what I kept seeing across three runs per setup (same seed, same motion preset, same length):
- Messy reference → jittery edges, “breathing” halos, and textures that smudge during motion.
- Clean reference → stable contours, confident lighting continuity, and fewer weirdness spikes frame-to-frame.
Why this happens in practice:
- AI video models (Seedance 2.0 included) use your reference as a signal map. If the alpha is noisy or the subject blends into the background, the model spends capacity guessing edges instead of refining motion and light.
- Any ghost pixels (wisps, leftover background) become “evidence” that the scene is bigger or brighter than it is. You get flicker or a faint aura. Not cute.
What “Clean Asset” Actually Means for AI Video Models
A clean asset isn’t just “no background.” It’s a tidy set of signals the model can trust. When I say “clean,” I mean:
- Subject isolated with a proper alpha channel (no halos).
- Edges decontaminated so color bleed isn’t hinting at a fake background.
- Composition cropped to what matters, no dead air.
- Sensible file format and resolution (more in the FAQ).
Transparent Background vs Solid Color vs Scene Crop
If you’re handing Seedance 2.0 a single reference frame or a short source clip, you’ve got a few options:
- Transparent PNG/WebP with alpha: Best for unambiguous edges and flexible placement. The alpha tells the model exactly what’s subject and what’s not. In my tests, this yielded the most stable contours across motion.
- Solid color (e.g., pure green or gray): Works if the color is truly flat and far from subject hues. But any lighting falloff becomes a gradient, and the model reads it as part of the object. Expect occasional halos or color spill.
- Scene crop (natural background left in): Useful when you want context (shadows, reflections) to drive realistic movement. If the background is busy, the model may “lock” onto the wrong shapes and smear fine edges.
Rule of thumb I use: if the final looks like a composited shot or a styled motion graphic, give it a transparent background. If you want environmental realism, keep a simple, honest scene crop with clear separation.
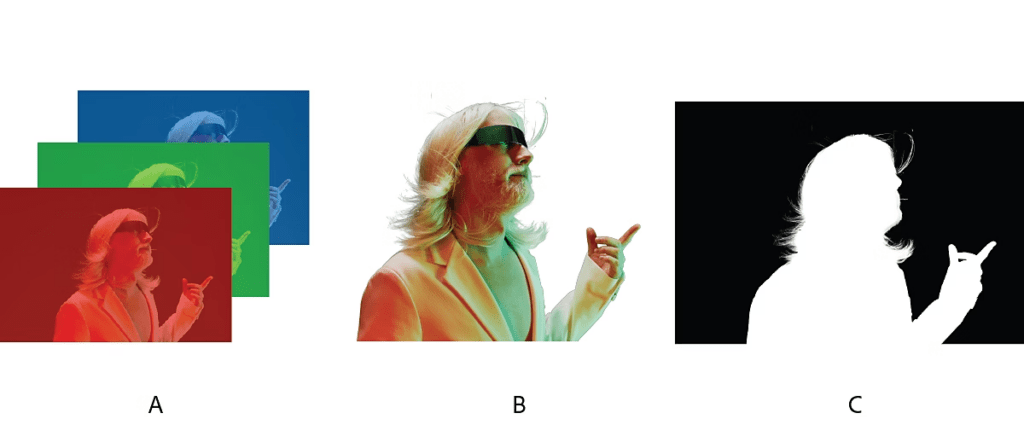
Edge Quality, Halo Artifacts, and Alpha Channel Basics
Two tiny troublemakers:
- Light halos: left-behind luminance from the original background (often from white sweep setups). They glow when you add motion or contrast.
- Color fringing: background spill in hair, fabric fibers, or glass edges that the model interprets as part of the subject.
What helps:
- True alpha channel files (PNG/WebP/TIFF) with premultiplied edges handled correctly. If you must composite, ensure you’re not double-premultiplying. Adobe’s guide on alpha channels and premultiplication is still a trusty reference.
- Edge decontamination: remove color spill so your edges don’t inherit the old backdrop. Tools that offer “edge clean” or “decontaminate colors” save you later headaches.
- Simple comps: if you do place on a solid, use a mid-gray rather than pure white or black, less contrast means less halo drama during motion. Ahh, that’s nicer.
Before-and-After: Same Prompt, Messy vs Clean Reference
Setup: Seedance 2.0 (Jan 2026 tests), 6-second loop, same seed, “ambient studio sweep, soft orbital pan, gentle specular bloom.” Subject: a gloss-white skincare jar with silver cap.
Messy reference (quick lasso, faint studio sweep left in):
- Result: The silver cap caught a shimmering fringe that pulsed as the camera moved. Shadows “breathed.” Around frame 90, the jar’s label edges softened like marshmallow. Past me would have fiddled for hours: present me just sighed and marked it “needs cleanup.”
Clean reference (tight crop, transparent PNG with decontaminated edges):
- Result: Contours held steady. The specular bloom felt intentional, not hazy. The label text stayed readable throughout. Well, that settled nicely.
Time difference: prepping clean took me ~3 extra minutes upfront: I saved ~10 minutes I would’ve spent re-generating, masking, and patching in post. One and done, no back-and-forth nonsense. If it can rescue my sleepy brain at 10 p.m., imagine what it’ll do for you.
The 3-Step Asset Prep Rule (Crop → Cutout → QA)
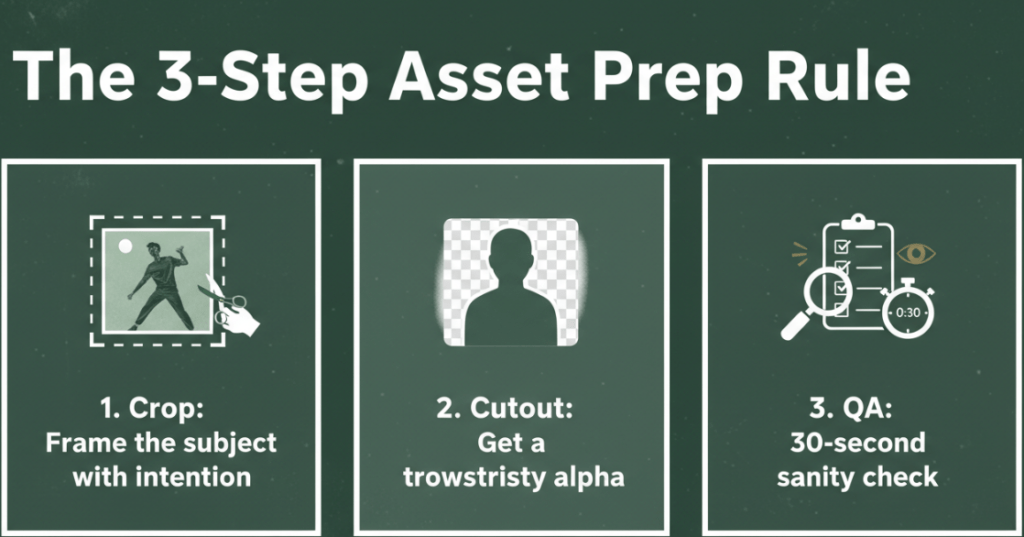
This isn’t a perfection gauntlet, it’s a light tidy-up. I run this on anything I plan to animate in Seedance 2.0.
- Crop: Frame the subject with intention
- Remove dead margins so the model focuses on the form, not the void. Think poster-ready composition.
- Keep a little breathing room (3–5% headspace) to avoid accidental edge truncation when there’s motion.
- Cutout: Get a trustworthy alpha
- Use a cutout tool that respects hair, glass, and transparent materials. Avoid rough lassos, those jaggies will dance.
- Decontaminate edges if you had a colored backdrop. It reduces color spill that becomes halo shimmer later.
- QA: 30-second sanity check
- Zoom to 200% and pan the perimeter. Look for bright fringing and stray pixels.
- Toggle on a mid-gray background. If you see a glow, do one more pass. Mmm, that feels good.
If you like automations, a tiny script that crops to subject bounds → runs background removal → exports PNG+alpha → reimports for a perimeter check is worth its weight in tea. FFmpeg notes on alpha handling are handy if you’re batch-processing.
How Cutout.Pro Fits into This Pipeline
I’ve tried a mix of tools for step 2, but lately I’ve been leaning on Cutout.Pro when I need speed plus clean edges on small batches. It hits a cozy middle ground: fast as hell and still rock-solid.
- Why I reach for it: the hair handling and glass edges are dependable, and the “edge feather + color decontaminate” combo keeps halos in check. On apparel flats, fine threads don’t melt. On bottles, the alpha doesn’t chew into the highlight.
- Where it saves time: I batch-drop 10–20 assets, let it chew, then spot-fix just 1–2 tricky ones instead of 8–9. I’m down from ~15 clicks per asset to ~5 when I pair it with my crop macro.
- Limits to note (because honesty matters): heavy motion blur or extremely low-res sources still need a manual pass. And very complex semi-transparencies (wispy chiffon, fog) may ask for a layered approach.
If you’re curious, our docs outline formats and transparency support clearly, start with PNG/WebP + alpha.
Trt Cutout.Pro here.
FAQ — Resolution, Format, When Cleanup Matters Most
What resolution should I use for Seedance 2.0 references?
Aim for 2–4x the final frame’s subject size. If your final export is 1080p and the subject occupies half the frame, a 1500–2000 px subject edge works well. Oversizing beyond 4k seldom helps and can add processing overhead.
PNG, WebP, or something else?
PNG+alpha is a safe bet for single frames. WebP with alpha is lighter for sequences. TIFF is fine but heavier. Avoid JPEG for edges: no alpha and compression blocks can invent fake texture.
Does background color matter if I’m using alpha?
Yes, a little. Premultiplication can bite. If you prepared the asset on white and premultiplied, compositing onto dark can reveal halos. If possible, keep straight (unpremultiplied) alpha and composite downstream. Adobe’s article on alpha channels is a clear explainer.
When does cleanup make the biggest difference?
- High-contrast scenes (dark-on-light or light-on-dark). 2) Metallic, glossy, or translucent surfaces where speculars shift during motion. 3) Tiny text or fine edges (zippers, threads, eyelashes). These are the spots where models amplify small mistakes.
- Can I skip cleanup for lo-fi or stylized outputs?
Absolutely. If you’re leaning into grain, glitch, or painterly looks, a rougher edge can be a vibe. Old habits, still learning. But for product, brand, or anything “premium,” clean wins.
What if my source is already a video?
Do a rough matte pass first. Even a soft garbage matte that excludes the noisier background zones helps the model prioritize the subject. If you can, pre-stabilize micro jiggle to avoid compounding motion.
Beautiful design doesn’t have to feel heavy. A tidy crop, a calm cutout, and a quick QA, and suddenly your Seedance 2.0 clips feel luxe instead of labored. Wait… that’s actually lovely. Try it on your next project, you might surprise yourself.
Until next time.
Previous posts:
Remove Video Background Without Green Screen: A Practical Guide
How to Use Vidu Q3 Text to Video (Step-by-Step)
Remove Background on Android: Clean Cutouts for Social & Ecommerce