Table of Contents
Hi,everyone! I’m Camille.
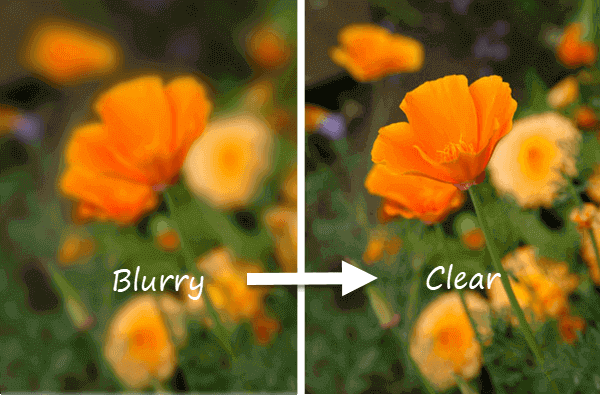
You know that moment when you’re scrolling through your camera roll, land on a photo you really loved taking — and then you zoom in? Soft edges. A little smeared. That mild, quiet heartbreak of a blurry image that was almost great. I’ve been there more times than I care to admit. Let me walk you through how to actually fix blurry photoswithout accidentally making them look worse in the process. If you’re curious what tools people usually use for this kind of fix, you can also explore the best AI photo editors.
Types of Blur (Motion vs. Focus)
Before anything else, it helps to understand what kind of blur you’re looking at. They have different root causes, and they respond differently to sharpening tools. Treating them the same way is the first mistake most people make — including past me, who just slapped the sharpness slider up and wondered why things looked crunchy.
Focus blur is what happens when the camera locked onto the wrong thing. Your subject is soft, but something else in the frame — the background, a wall, someone’s shoulder — is perfectly sharp. It has an even, round softness to it. Sometimes focus blur is deliberate and beautiful (hello, bokeh). Unintentionally, though — like when autofocus quietly locked onto your subject’s nose instead of their eyes — it’s just frustrating. As Microsoft Design’s research on blur effects explains, this kind of out-of-focus blur is governed by aperture and depth of field: the wider the aperture, the narrower the zone of sharpness, and the easier it is to accidentally land outside it.
Motion blur is different. It leaves a directional smear — horizontal streaks from a fast-moving car, diagonal trails from a shaky hand, a ghost-like double image of someone who shifted mid-shot. If you look carefully, motion blur has a linear quality to it, like the image was dragged slightly in one direction. The whole frame may be blurred (camera shake) or just the moving subject (subject motion). Either way, the camera captured movement . It wasn’t fast enough to freeze.
Knowing which you’re dealing with changes how you approach the fix. Focus blur tends to respond better to standard sharpening. Motion blur is trickier — more on that in a moment.
When Blur Is Not Recoverable
Here’s where I try to be a good friend rather than oversell the magic: some blur genuinely cannot be fixed.
If you have severe motion blur — a subject that’s been reduced to a full smear, a completely shaky frame where nothing is anchored — an AI tool can improve it, but it won’t restore the detail that was never captured. The camera was moving during the exposure. Those pixels contain motion data, not subject data. No algorithm can fully reconstruct what the sensor never recorded.
The same applies to extreme focus miss. If a portrait has the background in crisp focus and the face as an indistinct soft shape, sharpening the face won’t rebuild the eyelashes and pore texture that weren’t captured in the first place. AI can make a confident educated guess — and sometimes that guess is genuinely impressive — but it’s still inference, not recovery.
Where things get happily treatable: slight softness from a minor camera shake, mild focus drift, a photo that’s almost sharp but needs a small push. These are the sweet spots. Honest reality check here — set your expectations by the original quality, and you won’t be disappointed.
Step-by-Step Sharpening
Upload & Auto-Enhance
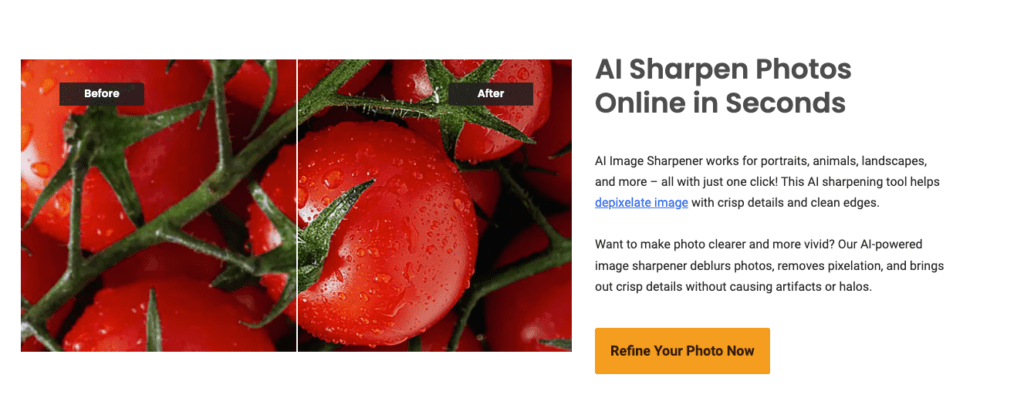
Most modern AI photo tools open with an automatic enhancement pass. If you want to try it yourself, you can start with a free AI photo editor online. Let it run first. Don’t touch anything yet.
This auto-pass gives you a baseline — something to evaluate before you start adjusting manually. I used to skip straight to the sliders (old habits — still learning), and I’d lose my reference point before I even knew what I was working with. Starting with the auto result and then deciding if adjustments are needed saves a surprising amount of time.
Upload your image. Let the AI do its initial read. Then look — actually look — before you change anything.
Adjust Strength (If Available)
If the tool offers a manual strength or intensity slider, treat it gently. The temptation is to push it high because more sharpening seems like more improvement. It isn’t.
Start at 30–40% of whatever the maximum is. Check the result at full zoom. Move up incrementally if the image still looks soft. The goal is to reach “clearly sharper” without crossing into “obviously processed.” That line is closer than people think.
For motion blur specifically, look for a targeted motion-blur correction mode if your tool offers one. General sharpening works by boosting edge contrast, which helps with softness but can make motion-blurred edges look oddly sharp and artificial. A dedicated motion correction approach handles this differently.
Preview & Compare Before/After
This is the most important step, and the one people rush past most often.
Use the before/after toggle or split-screen view. Zoom in to the parts that matter most for your specific image — eyes in a portrait, product edges in e-commerce shots, text in a document scan, fur or foliage in nature photography.
What to check: Is the edge definition actually better, or does it just look different? Does texture look natural, or like a texture effect was applied? Has noise become louder and grainier? Mmm, that feels good when it all clicks into place — but you have to actually verify that it has.
Avoid Halos & Noise Artifacts
Don’t Over-Sharpen
Halos are the most visible sign of over-sharpening, and once you know how to spot them, you’ll see them everywhere — including in your own work. They appear as bright or dark outlines tracing high-contrast edges: hair against a light background, product edges against a white backdrop, the silhouette of a tree against the sky.
Adorama’s guide to fixing halos in photography puts it plainly: oversharpening increases edge contrast, which amplifies halos. The fix for existing halos can be done in post, but it’s far easier to avoid creating them in the first place by not pushing sharpening past the point where those bright outlines start forming.
My practical test: zoom into the highest-contrast edge in your photo. If you can see a thin fringe of light or dark hugging that edge, you’ve gone too far. Ease back. There — done.
Other over-sharpening signs to watch for: fine textures that start looking embossed or three-dimensional rather than organic, hair that looks drawn rather than photographed, and noise that’s gotten louder rather than quieter.
Denoise First if Needed
Here’s a sequencing rule that genuinely matters: if your photo is both noisy and blurry, run noise reduction before you sharpen. Not after. Before.
The reason is logical once you hear it: sharpening works by increasing contrast at edges. Grain is technically a kind of edge — lots of tiny, random contrast differences. If you sharpen a noisy image, you make the noise sharper and more prominent. Then when you denoise, the tool has to work harder against noise that’s now been emphasized.
Topaz Labs’ official workflow guidance confirms this order: address noise first to give yourself the cleanest possible starting point, then sharpen. The end result is cleaner, and you typically need less sharpening overall because the image isn’t fighting against amplified grain.
Denoise gently — just enough to reduce the obvious grain without making skin or texture look plastic. Then sharpen. That’s the sequence. Easy now.
Export Tips for Web vs. Print
The end destination of your photo changes how you should export it — and how much sharpening is actually appropriate.
For web and social media: Export as high-quality JPEG (80–90% quality). Images displayed on screens are often viewed at small sizes, which naturally hides minor softness. This means you can afford slightly less aggressive sharpening for web use, and the compression artifacts from lower-quality JPEG will be the bigger quality culprit anyway. Keep the resolution matched to actual display size — upscaling a 500px image to 2000px for a social post adds file size without adding real detail.
For print: Print is unforgiving in ways screens aren’t. Cambridge in Colour’s detailed guide to digital photography sharpening notes that print sharpening can and should look slightly over-done on screen — the inkjet printing process has a softening effect, so images need to be a touch crispier than they look at final display size to appear correctly sharp on paper.
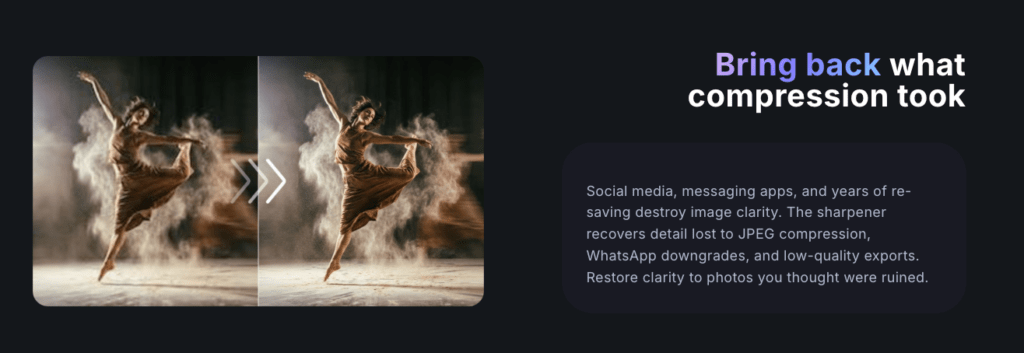
Export at the highest possible resolution for print. Use PNG or TIFF for maximum quality if file size is not a concern. And avoid resaving JPEG files repeatedly — each save-and-compress cycle stacks compression artifacts on top of each other, and no amount of sharpening will undo that.
One more thing: if you’ve upscaled the image, check whether the upscaling was done with an AI tool or a basic resize. AI upscaling — which reconstructs plausible detail rather than just stretching pixels — holds up much better at print size. Basic bilinear or bicubic resizing creates a larger image that still looks soft.
FAQ
Can I fix a photo that’s severely motion-blurred? AI sharpening can reduce the appearance of mild to moderate motion blur, but severe smear — where the subject is fully streaked — is generally not recoverable. The information wasn’t captured. You’ll see improvement, not restoration.
My photo looks sharp on my phone but blurry on my computer. Why? Phones display images at small sizes with screen sharpening applied, which hides softness. Viewing on a larger monitor at full resolution reveals the true quality. This is normal — it just means the phone was flattering you.
Should I sharpen before or after resizing? Always sharpen after final resizing. Sharpening and then scaling down softens the result anyway. Sharpen for the intended output size, not the pre-resize size.
How do I know if the blur is from camera shake or focus miss? Camera shake blurs the entire frame directionally — everything has a slight motion trail. Focus miss leaves specific areas sharp (whatever the camera focused on) while other areas are soft. Check whether any part of your frame looks crisp.
Is it safe to use AI auto-enhance on all photos? For most photos, yes — the auto-enhance pass is quite conservative and a good starting point. For portraits where skin texture is important, always compare the before/after closely. AI has a tendency to over-smooth skin if pushed, and the result can look more like an illustration than a photograph.
Why does sharpening make my grain worse? Because sharpening amplifies edge contrast, and grain is technically lots of tiny edge contrasts. Sharpening grain makes it sharper and more noticeable. Denoise first, sharpen after. That’s the workflow the pros follow — and once you try it in the right order, you’ll immediately see why.
What file format is best for a sharpened photo? PNG for anything needing transparency or clean edges. High-quality JPEG (80%+) for photos going online. TIFF or high-quality PNG for print. Never save intermediate editing steps as low-quality JPEG.
There, that wasn’t so hard, was it? A little patience with the before/after compare, a gentle hand on the strength slider, and a basic understanding of what went wrong in the first place — that’s genuinely most of it.
Beautiful photos don’t need heavy processing. They just need the right kind of care.
Until next time, dears.
Previous Posts:
7 Best AI Photo Editors in 2026 (Tested & Compared)
Best Free AI Photo Editors Online: 5 Tools That Actually Work (2026)
How to Remove Background from a Photo — Hair, Glass & Tricky Edges Done Right