Table of Contents
Hi,everyone! I’m Camille. There I was, application in hand, photo looking perfectly fine to my tired eyes — and then the letter came back. Rejected. For a shadow I genuinely couldn’t see until I looked very, very closely. If that sounds familiar, you’re in very good company.
Over 300,000 US passport applications were rejected in 2024 due to non-compliant photos alone. That’s not a small number. And with stricter biometric standards rolling out globally, the margin forerror keeps narrowing. The good news? Most rejections come down to the same handful of fixable issues.
Let’s go through all of them.
The 12 Most Common Rejection Reasons (Quick List)
Here’s a fast overview before we dig in:
- Non-white or off-white background
- Shadows on the background or face
- Head too small or too large in frame
- Head tilted or not facing camera directly
- Eyes partially closed or looking away
- Glasses (now banned in most cases)
- Photo taken more than 6 months ago
- Blurry, grainy, or low-resolution image
- Incorrect print size or wrong paper type
- Digital editing, filters, or AI retouching applied
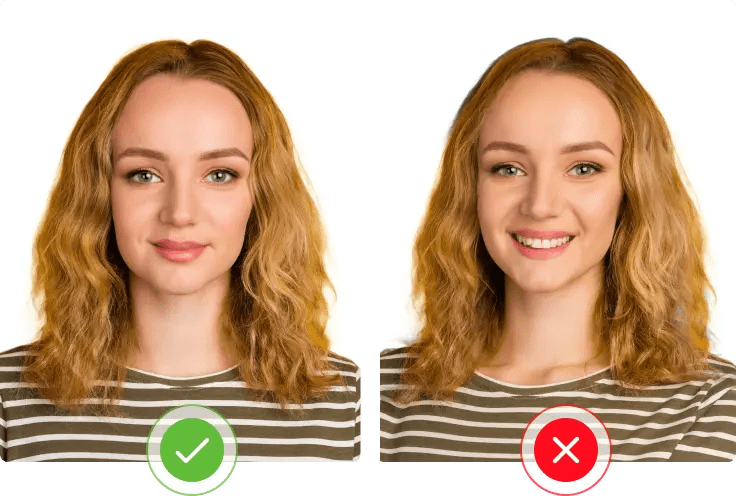
- Unacceptable expression (smiling too broadly)
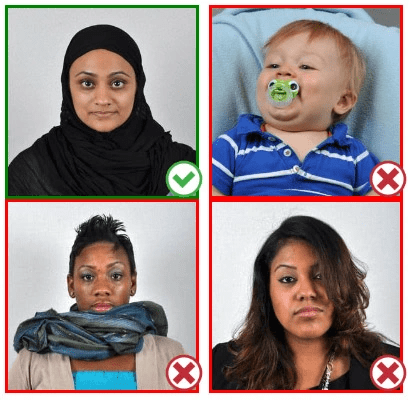
- Hair or clothing obstructing the face
Diagnose the Problem in 60 Seconds
Before you retake anything, figure out which problem you’re dealing with. Rejection notices are often vague (“photo does not meet requirements” — thanks, very helpful), so here’s a quick self-check.
Background Issues
Hold your photo at arm’s length against a plain white wall. Does the background match? Even an “almost white” cream or grey background can trigger rejection. Shadows — caused by standing too close to the wall or poor lighting placement — are sneaky culprits. They don’t have to be dramatic; a subtle gradient on one side is enough to fail automated scanning systems.
Size / Crop Issues
Your head must be between 1 and 1⅜ inches (25–35 mm) from the bottom of the chin to the top of the head. That’s surprisingly tight range. Too much headroom above the crown, or a photo cropped too close to the face, both get flagged. Biometric systems measure the distance between your facial features, so even a 2mm deviation outside the acceptable range can cause a rejection.
Quality Issues (Blur / Noise)
Zoom into your photo on a computer screen — not just your phone. Is the text on a nearby sign sharp in your environment, but your photo looks slightly soft? Smartphone cameras are wonderful, but autofocus sometimes locks onto the background instead of your face. Printed photos on regular copy paper rather than glossy or matte photo paper also fail quality checks instantly.
Fixes by Category
Fix Background Color & Shadows
The most reliable fix is the simplest one: shoot against an actual white wall (not a painted cream wall that looks white in person), with at least 3–4 feet of distance between you and the background. Place your light source — a window or lamp — in front of you, not beside or behind you.
If you’re editing an existing photo’s background digitally, be careful. The US Department of State explicitly states you should not change your photo using computer software, phone apps, filters, or artificial intelligence. Background removal tools are only acceptable if they’re being used to place you on a compliant white background without altering your appearance. When in doubt, retake rather than retouch.
Fix Head Size / Position
The easiest way to calibrate head size before printing: use a free passport photo template overlay. Most online tools will show you a guide frame. Your eyes should land roughly in the upper-middle third of the photo. If they’re too high, your head is too large; if they’re near the center, you’re likely framed correctly.
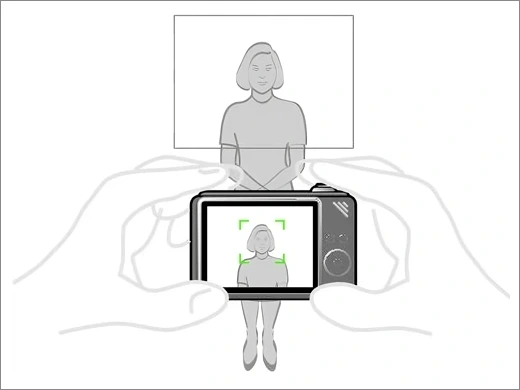
For positioning, ask someone else to take your photo — not a selfie. It’s nearly impossible to hold the camera perfectly level and at eye height while also looking natural. Even a very slight upward tilt (common in selfies) distorts the geometry enough for automated systems to flag it.
Fix Blur / Low Resolution
For online applications, digital photos must be between 600×600 pixels (minimum) and 1200×1200 pixels (maximum) in JPEG format. If you’re printing, aim for at least 300 DPI — a 2×2 inch photo at that resolution means 600×600 pixels minimum. Anything below that and the image starts to look soft when printed.
Practical tip: take the photo in good natural light near a window, use portrait mode off (it can add background blur that looks artificial), and hold very still or use a timer. Camera shake in low light is the number-one cause of unexpected blur.
For printed submissions, always use dedicated photo paper — matte or glossy both work. A photo printed on regular printer paper will fail on paper quality alone, regardless of how good the image looks on screen.
Final Submission Checklist
- Run through this before you submit:
- Background is plain white or off-white, no shadows
- Head fills 50–69% of the photo height
- Facing directly forward, no tilt
- Both eyes open, neutral expression
- No glasses (unless medically documented exception)
- Photo taken within the last 6 months
- No digital edits, filters, or AI enhancements applied
- Print size exactly 2×2 inches (51×51 mm) for paper submissions
- Printed on matte or glossy photo paper
- For digital: JPEG file, 600–1200px, under 240KB
The full, official requirements — including edge cases for religious headwear, medical exceptions, and infant photos — are detailed on the US Department of State passport photo page, which is always worth bookmarking as your primary reference.
Maker Workflow (Fast Re-Do)
So you need to retake it. Here’s how to do it efficiently — this whole process can realistically take 15–20 minutes if your space is set up right.
Upload
Take a fresh photo with these conditions: bright room, window light in front of you (not behind), solid white wall at least a metre behind you. Use your phone’s rear camera with the timer function, propped on a stack of books or a mini tripod at eye level. Take 5–6 shots and choose the sharpest one.
Apply Correct Specs
Use a reputable passport photo tool that applies the correct crop and sizing for your country. Different countries have genuinely different specs — the US requires 2×2 inches,the UK needs 35×45mm, and Canada requires 50×70mm — so make sure you’re selecting the right document type. A good tool will position your face correctly within the frame automatically.
If you’re applying online, the US State Department’s digital photo upload guide walks through exactly what the system checks for, including file size and format specs. Useful reading before you hit submit.
Export for Print / Upload
For printing: export at 300 DPI, JPEG format, and print on photo paper at a pharmacy or print shop. Don’t home-print on regular paper — it’ll be rejected on paper quality alone, even if everything else is perfect.
For digital submission: compress to under 240KB if needed (most online tools handle this automatically), confirm it’s JPEG or HEIF format, and double-check the pixel dimensions one more time before uploading.
“There — done.” Genuinely, that’s it. Once you’ve got the setup right, a compliant photo takes less time than the application paperwork.
FAQ
Q: Can I smile in my passport photo? A slight, natural closed-mouth expression is generally acceptable. A broad smile — teeth showing, cheeks raised — changes the geometry of your face enough to cause biometric matching issues. Neutral is always the safest bet.
Q: My photo was rejected for “digital alteration” but I didn’t edit it. What happened? Some smartphone cameras apply automatic skin smoothing or portrait-mode background blur without you realizing it. Check your camera settings and turn off any beauty or AI enhancement features before retaking. This has become a surprisingly common cause of rejection.
Q: How old can my photo be? For US passports, the photo must have been taken within the last 6 months. The UK now requires photos taken within the last month, reduced from the previous six-month window. Always check the requirements for your specific country.
Q: Do I need to show my ears? For US passports, ears don’t need to be visible if your hair naturally covers them. The key requirement is that your full face — from hairline to chin — is clearly visible with no obstructions. The ICAO international standards for biometric photos go into more detail if you’re curious about the technical reasoning behind these rules.
Q: Can I wear a hat or head covering? Religious head coverings are permitted, provided they don’t cast shadows on the face and don’t cover any part of the face itself. Hats worn for non-religious reasons are not allowed.
Q: What paper should I print my passport photo on? Matte or glossy photo-quality paper only. Standard printer paper is too thin and has the wrong finish — it will be rejected on sight.
Q: What if my photo gets rejected again? Consider using a professional passport photo service — many pharmacies and post offices offer this, and some provide a guarantee that their photos will be accepted. It costs a little more, but after two rejections, the time and stress saved is usually worth it.
Past me used to think passport photos were the easy part of the application process. Bless my fiddly heart. The rules are genuinely more detailed than they look — but once you know what the system is checking for, fixing it is usually just a matter of taking a fresh photo with better lighting and the right setup.
Here’s to getting it right this time. Until next time — keep it light, keep it lovely.
Previous Posts:
Passport Photo Size India (2026): Requirements + Quick Maker Steps
Passport Photo Size Bangladesh (2026): Size, Background, Common Mistakes
Passport Photo Size Philippines (2026): Specs + How to Take at Home