Table of Contents
Hello, I’m Camille. If you’re here for the exact passport photo size Bangladesh requires (and the little details that quietly make or break an application), come sit with me. I’ve been making these for clients and myself, and I’ve tested a few quick workflows in February 2026 across Photoshop, Lightroom Classic, and a couple of lightweight online ID photo makers. Here’s the version that got me from raw snap to print-ready in minutes, no drama, just tidy results. There we go~
Size & Print Specs
Let’s anchor the essentials first because this is what officials check at a glance.
- Print size (Bangladesh): 45 mm (height) × 35 mm (width). In inches, that’s roughly 1.77″ × 1.38″.
- Orientation: Portrait.
- Background: Plain white (not gray, not off-cream). We’ll talk about backgrounds in the next section.
- Paper: Photo-quality paper with a matte or semi-matte finish. Gloss can work, but it sometimes adds glare under counters’ lighting.
- Color: Full color. No filters, no heavy retouching.
- Quantity: Many photo studios print 4–6 per sheet: for submission you’ll usually bring 2, but check your local office’s current note.
Digital vs. printed submissions:
- If you’re applying in person and bringing photos, stick to the 45×35 mm prints.
- If you’re going through an e‑service flow where a digital photo upload is needed, follow the pixel and file-size guidance in that portal (they can vary). When in doubt, I export at 300 dpi and let the tool crop to 45×35 mm framing.
Where this comes from: Bangladesh follows ICAO standards for travel documents (Doc 9303) on dimensions and biometric visibility. If you enjoy primary sources (I actually do, nerd alert), skim the ICAO facial image notes here:ICAO guidance on facial images. For country specifics and the latest e‑passport pointers, I keep an eye on the official portal: Bangladesh e‑Passport. Policies evolve, so I double-check requirements before a print run, two minutes of checking can save a reshoot.
A tiny field note: At 300 dpi, a 45×35 mm photo is about 531×413 pixels. Don’t obsess, just make sure the export is crisp, and the head falls within the allowed proportions (coming up next). Ahh, that’s nicer.
Background & Clothing
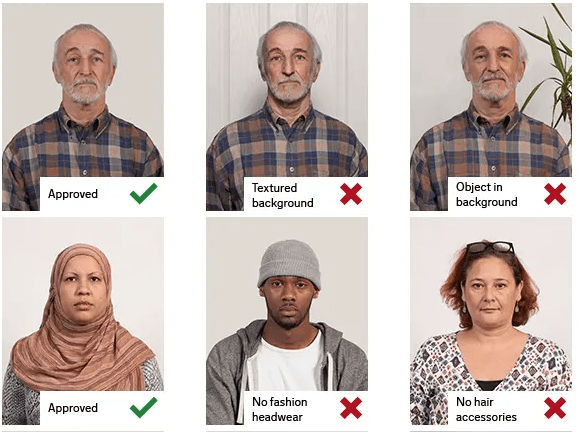
Background
- Pure white. No gradients, no texture, no shadows hugging your jawline.
- Even lighting helps avoid banding or gray patches. If you see a faint vignette, it’s safer to fix it now than gamble at the counter.
Clothing
- Think contrast. A mid-to-dark top (navy, charcoal, deep green) against white keeps your face crisp. White shirts can blend into the background, if that’s your only option, layer a darker cardigan.
- No uniforms, no camouflage, and avoid logos or bold text. Simple and tidy wins.
- Head coverings worn for religious or medical reasons are allowed, but keep your full face visible: from the bottom of the chin to the top of the forehead, and edges visible on both sides.
Make up, glasses, jewelry
- Keeping makeup natural, true-to-life skin tones are key. Shimmery highlights can look like glare under office lights.
- Remove tinted glasses. If you must wear clear lenses, tilt slightly to avoid catching lights and make sure your eyes are fully visible.
- Small studs are fine: big, mirror-shiny earrings can throw mini-sunflares.
Face/Head Position Rules
The aim is simple: you, clearly and calmly, facing forward. Here’s how I frame it, so it sails through checks.
- Pose: Face the camera directly, head straight, not tilted. Neutral expression with mouth closed. A gentle, natural look is fine: no exaggerated smiles or frowns.
- Eyes: Open, clearly visible, looking into the lens. Strands of hair shouldn’t curtain the eyes.
- Head size in the frame: Aim for the ICAO-friendly proportion, roughly 70–80% of the photo’s height occupied by the head (chin to crown). In a 45 mm tall photo, that’s about 31–36 mm of head height. This usually lands the eye line around two-thirds up from the bottom, which looks…very quiet right. There…are just right.
- Shoulders: Keep a sliver visible. If it’s only your neck, you probably cropped too tight.
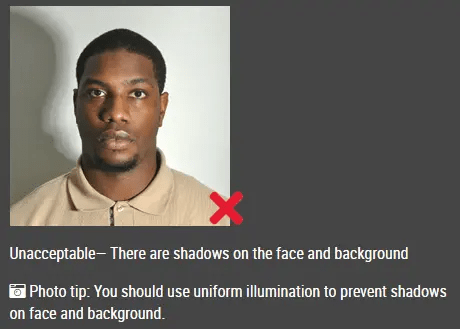
- Shadows: None on the face, none behind the head. Move a light slightly to the side or step a half‑meter away from the wall to soften that pesky halo.
- Color fidelity: Your skin tone should look like you on a good day, not an Instagram filter. Avoid heavy color grading or clarity/crunch that warps features.
If you’ve ever had a “Why does my face look stretched?” moment, check your lens. Shoot around 50 mm full-frame equivalent (or 2x on many phones) to reduce distortion. My jaw actually dropped a little the first time I switched to 2x and the features felt more natural. Well, that settled nicely.
Common Mistakes (and Fixes)
Wrong Crop
This one trips up even careful creators. If the chin is too low or the crown nearly touches the edge, automated checks can flag it. I use an overlay template sized to 45×35 mm with a head-height guide (31–36 mm). In Photoshop, I set a 35×45 mm crop preset, then nudge until the eye line sits comfortably above center. Past me was so serious. Now I line it up, whisper “Easy now~,” and move on.
Bad Lighting
Harsh overheads make under‑eye shadows: side lamps carve little canyons. My quick fix: stand near a window with sheer curtains, face it, and lift a white notebook just out of frame to bounce light. If you’re stuck with artificial light, two lamps at 45° angles, slightly above eye level, work wonders. In post, I only soften shadows and fix color cast, no plastic skin. If it can rescue my sleepy brain at 10 p.m., imagine what it’ll do for you.
Low Resolution
Blurry prints get rejected. If your original is a tiny crop from a group photo, reshooting is faster than upscaling. For phone shots, tap to focus on the eyes and hold steady for a beat. Export at 300 dpi for print, and avoid heavy noise reduction that smears texture. Ooh, look at that, texture intact and edges clean.
Maker Steps (Fast Workflow)
Here’s the brisk, low‑stress path I used last week . Total time: ~6–8 minutes, start to finish.
Upload
- Capture: Stand ~1 meter from a white wall, 2x lens, window light. Neutral face. Take 5–7 shots, tiny variations help.
- Pick the sharpest file (zoom to the eyes). Import to your editor or a trustworthy photo maker.
Confirm Size & Background
- Crop: Set output to 45×35 mm. Use a head-height guide (31–36 mm). Watch the eye line, slightly above center feels balanced.
- Background: If the wall isn’t perfectly white, use a subtle background cleaner. Keep edges natural (no halos). I feather 1–2 PX and lift whites gently, so it stays believable.
- Tone: Neutralize color cast (auto white balance is fine). Tidy flyaway that crosses eyes: don’t alter features.
Download and Print
- Export: JPEG, sRGB, high quality. At 300 dpi, you’re print-ready.
- Contact sheet: I like a 4‑up or 6‑up layout on a 4×6″ sheet: it saves cost and gives spares.
- Test print: One quick print to check brightness. If it’s a touch dark, bump exposure +0.15 and reprint. There, done. One and done, no back‑and‑forth nonsense.
FAQ
Q: What is the official passport photo size for Bangladesh?
A: 45 mm (height) × 35 mm (width), portrait orientation, white background. This aligns with ICAO standards and the guidance referenced on the Bangladesh e‑Passport portal.
Q: Do I need matte or glossy paper?
A: Matte or semi‑matte tends to scan better with fewer glare issues. Gloss is sometimes accepted but can reflect under office lights.
Q: Can I wear glasses?
A: Tinted lenses aren’t allowed. Clear lenses are sometimes acceptable if there’s no glare and the eyes are fully visible. If you can remove them, do, it reduces risk of rejection.
Q: What about head coverings?
A: Religious and medical head coverings are generally allowed. Keep your full face visible from chin to forehead with edges visible on both sides, and avoid shadows on the face.
Q: Are beards okay?
A: Yes, just be yourself. Make sure the beard doesn’t cast heavy shadows over the mouth or jaw.
Q: Any quick check before I print?
A: Confirm three things: size 45×35 mm, head height around 31–36 mm, and a clean white background with no shadows. If those line up, you’re in a good place. See? Feels better.
Beautiful design doesn’t have to feel heavy, and neither does this. Try it on your next project: you might surprise yourself. Until next time, dears~
Previous Posts:
Background Remover for IDs: When It’s Allowed and When It’s Not
How to Remove Background from a Photo — Hair, Glass & Tricky Edges Done Right
Best Free AI Photo Editors Online: 5 Tools That Actually Work (2026)