Table of Contents
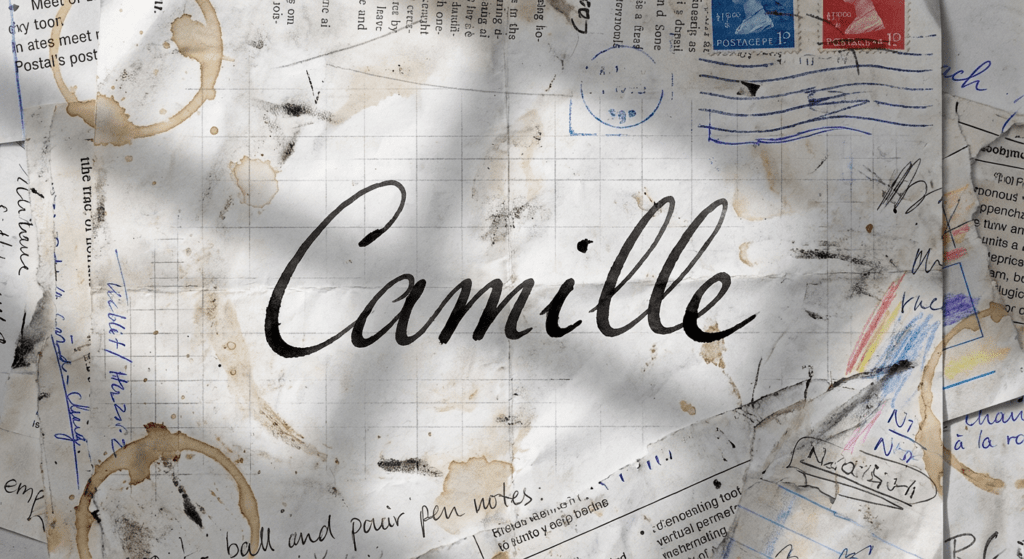
Hi, Camille is coming! That day, I remembered I still needed a clean digital signature for a contractor form. If you’ve ever tried to remove the background from a signature and ended up with crunchy edges or ghostly paper shadows, same. The fix doesn’t have to be fiddly. Let me show you how I capture, prep, and cut out a signature so it looks crisp and human, not like it’s been ironed to death by a filter.
I tested these steps across a few tools: iPhone Notes Scan (iOS 17), Google Drive’s Scan on Android, Adobe Photoshop, and a couple of AI removers. The goal: fast as hell and still rock-solid. And yes, thin strokes survive. There we go!
Best Ways to Capture a Signature (Scan vs Phone)
I’ve tried everything from fancy scanners to “hold it under a desk lamp and pray.” What actually matters is clean contrast and even lighting. The fewer shadows you start with, the less cleanup later.
- Pen choice: Use a black fine-tip pen or brush pen on bright white paper. Gel pens give rich blacks: ballpoint can look grainy.
- Paper: Smooth printer paper or a blank index card, no texture, no ruled lines. Avoid recycled paper with specks if you can.
- Lighting: Window light works beautifully. Lay the paper flat and shoot from directly above to avoid distortion.
Scan app vs phone camera
- Phone Scan (Notes on iOS, Drive on Android): Surprisingly great. Auto-crop and contrast boosts help, and the perspective correction saves me from my wobbly hand. On iOS 17, Notes’ Document Scan gave me the cleanest edge detection of all the “quick” options.
- Flatbed Scanner: Still king for perfect consistency (if you have one). 300–600 dpi, grayscale or color. It’s slower but beautiful for archival signatures.
- Regular Camera Shot: Works in a pinch. Keep the phone parallel and use grid lines. Tap to focus on the ink.
My pick most days: iPhone Notes Scan. It took 30 seconds and reduced my clean-up time by roughly 40% compared with a quick phone photo. Ahh, that’s nicer.
Prep the File Before Cutout
Before any background removal, I give the image a tiny spa moment, just enough to make the removal tools behave. Think “gentle facial,” not a new face.
Contrast Boost (Without Overdoing)
In Photoshop, I duplicate the layer and try one of these:
- Levels: Pull the white point in until the paper looks bright, then nudge the black point to make ink feel solid. Watch the thin hairlines, if they vanish, you’ve gone too far.
- Curves: A soft S-curve can deepen the ink without crushing subtleties.
- Camera Raw Filter: Texture -10 to -20 to smooth paper grain: Clarity close to 0 to avoid halos.
Tip: Zoom to 200% while adjusting. If the thin parts of your “t” and “y” look frayed, back off. Past me would’ve pushed it until the signature looked like a sticker. Bless my fiddly heart~
Remove Paper Shadows
Those gray corners and subtle page shadows haunt exports. Quick fixes:
- Selective white brush: On a blank layer set to “Color Dodge” or use a gentle white soft brush on a masked curve to lift only the paper, not the ink.
- Gradient fix: If one side is darker, a white-to-transparent gradient on a masked Levels adjustment evens it out.
- De-noise the paper: In Camera Raw, Luminance Noise 10–20 smooths grain without touching ink too much.
On mobile scans, I sometimes use the built-in “Increase Contrast” toggle, then dial it back. The goal is consistent white, not clinical white. Wait… that’s actually lovely.
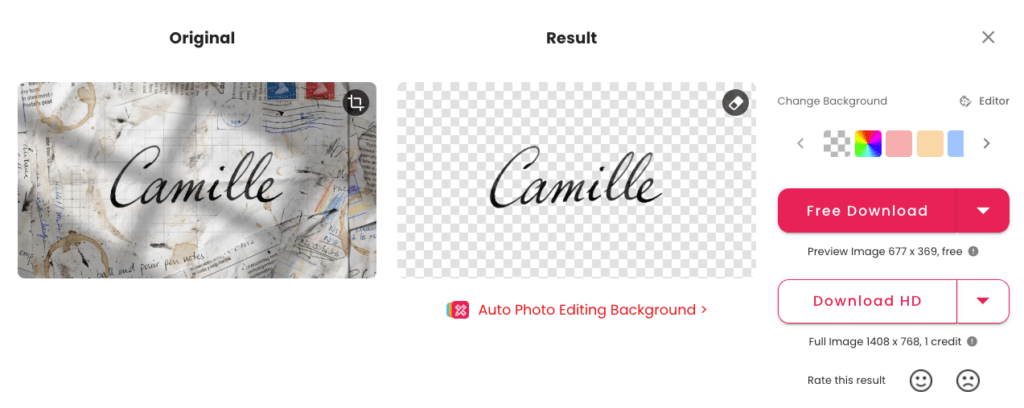
Step-by-Step Signature Cutout
Here’s my current flow for removing the background from a signature with clean edges and intact hairlines. Tools vary, but the principles stay the same: contrast, preserve stroke weight, export clean.
Auto Removal
When I’m in a rush, I’ll try an auto remover first, then refine.
- Photoshop Remove Background (Quick Actions): Window > Properties > Quick Actions > Remove Background. For signatures on clean paper, it does a surprisingly decent first pass.
- Select Color Range: Select > Color Range > Sample the white background and set fuzziness until the paper is selected, then invert selection to isolate the ink. I feather 0.3–0.5 px.
- AI services: Tools like PhotoRoom or remove.bg can be fine if the scan is clean. They’re fast for batch work, but watch for chewed edges on thin script.
Why I still prep first: Any shadow or paper texture tends to confuse auto tools and you’ll spend more time fixing artifacts. A quick pre-clean saves minutes.
When all you need is a clean first cut, that’s exactly what we built Cutout.Pro for. It removes the paper background from scanned signatures in one step, giving you a usable transparent PNG fast, before any manual refinement. Try it here!
Preserve Thin Strokes
This is where signatures live or die. A few ways I keep the personality intact:
- Multiply method (my favorite for docs): Skip cutout entirely, place the signature image over your document and set the layer to Multiply. White disappears, ink stays natural. Then mask the edges to hide the paper boundary. One and done, no back-and-forth nonsense.
- Blend If sliders: In Photoshop, double-click the layer > Blend If: This Layer, drag the white slider left until the paper drops away, then Alt/Option-split the triangle for a soft transition. This preserves those delicate ink fringes. Mmm, that feels good.
- Channel extraction: If the blue channel has the highest contrast, duplicate it and run Levels to isolate the ink, then load it as a selection (Cmd/Ctrl-click the channel). Great control, slightly nerdy.
- Refine Edge with care: Select and Mask > Shift Edge around -5 to -10 to avoid bulking up strokes. Feather under 0.5. Too much and your signature looks like it’s wearing mittens.
Field note: In a batch of 40 signatures for a client contract system, Blend If reduced my cleanup time by roughly 30%. Past me was so serious.
Export Transparent PNG
Once the background is clean (or removed via Multiply/Blend If):
- Inspect at 200–300% for halos or leftover gray. A white brush on a clipped Curves layer is your quiet fixer.
- Trim and pad: Image > Trim (Transparent Pixels) then add 60–120 px padding so the signature doesn’t kiss the document edges when placed.
- Color profile: sRGB is safest for web and PDFs. Keep 8-bit unless there’s a special need.
- Export: File > Export > Export As… PNG with Transparency. If you’ll reuse it often, save a high-res master (300–600 dpi) and a downscaled version for email PDFs.
There… just right.
Use Cases (Docs, PDF, Email)
You’ve got a clean signature, now make it behave nicely in real-world workflows. Ooh, look at that.
Insert into Word / Google Docs
- Word: Insert > Pictures, place your transparent PNG, then set Wrap Text to “In Front of Text” for easy positioning. If the background wasn’t fully removed, set the layer to 95–98% opacity or use Picture Format > Color > Set Transparent Color for quick touch-ups.
- Google Docs: Insert > Image > Upload. Use Image options > Adjustments to nudge brightness/contrast if it looks gray. For repeat use, stash it in a brand assets doc.
Tip: If your signature looks too bold against the document, drop opacity to 90–95% and add a 1–2 px Gaussian Blur. It mimics ink soak. Hehe, nice when it works.
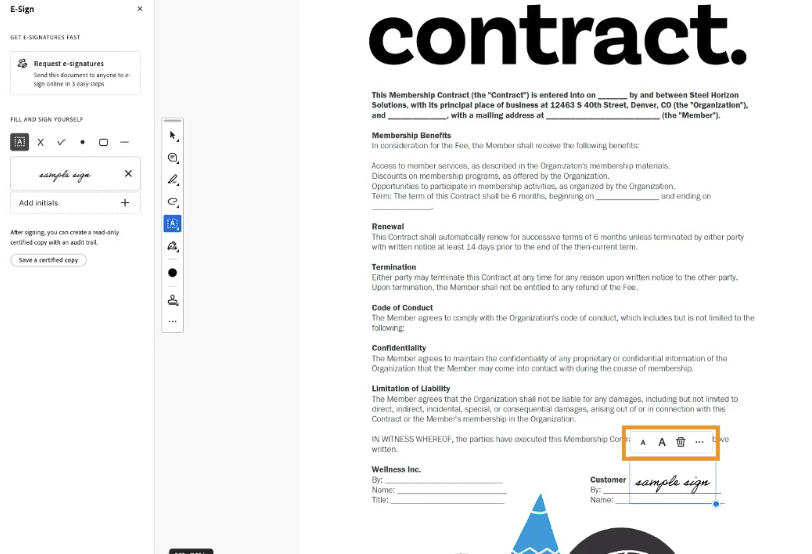
Add to PDF Workflows
- Acrobat (Reader or Pro): Use Fill & Sign to place the PNG or draw once and reuse. If it appears jagged, check the PNG size, bigger source, tighter result. Adobe’s official help is solid: Fill and sign PDF forms
- macOS Preview: Tools > Annotate > Signature lets you capture directly with the camera or trackpad: or simply insert your cleaned PNG via Edit > Insert > Page from File.
- Gmail: I keep a small version for quick attachments: keep file size under ~300–500 KB to avoid bloating email threads.
Well, that settled nicely.
Safety Tips (Prevent Misuse)
A little practical care goes a long way.
- Store securely: Keep master signature files in a private folder or password-protected drive. Avoid public links. Watermark internal proofs.
- Use variants: I keep a “legal” version and a simpler “acknowledgment” version for low-stakes approvals. Different looks, less risk.
- Add invisible tells: A tiny, consistent pixel detail (like a subtle angle on the baseline) helps you spot unauthorized reuse. Quiet but useful.
- Prefer platform e-sign: For legally sensitive docs, tools with audit trails (like Adobe Acrobat Sign or DocuSign) provide timestamps and identity checks. It’s not glamorous, but it’s safer than emailing PNGs around.

- Metadata check: Strip metadata on distribution copies if privacy matters. In Photoshop: File > Export As… removes most embedded data by default.
- Limits: I’m not a lawyer. If you handle regulated docs, follow your organization’s compliance policy and local laws.
See? Feels better.
Reflection
Beautiful doesn’t have to feel heavy. A little contrast polish, a kind removal method, and you’ve got a signature that looks like it flowed off the page five seconds ago. If it can rescue my sleepy brain at 10 p.m., imagine what it’ll do for you. Off you go, little one.
Until next time, keep it light, keep it lovely.
Previous posts:
Remove Background from Logo: Keep Sharp Edges & True Colors
Transparent Background PNG: How to Export Cleanly (No Artifacts)
Fur & Hair Background Removal: How to Get Natural Edges