Table of Contents
Hey! I’m Camille. Have you’ve ever tried to remove a background on iPhone and ended up pinching, masking, and sighing at 10 p.m., I’ve been there. Good news: iOS has gotten quietly excellent at this, and with one or two tiny habits, the results look polished enough for storefronts and social.
I tested the workflows below on iPhone 14 Pro and iPhone 15 Pro Max, in iOS 17.6 and iOS 18 (January 2026). In practice, this trimmed my usual 8–10 steps down to 3, and for simple product shots, I’m saving 6–8 minutes per image. Not hype, just peace of mind and fewer fiddly taps. Let me show you the inputs, the quick flow, and a few fixes for the usual mobile gremlins (hair edges, noise, and those crunchy JPEGs). There we go!
Best Inputs on iPhone (Quick Setup)
Beautiful cutouts begin before you touch an app. Past me was so serious about “fixing it in post.” Present me prefers 30 seconds of setup that makes the background vanish cleanly on the first try.
- Light that’s soft and even: A window with sheer curtains or open shade outdoors. Avoid overhead spotlights: they carve harsh shadows that auto removers misread.
- Clear separation: Put your subject 2–3 feet from the background so the phone sees distinct edges. A simple foam board or a neutral wall works wonders.
- Lens choice: Use the 1× main camera for the cleanest detail and least distortion. If you need a tighter frame, step closer before jumping to 2×.
- Exposure sanity: Tap to focus, then drag down slightly to avoid blown highlights. Slightly underexposed is easier to recover than clipped whites.
- Steady hands: Live Photos can add micro-blur. If you’re shooting small products, consider turning Live off for the sharpest edges.
- Texture check: Super shiny objects pick up room reflections that confuse edge detection. A quick dust/cloth wipe reduces “mystery pixels.”
Why this matters: background removers, whether the built-in iOS subject lift or an app, lean on clean contrast and crisp edges. Feeding them a well-lit, separation-friendly photo gives you that neat “poof, subject isolated” effect instead of jagged halos.
If you’re shooting for ecommerce, capture at the phone’s full resolution (HEIC or JPEG is fine). You can export a transparent PNG later. And yes, HEIC looks different in some older tools: if a client pipeline complains, switch Camera > Formats to “Most Compatible” for JPEG just for that shoot. Easy now~
Step-by-Step: iPhone Workflow
Here’s my current three-step rhythm. No drama, no forty-layer edits.
Choose the Right Photo
I skim my album and pick the cleanest, sharpest shot (see setup above). If I’m torn between two, I zoom in on edges, hair, straps, product rims. The one with tidier edges almost always removes better. Mmm, that feels good.
Upload and Auto Remove
Two reliable paths depending on what you need:
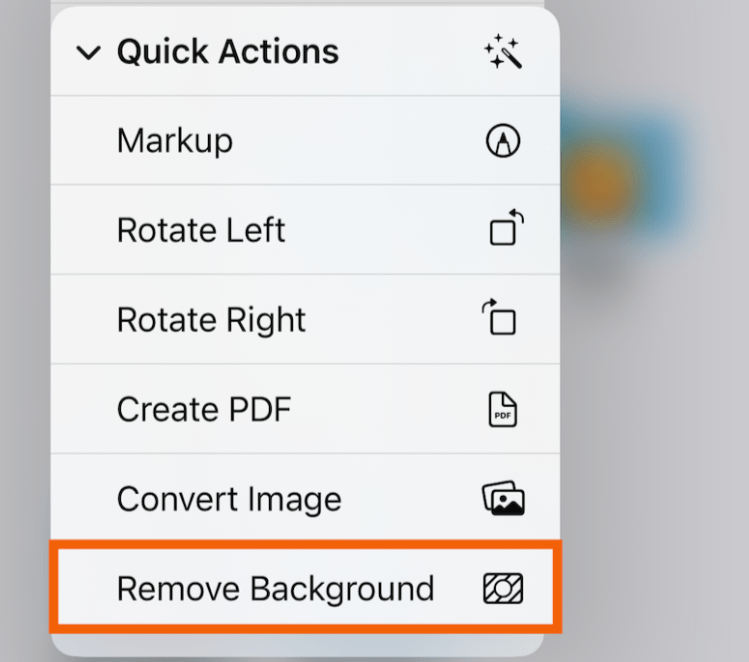
- Built-in iOS (fastest, single image): In Photos, long-press the subject until you see a glowing outline, then choose “Copy Subject.” Paste into Notes, Pages, or any app that accepts images, it pastes as a PNG with transparency. Or, in the Files app, long-press an image > Quick Actions > Remove Background to instantly save a new cutout PNG. Apple covers it here: Lift a subject from the background in Photos and Remove background in Files. On iOS 17/18, this is surprisingly crisp, even on wispy edges.
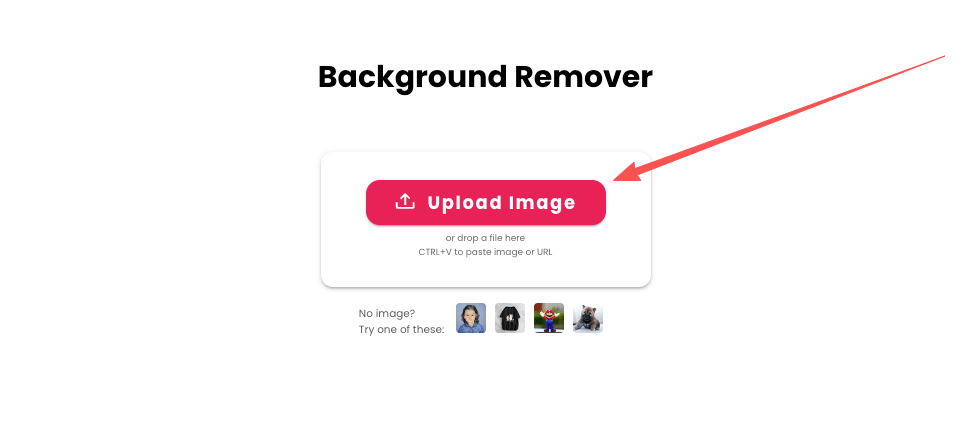
- App/online (batch, refine, or larger files): When I have 20 product shots, I’ll send them to a background removal app or web tool with a clean refine brush. The win: batch processing, quick “erase/restore” to tidy edges, and direct PNG export to Files. I avoid over-tweaking: two or three restores on tricky areas is usually enough. Hehe, nice when it works.
Field note (Jan 2026): iOS’s subject lift has improved on hair and semi-transparent objects compared to my tests last summer. It still stumbles on busy backgrounds and fine jewelry chains. That’s when I bounce to an app with a refine brush for 30–60 seconds of touch-up.
When iOS subject lift isn’t enough — especially with hair or fine details — this is the gap we designed Cutout.Pro to cover. We focus on fast, clean background removal with light edge refinement, so you can export a proper transparent PNG without turning mobile edits into a project.
Export Transparent PNG
For design work, I save cutouts as PNG to preserve transparency. In Files, rename with a clear convention (e.g., brand_sku_angleA.png). If this is heading straight to Shopify, I’ll export at 2048 px on the long side. For Amazon, I keep at least 1600 px (longest side) for zoom, and then place it on a pure white #FFFFFF background.
Fix Common Mobile Issues
Even with good inputs, phones are tiny miracle boxes with opinions. Here’s how I nudge them kindly.
Low Light Noise
- Capture fix: Move closer to the window, or bump ISO indirectly by tapping to expose for the subject and nudging brightness up just a touch. Avoid night mode for product shots: it can smear micro-detail.
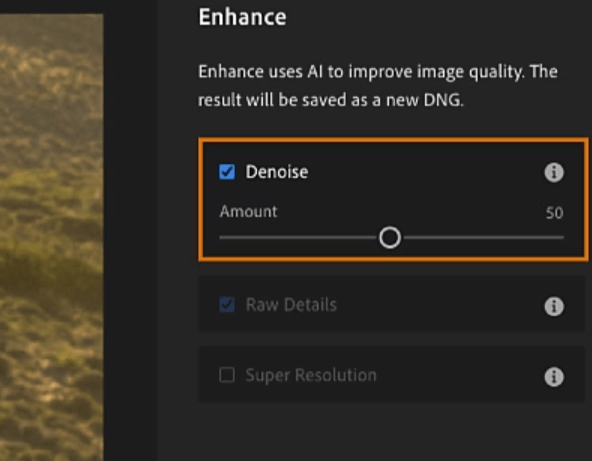
- Quick clean-up: In Photos > Edit, slide Noise Reduction up just enough to calm the grain, then add a touch of Sharpness back. If it’s stubborn, I send it to Photomator or Lightroom Mobile’s Denoise. I time this, 30 seconds max. Past me would have fussed forever… silly.
- Prevention: A $15 clip-on LED or a desk lamp bounced off a white wall is often enough to make noise a non-issue.
Hair Edges
- Capture fix: A little rim light from behind separates hair beautifully. Even a window behind and off to the side helps. Keep the background darker or lighter than the hair, contrast is your friend.
- Removal tip: iOS subject lift does well on solid backgrounds but can leave crunchy strands on busy scenes. I do one pass with iOS, then, if needed, open a background remover with a “refine hair” or soft-erase brush and feather 1–2 px around flyaways. There… just right.
- Placement trick: If the final is for a social graphic, place the cutout over a slightly textured or soft gradient backdrop. Gentle texture hides micro-jaggies better than a flat, harsh color.
Compression Artifacts
- Symptom: Blocky edges, color banding, or halos, common with screenshots or re-downloaded pics from messaging apps.
- Quick rescue: In Photos > Edit, a tiny clarity/definition bump and reduced contrast can smooth the blocks. Then export as PNG (not JPEG) to avoid re-compressing. If it’s still crunchy, upsize 120–150% in an app with a smart resize before removing the background: the extra pixels give the edge detector more to chew on.
- Workflow tweak: Pull assets from iCloud Photos, Files, or AirDrop rather than chat apps. It’s the smallest habit that saves the most headaches. Oh, that’s lovely.
Export Sizes for Social / Ecommerce
Here are sizes that have held up well across my clients’ channels. I keep a few reusable canvases in Files so I can drop a fresh cutout and export
in seconds.
- Instagram posts: 1080 × 1350 (portrait) or 1080 × 1080 (square). Portrait gets more screen space without stretching.
- Instagram Stories/Reels and TikTok: 1080 × 1920. Leave a little breathing room top/bottom for UI overlays.
- YouTube thumbnail: 1280 × 720. I aim for a 3–5 px soft shadow behind cutouts for depth at small sizes.

- Pinterest standard: 1000 × 1500.
- Shopify product: 2048 × 2048 square PNG is a sweet spot, crisp with reasonable file weight. Shopify’s guidance favors large, square, consistent images for clean grids. See: Shopify product photography best practices.
- Amazon product detail: Longest side at least 1600 px for zoom, pure white background (
#FFFFFF), subject fills ~85% of the frame. - General web banners: 1920 × 1080 or 2560 × 1440, export as PNG-24 only if you need transparency: otherwise high-quality JPEG or AVIF to keep pages speedy.
Tiny workflow win: I save export presets named “IG-Portrait,” “TikTok,” “Shopify-2048,” and “Amazon-1600w.” Tapping the right preset instead of re-typing sizes saves me ~15 seconds per image. It adds up, especially on batch days. Ooh, look at that.
If you’re building this into an app or a lightweight automation, keep a single source PNG cutout and render multiple sizes server-side or via an API so you don’t roundtrip edits on the phone. One and done, no back-and-forth nonsense.
Reflection
Beautiful design doesn’t have to feel heavy. With a little front-loaded care, soft light, clean separation, and iOS’s quiet superpower to remove background on iPhone, the rest falls into place. If it can rescue my sleepy brain at 10 p.m., it’ll probably treat you kindly, too. Try it on your next product shot or profile photo, and see how it feels when the work moves more like a gentle breath than a grind. There… feels gentle, doesn’t it?
Until next time, keep it light, keep it lovely!
Previous posts:
Background Remover for IDs: When It’s Allowed and When It’s Not
Remove Background from Signature: Create a Clean Transparent Stamp
Remove Background from Logo: Keep Sharp Edges & True Colors