Table of Contents
Hi,everyone! I’m Camille.
This morning I stared at a blank afternoon calendar and thought — do I really want to drive to the pharmacy, wait in line, and pay $18 for two little squares of paper?
Short answer: no.
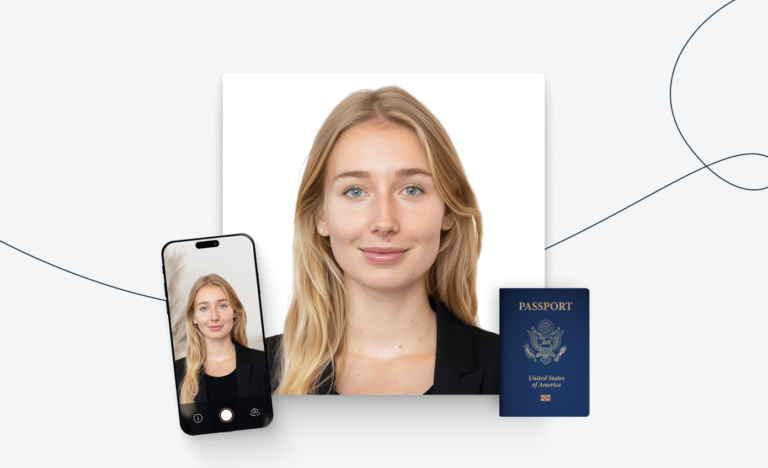
The longer answer is that taking a passport photo at home with your phone is genuinely doable. Not just “technically possible if you’re lucky” doable — reliably doable, with the right setup. I’ve done it enough times now that I’ve got it down to about 15 minutes, including the editing step.
Let me walk you through exactly what that looks like.
What You Need (Low-Cost Setup)
Here’s the thing — you don’t need a ring light or a DSLR. Most modern smartphones shoot at high enough resolution to meet the requirements. What you do need is a little bit of intention.
The short checklist:
- A smartphone with a rear (main) camera — front cameras tend to introduce more lens distortion
- A neutral, plain white or off-white background (a wall, a large sheet, or a bedsheet stretched flat works fine)
- Natural light from a window, or two soft household lamps positioned evenly on either side
- Something to prop your phone at eye level — a stack of books, a small tripod, or a helpful roommate
- A timer app or voice assistant to trigger the shutter hands-free
- A photo editing or passport maker app for the crop and size check
That’s genuinely it. No special purchases required for most setups.
Step-by-Step Capture Guide
Background Prep
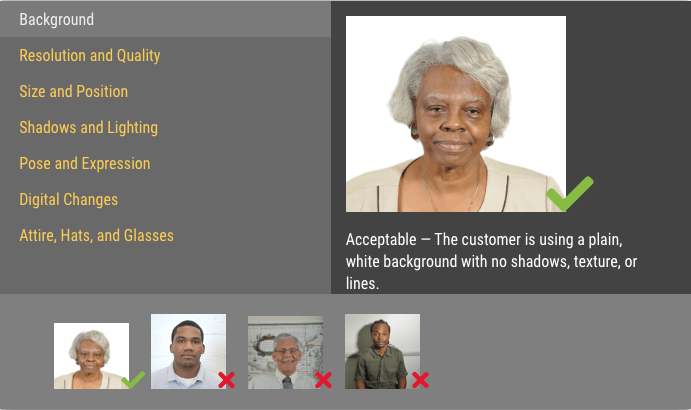
The background is the step most people underestimate. A plain white wall is ideal. If your walls are off-white, cream, or very light gray, those can work too — but avoid anything with texture, patterns, or color.
If you don’t have a suitable wall, hang a white bedsheet and make sure it’s taut — wrinkles catch shadows and can cause rejection. Stand at least 2–3 feet in front of the background. That distance prevents your shadow from falling behind you.
A quick reality check here: stand back, take a test shot, and zoom in on the background corners. If you can see any color cast, shadows, or creases — fix it now before you spend 20 minutes on the perfect expression.
Lighting Setup
Even, shadow-free lighting is non-negotiable. According to the U.S. Department of State’s passport photo guidelines, photos that show shadows on your face or uneven brightness will be rejected.
The easiest setup: facing a window. Natural diffused light (not direct sunlight) is genuinely the most flattering and most compliant light you can work with. Position yourself so the light hits your face evenly from the front.
If natural light isn’t available, place two lamps at roughly 45-degree angles on either side of you, at face height. Make sure the bulbs are the same type and temperature — mixing warm and cool light creates uneven color casts that look strange in photos.
Quick test: take a photo and look at your nose for shadows. If there’s a dark shadow under or to the side of your nose, your lighting needs adjustment.
Camera Distance and Angle
This is where most DIY passport photos fall apart.
Your phone should be at eye level — not tilted up, not tilted down. If it’s propped on books, check that it’s level with a spirit level app before you start. The lens should be facing you straight-on.
Distance matters too. You want your head and the top of your shoulders visible, with a small amount of space above the crown of your head. Too close and your face fills the entire frame with no room to crop correctly. Too far and your head will be too small relative to the required dimensions.
The official U.S. passport photo requirement specifies that the head must measure between 1 inch and 1 3/8 inches from chin to crown in the final 2×2 inch print — roughly 50–69% of the image height. Frame accordingly.
Take 10–15 shots. Seriously. You’ll want options.
What Not to Do (Fast Do/Don’t)
Filters and Beauty Mode
Please, please turn these off. Not just because they look unnatural — because they will get your application rejected.
The U.S. State Department now explicitly prohibits photos created or edited using artificial intelligence or digital tools, including filters, skin smoothing, and background replacement apps. Beauty modes on most phones apply some degree of smoothing automatically, so go into your camera settings and disable it before you start shooting.
The rule is simple: the photo must accurately reflect your current appearance. Airbrushing doesn’t qualify.
Shadows and Reflections
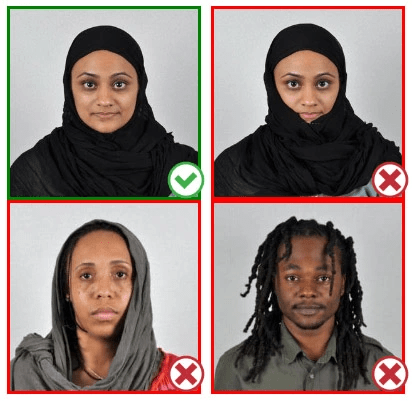
We mentioned lighting above, but it bears repeating as a “don’t.” Beyond facial shadows, watch out for:
- Hair shadows — if you have thick or voluminous hair, check that it isn’t casting a shadow on the background behind you
- Glasses reflections — if you wear glasses, the State Department recommends removing them entirely; glare from lenses is a common rejection reason
- Overhead light shadows — a single overhead bulb will cast shadows under your eyes and nose, making the photo look like a security camera still from 1997
And one more: red-eye. If your photo has a red-eye, don’t edit it out. Take a new photo with better lighting instead. Per official guidance, digitally correcting red-eye counts as editing and may result in rejection.
Quick Maker Workflow
Once you have a good raw photo, the last step is getting it into the right dimensions and format.
Upload
Choose a photo that meets the visual requirements — clear face, neutral expression, eyes open, no shadows, plain background. Upload it to your chosen passport photo tool from your camera roll.
Auto Crop and Background
Most passport photo tools will auto-detect your face and suggest a crop. Review it carefully — the head should be centered, with a little breathing room at the top and the bottom of the frame cut just above your shoulders.
If the tool offers background correction, be aware of the current rules: as of late 2025, the ICAO biometric passport photo standards now used by most countries have a zero-tolerance policy for AI-edited or digitally altered photos. Background replacement that changes your actual photo (as opposed to simply cleaning up a naturally white background) can cause rejection. When in doubt, get the background right in camera rather than relying on post-processing.
Download and Print
For U.S. passport applications, the final photo must be 2×2 inches (51×51 mm), printed on matte or glossy photo-quality paper. Standard printer paper won’t pass.
Your options: print at home on photo paper, or upload to a pharmacy’s photo printing service and request a 4×6 print with the 2×2 image tiled — many will do this for around $0.30.
For digital submissions (online passport renewals), the file must be a JPG or HEIF format, sized between 54 kilobytes and 10 megabytes.
FAQ
Can I use my phone’s front camera?
Technically yes, but the rear camera is preferred. Front cameras on most phones use a wider lens that introduces barrel distortion — faces can look slightly off-proportioned, especially around the edges. Use the rear camera and a timer. If you’re curious about why the rear camera actually behaves differently, understanding the exposure triangle on your smartphone is a surprisingly readable breakdown from OSU’s photography extension.
Does my expression matter?
Yes. Neutral expression with your mouth closed is standard. A natural, slight smile is acceptable for U.S. passports, but avoid showing teeth. No exaggerated expressions, squinting, or raised eyebrows.
What should I wear?
Everyday clothing is fine. Avoid uniforms, camouflage, or anything that resembles official attire. White shirts can blend into a white background, so a light colored but non-white top often works better.
Can I wear glasses?
The U.S. State Department strongly discourages glasses in passport photos. Even prescription glasses can cause glare issues. The safest call: remove them.
How recent does the photo need to be?
For U.S. passports, photos must be taken within the last 6 months. The UK now requires photos taken within the last month. Always check the current requirements for your specific country before submitting.
Will the pharmacy reject my home photo?
Pharmacies and application centers don’t typically scrutinize DIY photos if they visually meet requirements. The review happens at the passport agency level. That said, using a digital compliance checker before printing can save you from an avoidable rejection.
What’s the difference between passport and visa photos?
U.S. passport photos are 2×2 inches. Visa photos can vary by destination — some countries follow the standard ICAO 35×45mm biometric format, while others have specific local requirements. Always check the requirements for the specific document you’re applying for.
There — that wasn’t so hard, was it?
The first time I tried this, I spent way too long nudging the lamp stands and retaking photos over minor shadow issues. Now I have a little mental checklist: background taut, lamps at 45 degrees, phone level, beauty mode off, rear camera, timer on. Fifteen minutes and it’s done.
Try it on your next application — you might surprise yourself with how clean the result looks.
Until next time — keep it light, keep it lovely.
Previous Posts:
Background Remover for IDs: When It’s Allowed and When It’s Not
Passport Photo Size India (2026): Requirements + Quick Maker Steps
Passport Photo Size Philippines (2026): Specs + How to Take at Home