Table of Contents
Hey, Camille is here. Have you ever opened a new video tool, glanced at the pricing table, and felt your creative energy tiptoe out the door? Same. This week I’ve been reviewing Vidu Q3 pricing while exporting covers, quick reels, and a few product loops. I wanted a clear sense of what I’m paying for on the web plans versus the API, how resolution and duration nudge the bill, and the little toggles, like audio, that quietly save money.
I don’t speak for Vidu, and pricing changes, so always peek at the official page before you budget. But here’s how I think about it in practice, based on my recent tests and notes from client work: simple guardrails, a tiny mental calculator, and a cost-saving flow that lets you explore creatively without the “uh-oh” feeling. There we go.
What You Pay For (Web Plans vs API)
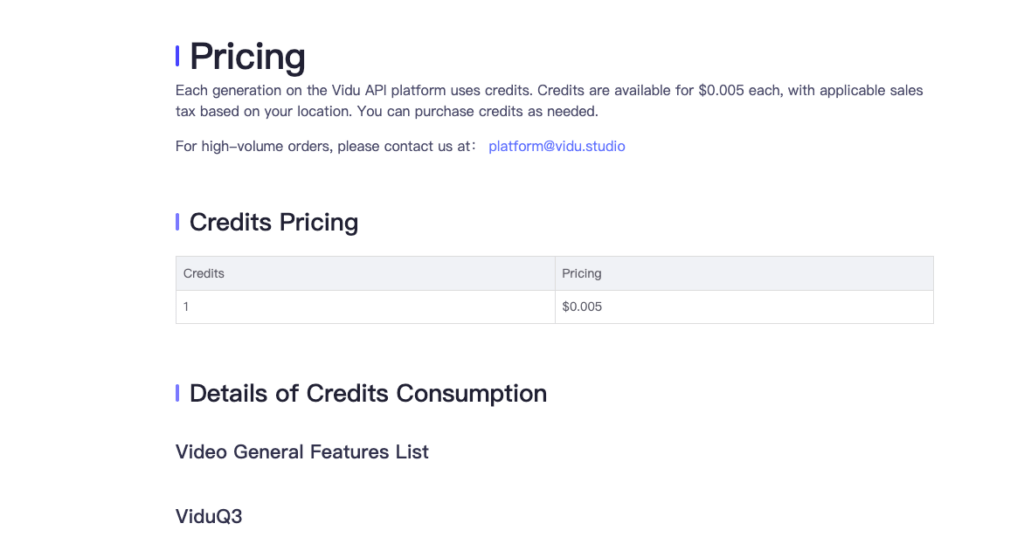
Here’s the gentle, big-picture truth of Vidu Q3 pricing: you’re paying for compute. How that shows up depends on where you sit, inside the web app with credits, or in an API workflow that tracks usage units.
- Web plans (credit-style): Great if you’re a solo creator or a small team living mostly in the interface. You buy a monthly plan or top up credits, then spend them on generations, short clips, longer renders, and sometimes add‑ons like higher resolution or audio. It’s tidy, predictable, and easy to cap.
- API usage (metered): If you’re automating or baking Vidu into your pipeline, you’ll likely see per‑second or per‑frame pricing that scales with resolution and features. Instead of “credits,” you get billable units, handy for developers who need to forecast costs across many jobs.
Why it matters in practice:
- Web plans are lovely for creative sprints. Need a flurry of mood tests and a couple of finals each week? Credits keep the mental load low.
- API pricing makes more sense when you control the dials programmatically and want to optimize each parameter, resolution, duration, audio, upscaling, like a little cost-music mixer.
In my own work (client reels, storefront hero loops, and social teasers), I’ll sketch in the web app when I want to play, then switch to API when I’m producing at scale or chaining steps in an automation. Past me was so serious. Now I pick whatever removes the most friction that day.
Typical Cost by Resolution & Duration

With most modern video models, two knobs move the meter most: how big and how long. Bigger frames mean more pixels to synthesize. Longer clips mean more frames to compute. And each optional feature (audio, upscaling, super-stable motion modes) may have its own add-on cost.
Here’s how I sanity-check a render before I click go:
- Resolution tiers: 720p is friendly for drafts and social tests. 1080p works for most polished posts. 4K is beautiful but only when the shot will truly benefit. If your deliverable is phone-first, 1080×1920 or 720×1280 often looks plenty crisp, especially with good light and motion.
- Duration blocks: Many providers meter in seconds. Ten to fifteen seconds is a sweet spot for testing style and motion without paying for story length you don’t need.
- Frame rate: If you don’t need 60 fps, don’t pay for it. 24–30 fps keeps motion natural while staying efficient.
- Audio: Lovely if you need it, but don’t accidentally pay for music generation or voice when you plan to replace audio in your editor.
A small field note from my week: I mocked up three product loops at 720p, 12 seconds each, no audio, just to lock the camera move and reflections. Each draft felt light on cost and heavy on clarity. Then I took the keeper to 1080p, added subtle grain in post, and called it. “Well, that settled nicely.”
A Simple Cost Calculator Formula
If you like a back-of-napkin estimate before you render, this is the mental math I use. It’s intentionally simple and tool-agnostic, replace the variables with the rates on the official page when you have them.
- Total cost ≈ (seconds × resolution factor × base_rate) + audio_addon + extras
Where:
- seconds: your clip length
- resolution factor: a multiplier that grows with pixel count (for example, 1.0 for 720p, 1.8–2.0 for 1080p, 3.5–4.0 for 4K). Use the provider’s real multipliers when available.
- base_rate: the per‑second price for the baseline tier
- audio_addon: charge for music/voice generation or audio processing if enabled
- extras: upscaling, high-stability motion modes, advanced control features
Example (purely illustrative, not official pricing):
- 12s at 1080p, no audio: cost ≈ 12 × 1.9 × base_rate
- Add AI music: cost ≈ previous + audio_addon
- Go to 4K: cost ≈ 12 × 3.8 × base_rate (+ any 4K extras)
Why this helps: it nudges you to ask “Do I need 4K for this?” or “Can I test at 720p first?” And that tiny pause saves real money over a month. Ooh, look at that, savings hiding in plain sight.
When to Disable Audio to Save Cost
If you’re planning to design the sound in post, stock music, custom VO, or just captions, disable audio at generation. In many systems, audio is a distinct model path with its own compute. Turning it off is a low-effort, high‑yield toggle.
Good times to go silent:
- Placeholder drafts: You’re blocking out timing and motion, not mixing a soundtrack.
- Ad variants: When you’ll be testing multiple tracks anyway, don’t pay for temp music.
- Platform-specific edits: TikTok, Reels, YouTube Shorts, these often get their own native audio.
- Developer pipelines: If you’re returning silent MP4s or WebMs and layering audio later, keep audio=false (or whatever the flag is named in the docs).
A tiny story: I once let “audio on” slip into a batch of 16 drafts. The visuals were great: the surprise elevator music… less so. Bless my fiddly heart~ Turning off audio for ideation runs trimmed the spend and made my timeline tidier. There… just right.
Caveat: If your concept depends on beats, lip‑sync, or sound‑reactive moments, keep audio in, but do it intentionally and only on late-stage renders. Past me would have sprinkled it on everything. Present me smiles and flips the switch only when it serves the piece.
In actual projects, the savings in generation costs are often quietly consumed by the subsequent basic processing steps.
Our Cutout.Pro is designed to minimize the cost of this step: background removal, image cleaning, product and character extraction. There is no need to repeatedly regenerate the video, nor to re-run the high-resolution materials through the model.
Cost-Saving Workflow (Draft → Final)
This is the rhythm I use when I want quality without overspend. It’s simple, calm, and, crucially, keeps the fun part fun.
- Sketch in small frames
- Start at 720p (or the lowest tier that still shows you motion and lighting clearly).
- Keep drafts 8–12 seconds: you’ll spot composition issues fast.
- Turn off audio. You can hum while it renders, works a charm.
- Lock the look with seeds and short loops
- Reuse seeds or prompts that gave you the right mood. Consistency means fewer rerolls.
- For product shots, I test a 4–6 second camera orbit first. If the first half sells the idea, I don’t need to pay for the back half.
- Note your keepers: lighting angle, texture fidelity, motion style. “Ahh, that’s nicer.”
- Iterate smart, not wide
- Change one variable at a time, camera path, color tone, or reflectivity. If you tweak five things, you’ll never know what worked.
- For web users: duplicate projects instead of starting fresh: some apps cache bits of setup.
- For API users: track parameters in a lightweight log. It pays off when you need to reproduce a winning look on demand.
- Upscale or extend only when it’s locked
- Once the draft sings, bump to 1080p. If your shot will live full-screen or in a brand film, consider 4K selectively.
- Need longer duration? Stitch two good loops, or extend with the same seed for continuity.
- Add audio only at this stage if the piece truly needs it.
- Post-polish in tools that are cheaper than re-rendering
- Minor sharpening, grain, or a gentle vignette can elevate perceived quality without paying for another high-res generation.
- For timing, trim and reposition beats in your editor rather than re-generating a full clip.
- Automate the repeatable bits
- In the API: batch night runs, set max_resolution caps, and default audio to off.
- In the web app: save templates for shot types you reuse (hero spin, soft-tabletop, parallax social cover). “And just like that…” next time is quicker.
Where this saved me time this month:
- A jewelry carousel: three 10s loops at 720p to choose the right sparkle level: one 1080p final. Roughly 40 minutes of noodling became 12 minutes of decisive moves. Easy now~
- A founder intro reel: I drafted motion with silence, then added VO in post. Cost fell, clarity rose, and my editor thanked me.
When to break the rules
- If your client is signing off on color and texture fidelity, don’t cheat with a low-res draft, they’ll notice the upgrade later and second-guess the approval.
- If the concept is sound-led (beats, VO pacing), keep audio in by design. Plan for it: price for it.
Little developer corner
- If an endpoint exposes quality presets, start at the lowest that preserves motion intent.
- Look for an audio flag and a resolution cap in the request body: keep sensible defaults.
- Log seconds, resolution, and toggles per job, then you can forecast next month’s bill with real data instead of vibes. Mmm, that feels good.
Final nudge
Beautiful outputs don’t require heavy spending, just thoughtful sequencing. Draft where it’s cheap, finish where it counts, and keep an eye on the toggles that aren’t serving the piece. When it clicks, you’ll feel it: “Wait… that’s actually lovely.”
All right, rest easy now~ If this helped you sketch a cleaner map for Vidu Q3 pricing, try it on your next project, you might surprise yourself. Until next time, dears~
Previous posts:
Vidu Q3 vs Q2 Pro Reference-to-Video: Which One Should You Use?
How to Write Prompts for Vidu Q3 Native Audio (Dialogue + SFX + BGM)
How to Use Vidu Q3 Text to Video (Step-by-Step)