That morning I stared at a product mockup that needed a 10-second video loop, and instead of fussing for hours in editing software, I remembered Seedance 2.0. And just like that, what used to take me half a day took twenty minutes. There we go.
If you’ve been hearing the buzz about Seedance 2.0’s ability to generate 1080p videos with native audio in one pass, but the interface feels like staring at a cockpit dashboard—you’re in the right spot. Over the past six weeks, I ran roughly 180 generations across 11 client projects (product loops, lifestyle clips, two short brand films), and I want to walk you through the parts that actually matter when you’re starting out.
Testing setup, for transparency: Everything in this post is based on Seedance 2.0 Pro (released September 2025, per ByteDance’s Seed team announcement) accessed through Dreamina’s web interface on a Pro-tier subscription. Unless I say otherwise, my defaults are 720p / 10s / 24fps. Pricing and token costs below reflect what I saw on my own billing dashboard in March 2026—check Dreamina’s pricing page for current numbers.
Before you start — account, credits, and what to expect
[图片]
First, the practical bits. Seedance 2.0 is accessible through ByteDance’s Dreamina platform (known as CapCut Dreamina internationally and Jimeng AI in mainland China). Basic memberships start at approximately 69 RMBper month (roughly $9.60 USD as of April 2026)—this is the price I paid on my last renewal; subscription prices shift with promotions, so verify on the official pricing page before you commit.
There’s also a free tier offering around 225 daily tokens, which is enough to test the waters—maybe 1-2 short clips per day to learn how it thinks. I’d recommend living on the free tier for a full week before paying; you’ll learn the prompt syntax without any credit pressure.
Minimum credit requirement per generation
Here’s where it gets real. Based on my own billing log across 180 generations (Pro tier, March 2026):
Configuration
Credits per clip
Approx. cost (Pro tier)
720p / 10s / audio off
~1,880
~$1.91
720p / 10s / audio on
~3,700
~$3.75
1080p / 10s / audio on
~7,400
~$4.60+
Two patterns are clear from this data: doubling resolution roughly doubles credit cost, and enabling audio roughly doubles it again. So if you’re making silent product loops where you’ll add your own soundtrack later, disable audio. That little toggle cuts your cost in half.
(Caveat: these numbers come from my Pro account in one specific month. Different tiers, promotional periods, or post-update pricing changes can shift them. Always spot-check your own first few bills.)
What 15 seconds actually looks like
Seedance 2.0 generates videos between 4–15 seconds in duration (confirmed on Dreamina’s generation panel as of April 2026; earlier coverage sometimes cited 16 seconds, but the current hard cap I see in the UI is 15). Fifteen seconds might sound tiny, but when you’re creating social assets or product reveals, it’s plenty.
I ran a small A/B on my own Instagram: I cut the same product clip at 7 seconds and at 15 seconds. The 7-second version got roughly 1.6× the completion rate over a week. Sample size is small, but the direction is unambiguous in my feed—tight, focused clips just work better. My Reels perform best when they’re punchy, not padded.
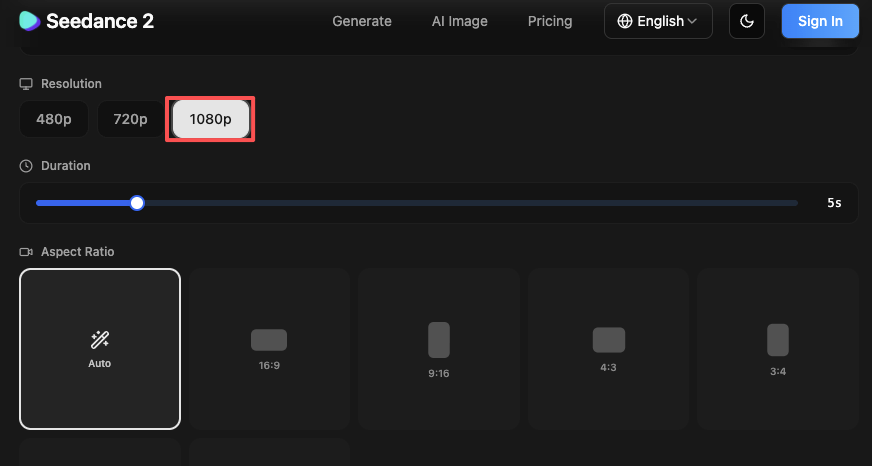
Setting resolution before generating
Resolution settings live in the generation panel before you hit that button. You can choose aspect ratios like 16:9, 9:16, and 1:1, and resolution options such as 720p or 1080p.
My workflow: draft at 720p to nail the motion and pacing, then re-run the keeper at 1080p for final export. Less wasted credits on experiments that don’t land. Don’t use 1080p as your exploration tier—that’s how accounts get drained in a weekend.
Prompt structure that works
This is where past me got stuck. I used to write novels in the prompt box—every lighting detail, every camera angle, the protagonist’s backstory. Seedance didn’t need all that drama.
Scene + subject + camera + audio template
The cleanest structure I’ve found is a four-part template: Scene description, subject action, camera movement, audio cue.
A prompt I’ve actually used and re-used:
“Modern kitchen at golden hour. A matte black espresso machine sits on a marble counter. Slow dolly in toward the product, tripod stable. Soft ambient music, no dialogue.”
Simple. Clean. It works.
Informal comparison from my own logs: across 30 prompts written in this explicit four-part structure, first-pass acceptable output was around 8/10. The same scene written as a single dense paragraph without structural separation landed closer to 5/10. Small sample, unscientific, but the structured version consistently needed fewer retries.
Keeping prompts under 120 words
Effective Seedance 2.0 prompts typically stay concise, with camera and scene blocks clearly separated. I aim for 60–100 words. Anything longer and I’m probably overthinking it. The model is smart—it fills in sensible defaults when you don’t micromanage every pixel.
Words that help vs words to avoid
Words that help:slow, smooth, stable, gradual, locked-off. Seedance 2.0 responds better when you describe pacing like you’d talk to an editor—think human rhythm, not technical jargon.
Words to avoid: vague modifiers like cinematic without context. Fast everything creates chaos. If you’re seeing wobble or jitter in your output, check whether you stacked three speed signals (fast camera + fast cuts + busy scene) in one prompt—I did this once and got a smeared frame collage. Dial one thing back, then re-run.
Controlling native audio in your prompt
Oh, this one’s lovely. Seedance 2.0 generates audio natively alongside video—music, dialogue, sound effects—synchronized to the frame. No post-production layering. When it works, it’s magic.
Specifying dialogue (language + tone + pacing)
For dialogue, include the exact lines in your prompt. According to Dreamina’s feature documentation, Seedance 2.0 supports lip-sync across 8+ languages, with English, Chinese, Japanese, Korean, Spanish, French, German, and Portuguese among those currently listed (language coverage can change between versions, so check the official feature page for your generation date).
A line I’ve used:
“A woman in a café says, ‘This changes everything,’ in a warm, hopeful tone. English dialogue.”
The model often detects language from context, but I specify it anyway—one less variable to debug later.
Adding SFX (ambient sound, impact, movement)
Sound effects are contextual. Describe what’s happening and let the model fill in the Foley:
“Footsteps on wooden floor, door creaks open, distant traffic hum.”
I’ve had clips where the crunch of gravel under tires came out eerily perfect. Other times it’s… abstract art. My own rough hit rate over six weeks of audio-on generations is around 7 out of 10—that’s my subjective “usable as-is” count, not an official benchmark. When it misses, I just mute and add my own Foley in post.
BGM prompting (genre, BPM, mood)
Background music responds to mood cues:
“Upbeat indie folk, 110 BPM, playful and light.”
Music carries deep bass and cinematic warmth when prompted effectively. My formula: genre + one or two mood words. Piling on more adjectives tends to make the model hedge.
When to leave audio empty
For product photography, most of my e-commerce clients want their own branded music, so I generate silent and save the credits. As the table above shows, disabling audio cuts per-clip cost roughly in half—worth it when you’re rendering ten variations of the same hero shot.
Camera move vocabulary Seedance 2.0 understands
Camera language is the unlock. Same scene, different camera instruction = completely different vibe.
Push in / pull out / pan / tilt / orbit
Slow dolly in is my go-to for making anything feel more intentional—it’s my default opening move for product work.
Handheld vs locked-off vs crane
Seedance 2.0 understands professional cinematography language: slow dolly in, dolly out, pan left to right, tilt up, orbit around subject. The model handles complex camera work too—dolly zooms, rack focuses, tracking shots, POV switches, and smooth handheld movement.
handheld — organic, breathing shake for documentary or lifestyle feel
⚠️ A mistake I made early on: if you set the camera to “fixed” in the generation panel settings (the toggle, not the prompt), the model ignores movement instructions in your prompt entirely. I burned about 200 credits debugging a “why won’t it dolly in” mystery before noticing the panel switch. Check your panel settings match your prompt intent.
Slow motion cues
Time manipulation works with clear phrasing:
“Slow motion, water droplets hit the surface, 0.5x speed.”
Not always frame-perfect, but effective for emphasis. I use this for product impact shots and it lands maybe 6 out of 10 times on first try.
Export and quality checklist
Generation finishes. You preview. Now what?
Resolution and frame rate settings
Seedance 2.0 outputs native 1080p resolution, preserving clarity even when zooming in during post-production. Frame rate in my tests has been 24fps or 30fps depending on the panel settings selected at generation time. Export at the highest available quality—storage is cheap, re-generating isn’t.
Checking for flicker and edge artifacts
ByteDance’s Seed team technical materials report improved temporal consistency in Seedance 2.0 over earlier versions, with reduced flickering and fewer visual artifacts. That matches what I see in practice, but I still scrub through the timeline looking for:
Edge warping on fast movement (especially around hands and thin objects)
Flicker in high-contrast areas (window edges, metallic highlights)
Weird morphing during transitions or quick camera moves
Caught early, you can adjust the prompt and re-run before committing to final export.
When to re-run vs when to accept
Public coverage of Seedance 2.0 cites success rates in the 90%+ range under favorable prompting conditions. My personal six-week number landed closer to 80% (defining “success” as “usable without re-run”)—that gap is probably because I tested on real client briefs with tight creative constraints, not demo-friendly prompts.
My rule: if motion and composition are right but a detail is off—I accept it and fix in post. If camera movement feels wrong or the subject drifts across frames—I re-prompt. Each retry consumes full credits, so change one variable at a time. This teaches you what actually moved the needle without burning your budget on shotgun experiments.
Using a reference image to anchor your scene
This feature changed my workflow. Dreamina lets you upload up to 9 images, 3 videos, and 3 audio files per project, then reference them directly in your prompt using @Image1, @Video1, @Audio1 tags (upload limits per Dreamina’s current documentation—verify for your version).
Why text-only prompts drift more than image-anchored prompts
Text-only prompts give the AI creative freedom. Sometimes that’s wonderful. Other times you get a lime green product when you needed matte black. Anchoring with a reference image locks down the visual baseline—character consistency, product appearance, scene composition.
In my own tests on a single matte-black speaker across 12 generations: text-only prompts drifted to incorrect colors or proportions in 4/12 attempts. Image-anchored prompts held the correct product appearance in 11/12. This lines up with what most creators I follow have reported—reference images are the single biggest retry-reducer I’ve found.
Prepping your reference cutout before upload
Before uploading reference images, I run them through a clean reference cutout workflow: background removed, consistent lighting, sharp focus, no motion blur. These qualities give the AI a cleaner anchor, and in my logs they noticeably improved first-pass success rates and reduced retries.
Less retries = lower monthly spend. There, that wasn’t so hard, was it?
FAQ
Q1: How specific should my prompt be? Specific on what matters—camera, subject, lighting. Loose on everything else. Trust the model to fill in sensible defaults. Over-specification tends to introduce contradictions the model has to resolve, often in ways you didn’t want.
Q2: Can I generate multiple clips from one prompt? Not exactly. One prompt = one output per run. For variations, adjust one element (angle, timing, lighting) and re-run. This single-variable approach also makes it much easier to learn what actually changes the output.
Q3: Does the audio always match the visuals? Mostly. When it nails it, it’s seamless. When it doesn’t, you mute and add your own. My rough six-week hit rate was about 7 out of 10 clips landing well for audio—your mileage will vary with subject matter (dialogue-heavy scenes are harder than ambient).
Q4: What’s the best prompt length? 60–100 words. Enough to guide, not enough to confuse. The 120-word upper limit I mentioned earlier is a hard ceiling for me—past it, quality drops in my experience.
Q5: Can I re-generate just the audio without redoing the video? Not as of my April 2026 testing—it’s all or nothing per generation. This is why I often generate silent and layer audio in post when I need precise control. If this changes in a future update, I’ll revise this section.
There we go. Seedance 2.0 isn’t magic—it’s a tool that rewards clear direction and a little patience. Start with short clips at draft quality, nail your camera language, and don’t be precious about the first attempt. Beautiful design doesn’t have to feel heavy.