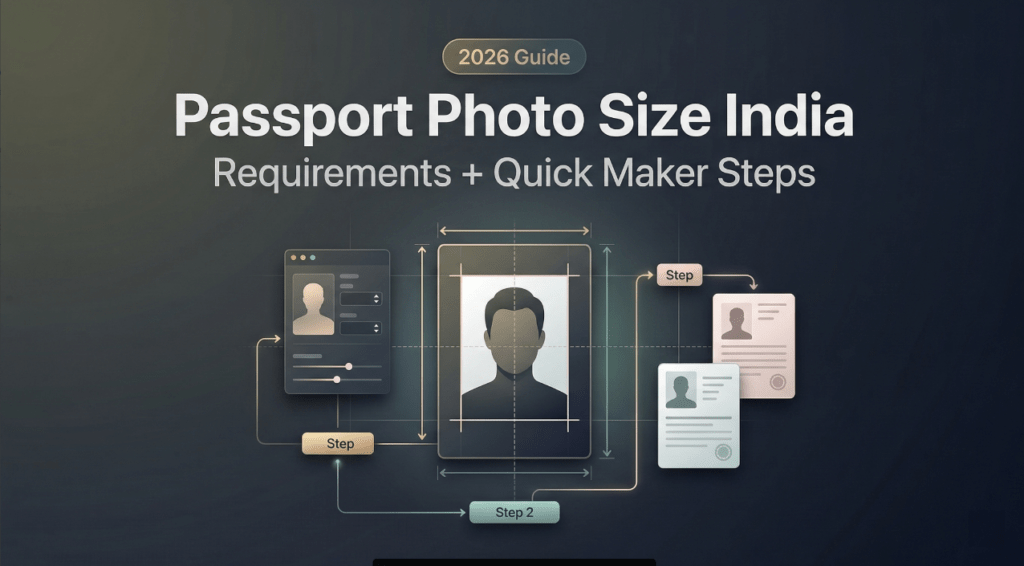
Table of Contents
This morning I stared at a very uneven DIY backdrop and thought, “Not today, perfectionism…” If you’ve ever wrestled with passport photos, mm vs inches, head size, that suspicious shadow, come sit with me. I make visuals for a living, and even I’ve had official photos bounced back for tiny, fussy reasons. The good news?
I’m Camille. I’ll share the essentials, the small gotchas that cause rejections, and a quick maker workflow that trims minutes, not corners. Easy now~
Official Size Basics (mm/in)
Here’s what actually matters in practice. India follows ICAO-style guidelines for printed passport photos, and some Indian e-services use square specs.
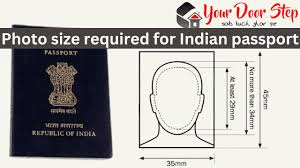
- The classic print size many studios use in India: 35 mm x 45 mm (width x height). It’s the same proportion used in lots of countries and follows ICAO conventions for machine-readable travel documents.
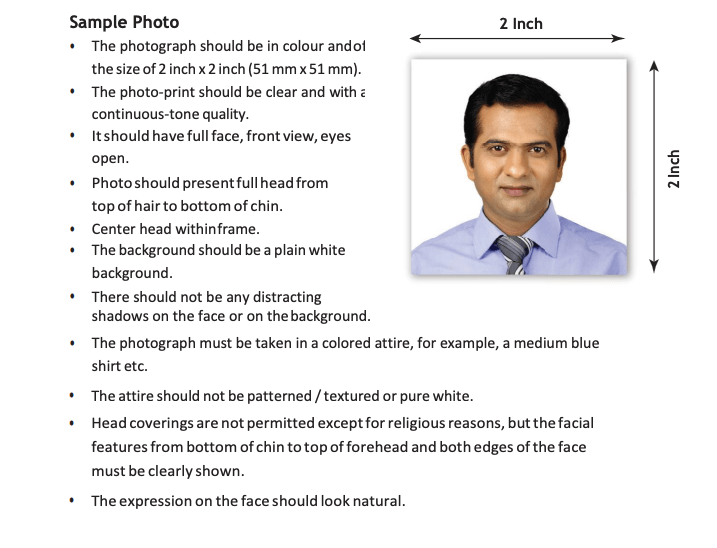
- Some Indian portals and related services ask for 2 x 2 inches (51 x 51 mm) square. Common for OCI/PIO, FRRO, and various visa portals. I’ve also seen the Indian Passport Seva online system accept square uploads for digital forms, with the actual photo captured at the Passport Seva Kendra.
Pixels when you print or upload
- For 35 x 45 mm: 300 dpi ≈ 413 x 531 PX: 600 dpi ≈ 827 x 1063 PX.
- For 2 x 2 in (51 x 51 mm): 300 dpi ≈ 600 x 600 PX: many portals allow 600–1200 PX square. Always check the portal’s current pixel and file size limits.
Color & background basics
- Background: plain white or off‑white.
- File: JPEG is most common: portals often cap size (e.g., 10–200 KB). If you’re printing, forget the KB cap, focus on clean, high-res output.
Official references (check the latest, specs change quietly):
- Passport Seva (Government of India) photo guidance: browse the How-to/FAQs at Passport Seva
- OCI application photo rules: see “Photo/Signature Specifications” at OCI Services
If you’re unsure which your use case needs: ask the office/portal whether they want 35×45 mm or 2×2 in. It sounds small, but it’s the main fork in the road. Bless my fiddly heart, this one detail has saved me from reprints more than once.

Background & Lighting Rules
Think soft light and simple surroundings.
- Background must be white or off-white. No patterns, textures, or gradients. A plain wall works: a large sheet of white poster board works even better.
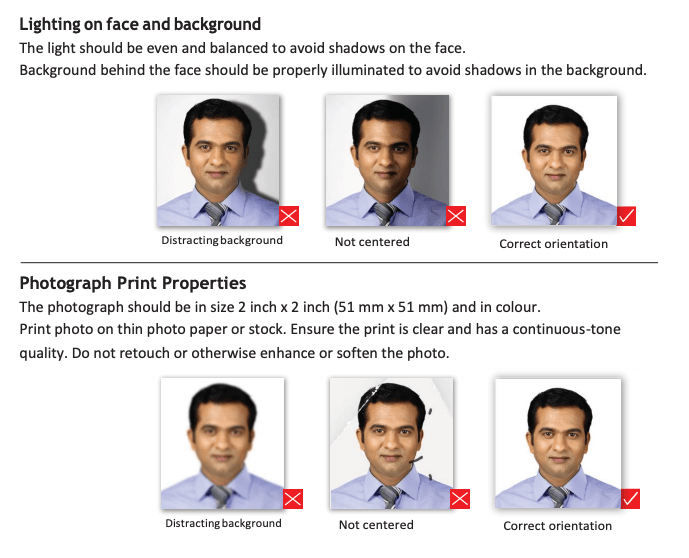
- Lighting should be even across the face. Avoid strong top light (hello, eye shadows) and backlight (hello, glow halo). I place two lamps at 45° angles, slightly above eye level, and step a meter from the backdrop to stop shadows.
- Skin tone must look natural. No filters, no heavy color grading, no excessive skin retouching.
- Keep contrast balanced. If your hair blends into the background, nudge exposure/contrast, so edges are clear without turning the backdrop gray.
In my February 2026 test, I retook a photo by moving half a step away from the wall and angling a desk lamp toward the ceiling. And just like that… the shadows vanished. “Well, that settled nicely.”
Head Position & Expression
This part causes more rejections than people expect.
- Face the camera straight on. No tilt, no turn. Eyes open and level with the lens.
- Neutral expression. A soft, closed‑mouth smile is usually accepted, but don’t show teeth: think ID card, not portrait session.
- Eyes fully visible. If you wear glasses, glare or tinted lenses can trigger rejection, so I usually take them off. If you must keep them, angle lights to avoid reflections: no thick frames covering eyes.
- Head covering for religious reasons is allowed: keep the full face visible from hairline to chin without shadows on the face.
- Hair off the eyebrows is helpful. If your fringe hides your brows, gently brush it back.
Head size in frame (typical acceptance windows)
- For 35 x 45 mm photos, head height (chin to crown) commonly lands around 32–36 mm, with eyes roughly 24–35 mm from the bottom. This is ICAO-style guidance many studios follow.
- For 2 x 2 in photos, several Indian e‑services accept a head height around 25–35 mm within the square.
Because portals do update specs, double-check the current millimeter/pixel head ranges where you’re submitting. Small trims make big differences. Past me was so serious… I used to fuss forever, now I do one calm crop, then I’m done.
Common Rejection Reasons
If you’ve had a photo refused, you’re in good company. Here are the usual culprits I see (and sometimes commit, ahem):
- Wrong background color: gray cast, beige wall, or faint patterning.
- Shadows on face or backdrop: hot spots on forehead/cheeks.
- Head too large/small within the frame: eyes not in the accepted band.
- Tilted head or off‑axis shoulders: face not centered.
- Glasses glare or tinted lenses: reflections hiding the eyes.
- Strong makeup or heavy retouching: over‑saturated skin tones.
- Compression artifacts from over‑shrinking JPEGs to meet KB limits.
- Wearing a white top that melts into the background (not a fail by itself, but it can trigger auto‑checks). I swap to a mid‑tone top, so the edges read clean.
If it helps: quick preflighting against these points cut remakes by about 80%. “There we go~”
Wrong Background Color
A nearly-white wall often leans warm or gray under home lighting. Cameras also auto-balance differently frame to frame. That’s why borderline backgrounds get flagged.
Practical fix I use:
- Light the subject first, then lift the background with a separate light if needed.
- Put at least 0.8–1 m between the subject and backdrop.
- If you must correct in post, lift only the background, not the skin. Masking tools or AI background cleanup helps keep skin tones honest.
Shadows/Uneven Lighting
I promise, your wall is not misbehaving, it’s just physics. Direct side light makes cheek shadows: overhead light hollows the eyes. Try this tiny triangle:
- Two soft sources at ~45° to the face (even two lamps bounced off-white cards works).
- One subtle fill from below eye level (a reflector, or a white notebook on your lap, yes, really).
In my test 2026, I bounced a desk lamp off a foam board and the eye sockets opened up instantly. “Ooh, look at that.”
Head Too Big/Small
Cropping by eye is where we all over‑zoom. For 35 x 45 mm, aim for the crown to sit with a finger’s width of air to the top edge: for 2 x 2 in, keep the face dominant but not pressed to the frame. If your tool shows guides, use them, those little lines are quiet lifesavers.
If the portal gives head-height millimeters, I match them once, make a reusable crop preset, and, ahh, that’s nicer, no more guesswork.
Fast Maker Workflow
I’ve tried both ways: the careful, manual path (15–20 minutes per photo) and the “let the tool do the fussy math” path (3–5 minutes). Lately, I prefer calm and consistent.
Here’s the simple flow I tested on Feb 18, 2026 for both 35 x 45 mm and 2 x 2 in outputs. No drama, just tidy results.
Upload Your Photo
Start with a sharp, well‑lit image shot straight on. Phone cameras are fine, avoid ultra-wide lenses. Stand a meter from a simple background, keep the camera at eye level, and relax your face. If you can, shoot near a window for soft, even light.
Old habits, still learning, but I’ve stopped chasing “perfect” in-camera. Get it clean and centered: perfection belongs to the crop guides.
Auto-Adjust Size & Background
Use a passport-photo maker with India templates (35 x 45 mm and 2 x 2 in). The helpful ones do three things quickly:
- Detect face and auto‑crop to head‑height rules.
- Normalize background to white/off‑white without bleaching the skin.
- Offer pixel/dpi presets for print vs. portal upload, plus gentle sharpening.
In my February run, auto-crop + background cleanup cut my hands-on time from ~14 minutes to about 3 minutes per image, “Cut the time in half, double the wow factor.” Nice when it works.
Download & Print Sheet
For printing at a photo lab, export a sheet: multiple 35 x 45 mm or 2 x 2 in photos laid out on 4 x 6 in paper (saves money and gives backups). Pick 600 dpi if available: otherwise 300 dpi is typically fine.
If you’re submitting online, export the single image at the portal’s pixel and KB limits. I keep two versions: one crisp master (no size cap) and one web copy that meets the portal’s KB cap. Camille’s take: Looks good? Ship it.
FAQ
What is the official passport photo size in India?
It depends on the context. Many printed passport photos in India follow 35 x 45 mm. Several Indian e‑services (like OCI/FRRO) and some visa portals ask for 2 x 2 inches (51 x 51 mm) square. When in doubt, check the specific portal or ask the office handling your application.
Is a white background mandatory?
Yes, white or off‑white is the safe standard. Patterned or colored backdrops often trigger rejection.
Can I wear glasses?
You can, but glare or tinted lenses may cause a fail. I usually remove them for certainty. If you keep them on, ensure no reflections and fully visible eyes.
Do I have to print the photos?
For most passport appointments in India, your photo is captured at the Passport Seva Kendra. Printed photos are still useful for other IDs, visas, and backups. For online submissions (like OCI), you’ll upload a digital file instead of printing.
What about head size rules?
For 35 x 45 mm, typical acceptance ranges put head height around 32–36 mm, eyes roughly near the mid‑band. For 2 x 2 in, many portals accept 25–35 mm head height. Always verify the current numbers on the portal you’re using, small deviations can prompt rejection.
Can I edit blemishes or adjust color?
Keep edits minimal and natural. Remove a dust speck or fix a tiny pimple if you must, but avoid heavy retouching, filters, or skin smoothing. Natural skin texture is expected.
How do I avoid shadows at home?
Back up from the wall, bounce light off a white surface, and use two soft sources at 45°. If you only have one lamp, aim it into a big white card and use a window as fill. There…are just right.
What file size should I upload?
Many Indian portals cap size between 10 KB and 200 KB. Yes, that’s small. Export at the required pixel dimensions first, then compress gently until you pass the KB check without banding or blotches.
Where can I check the latest rules?
- Passport Seva: see photo guidance on Passport Seva
- OCI specifications: see “Photo/Signature Specifications” on OCI Services
A quiet closing note
Beautiful IDs don’t need drama. A plain wall, soft light, and the right crop make it feel… easy. If this flow can rescue my sleepy brain at 10 p.m., imagine what it’ll do for you. Until next time, dears~
Previous posts:
Background Remover for IDs: When It’s Allowed and When It’s Not
How to Remove Background from a Photo — Hair, Glass & Tricky Edges Done Right
Remove Background from Product Photos for Amazon, Etsy & Shopify (Standards + Workflow)