
⚡ Quick Answer (30-Second Version)
If you only have a minute, this is the whole thing:
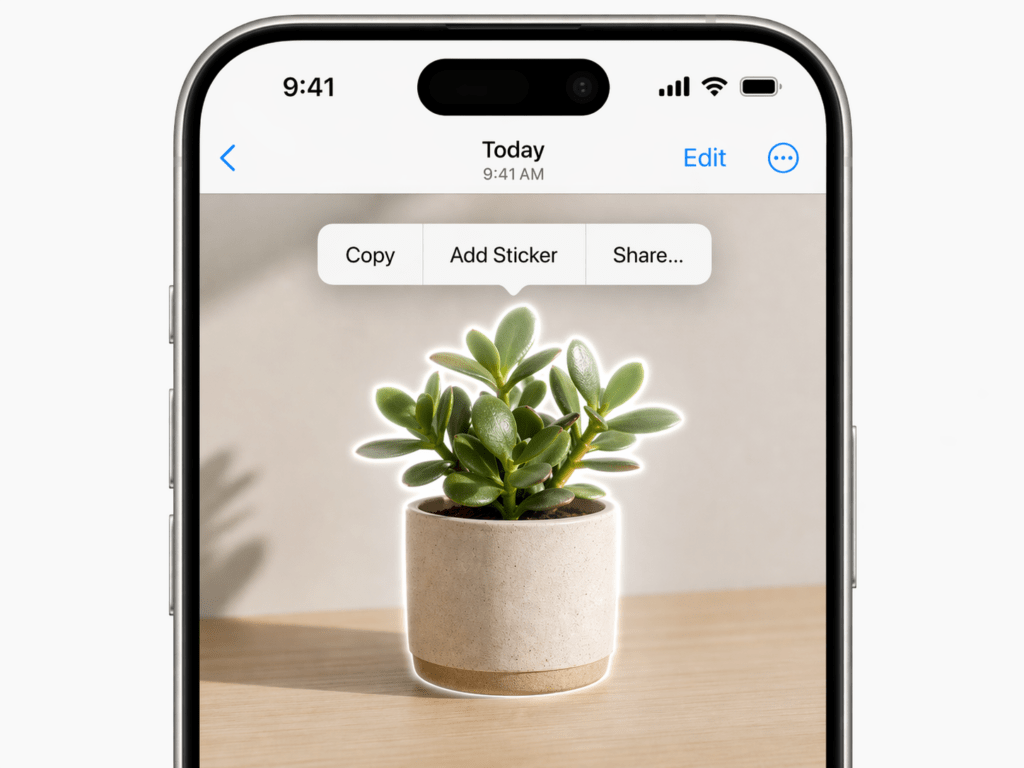
- Open Photos, find your image, then long-press the subject until it glows.
- Tap Copy Subject → paste into Notes, Messages, or Files. It pastes as a transparent PNG automatically.
- For batch work or hair edges, switch to a refine-brush tool. (More on that below.)
That’s it. No app install. No login. No fee. Works on iPhone XS or newer running iOS 16+.
If your result has crunchy edges, halos, or jagged hair — keep reading. The setup before the tap matters more than the tap itself.
iPhone Background Removal: At a Glance
| Method | Best For | Speed | Edge Quality | Batch? |
| iOS Subject Lift (Photos) | Single images, clean backgrounds | ~5 sec | Good | No |
| Files Quick Action | Saving as PNG directly | ~3 sec | Good | Limited |
| Cutout.Pro / Refine Tool | Hair, jewelry, busy backgrounds | ~30 sec | Excellent | Yes |
| Photoshop on iPad | Pixel-level control | 2–5 min | Excellent | No |
I’ll walk through each below — but if you’re a high-volume seller, skip ahead to the batch section. That’s where the time actually adds up.
A Quick Hi Before We Start
Picking up an iPhone and lifting a subject out of a photo used to feel a little like magic — and somewhere between iOS 16 and iOS 18, it really did become magic. With newer models on iOS 18, Apple has folded background lifting into a wider Apple Intelligence in Photos toolkit (think Clean Up for distractions, plus subject lift), which means the workflow keeps quietly improving in the background.
If you sell on Shopify or Amazon, run a small POD store, or just want a clean profile photo for LinkedIn without paying $9.99 for an app — this is the workflow I’d hand a friend at 10 p.m. when they message me in mild panic. Mm, much better than the old way.
Best Photo Inputs (30 Seconds That Save You 10 Minutes)
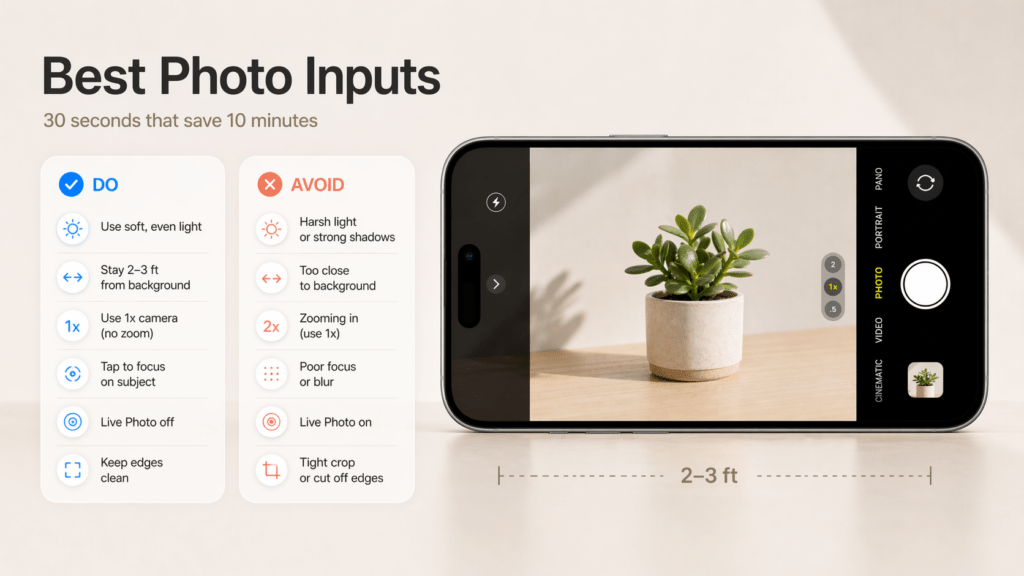
Beautiful cutouts begin before you touch any app. Past me was so serious about “fixing it in post.” Present me prefers a small front-loaded habit that makes the background lift cleanly on the first tap.
- Light that’s soft and even. A window with sheer curtains, or open shade outdoors. Avoid overhead spotlights — they carve harsh shadows that auto removers misread as part of the subject.
- Clear separation. Put your subject 2–3 feet from the background so the phone sees distinct edges. A foam board or a blank wall works wonders.
- Lens choice. Use the 1× main camera for the cleanest detail. If you need a tighter frame, step closer before jumping to 2×.
- Exposure sanity. Tap to focus, then drag down slightly to avoid blown highlights. Slightly underexposed is easier to recover than clipped whites.
- Steady hands. Live Photos can add micro-blur on small products. Turn Live off for the sharpest edges.
- Texture check. Shiny objects pick up reflections that confuse edge detection. A quick wipe with a microfiber cloth removes “mystery pixels” you’d otherwise spend minutes erasing.
Why this matters: every background remover, including Apple’s own subject lift, leans on clean contrast. Feeding it a well-lit, separation-friendly photo gives you the satisfying “poof, subject isolated” moment instead of a halo’d mess.
For ecommerce shooting, capture at the phone’s full resolution. HEIC and JPEG both work. If a client pipeline complains about HEIC, switch Camera → Formats → Most Compatible for that shoot. Easy fix.
Step-by-Step: The 3-Step iPhone Workflow
Step 1 — Pick the Cleanest Shot
I scroll my album and pick the sharpest one. If I’m torn between two, I zoom in on edges — hair, straps, product rims. The one with tidier edges almost always lifts better. There’s no point fighting the algorithm with a blurry source.
Step 2 — Lift the Subject
Two reliable paths depending on what you need.
Path A — Built-in iOS (fastest, single image)
In Photos, long-press the subject until you see a glowing outline. Choose Copy Subject, then paste into Notes, Pages, Mail, or Files. It pastes as a PNG with transparency baked in.
Or, for direct PNG export: in the Files app, long-press an image → Quick Actions → Remove Background. A new cutout PNG saves alongside the original. Apple’s official walkthrough on how to lift a subject from the photo or video background on iPhone covers every supported app — Photos, Safari, Quick Look — in one place.
On iOS 17 and 18, this is surprisingly crisp — even on wispy hair edges. Honestly, it’s improved noticeably from where it was a year ago. If you want to see what else lives behind that long-press menu beyond background removal, Apple’s official Quick Actions guide for iPhone covers the full list.
Path B — Refine tool (batch, hair, busy backgrounds)
When I have 20 product shots in front of me, or one tricky portrait with flyaway hair, I send them to a tool with a proper refine brush. The wins: batch upload, erase/restore for tidying edges, and direct PNG export to Files.
This is where I lean on Cutout.Pro myself — disclosure, I write for them, but I picked them as my go-to before that. The reason is narrow and specific: their hair-edge handling and bulk processing are where iOS subject lift starts to wobble. You can try the background remover here without signing up first, which is how I prefer to test any tool. If it doesn’t work on your hardest image, no harm done.
I avoid over-tweaking. Two or three restore strokes on tricky areas is usually enough. Hehe — nice when it just works.
Step 3 — Export as Transparent PNG
For design work, save as PNG to preserve the transparent layer. In Files, rename with a clear convention like brand_sku_angleA.png. If this is heading to:
- Shopify product pages: 2048 px on the long side — Shopify’s own Help Center confirms 2048 × 2048 px displays best for square product images and caps uploads at 5000 × 5000 px.
- Amazon product detail: at least 1600 px longest side, on a pure white
#FFFFFFbackground (per Amazon’s image standards) - Instagram or TikTok: see the export sizes section below
Done. No back-and-forth.
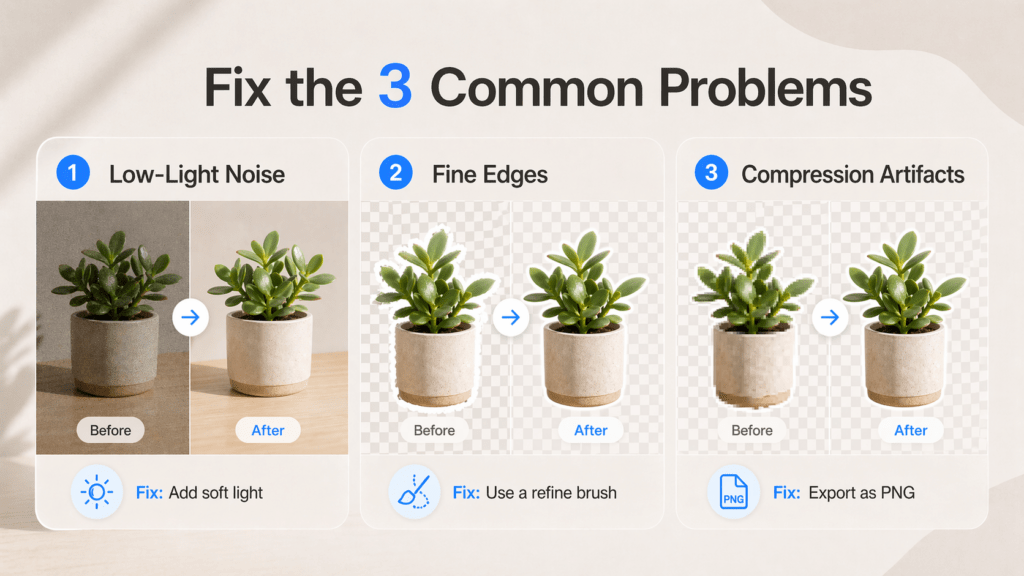
Fixing the Three Problems Everyone Hits
Even with good inputs, phones are tiny miracle boxes with opinions. Here’s how I nudge them.
🔴 Low-Light Noise
- At capture: Move closer to the window. Tap to expose for the subject, nudge brightness up just a touch. Skip night mode for products — it smears micro-detail.
- After capture: In Photos → Edit, slide Noise Reduction up just enough to calm the grain, then add a touch of Sharpness back. If it’s stubborn, send to Photomator or Lightroom Mobile’s Denoise. I time this — 30 seconds max. Past me would have fussed forever.
- Prevention: A $15 clip-on LED or a desk lamp bounced off a white wall removes the problem entirely.
🔴 Hair Edges
- At capture: A little rim light from behind separates hair beautifully. Even a window behind and off to the side helps. Keep the background darker or lighter than the hair — contrast is your friend.
- At removal: iOS subject lift handles solid backgrounds well but can leave crunchy strands on busy scenes. One pass with iOS, then a refine brush for flyaways. Feather 1–2 px around the strands. There — just right.
- At placement: If the final lives on a social graphic, place the cutout over a slightly textured or soft gradient. Gentle texture hides micro-jaggies better than a flat harsh color.
🔴 Compression Artifacts
That blocky-edge, color-banded look — usually from screenshots or images re-downloaded through messaging apps.
- Quick rescue: In Photos → Edit, a tiny clarity bump and reduced contrast smooths the blocks. Then export as PNG (not JPEG) to avoid re-compressing.
- If it’s still crunchy: upsize 120–150% in an app with smart resize before removing the background. The extra pixels give the edge detector more to chew on.
- Workflow fix: Pull assets from iCloud Photos, Files, or AirDrop instead of WhatsApp or WeChat. The smallest habit, the biggest payoff.
Export Sizes for Social and Ecommerce
I keep a few reusable canvases in Files so I can drop a fresh cutout and export in seconds.
| Channel | Recommended Size | Notes |
| Instagram post | 1080 × 1350 (portrait) | Portrait gets more screen space |
| Instagram square | 1080 × 1080 | Safer for grid consistency |
| Stories / Reels / TikTok | 1080 × 1920 | Leave breathing room top/bottom for UI |
| YouTube thumbnail | 1280 × 720 | Add 3–5 px soft shadow for depth at small sizes |
| Pinterest standard | 1000 × 1500 | Vertical performs better |
| Shopify product | 2048 × 2048 | Square, crisp, reasonable file weight |
| Amazon product | ≥1600 px longest side | Pure white #FFFFFF, subject ~85% of frame |
| Web banner | 1920 × 1080 | PNG-24 only if transparency needed; otherwise JPEG/AVIF |
Tiny workflow win: I save export presets named “IG-Portrait,” “TikTok,” “Shopify-2048,” “Amazon-1600w.” Tapping a preset instead of re-typing sizes saves ~15 seconds per image. On a 50-image batch day, that’s 12 minutes I’d rather spend on coffee. Ooh, look at that.
FAQ
Can I remove the background on an iPhone without an app?
Yes. iOS 16 and later includes a built-in “Subject Lift” feature in Photos and Files. Long-press a subject in Photos, choose Copy Subject, and paste it anywhere as a transparent PNG. No download or login required.
Which iPhone models support background removal?
Subject Lift requires an iPhone XS or newer running iOS 16, 17, or 18. The feature relies on the A12 Bionic chip or newer, so older models (iPhone X and earlier) won’t see the option.
Will the saved image have a transparent background?
Yes, when you paste into Notes, Files, Mail, or any app that accepts PNGs, the background is transparent. If you save through Files → Quick Actions → Remove Background, it saves as a true PNG with an alpha channel — meaning the empty space stays empty, not white.
Why does the cutout look jagged around hair?
The built-in tool handles solid backgrounds well but struggles with fine hair against busy or low-contrast backgrounds. For portraits, fur, or wispy edges, a refine-brush tool with feathering (like Cutout.Pro or Pixelmator Photo) cleans this up in 30 seconds.
Is the iPhone result good enough for Amazon or Shopify product listings?
For simple, well-lit products on neutral backgrounds — yes. For glassware, jewelry, fluffy items, or anything against a busy scene, you’ll want a dedicated tool with edge refinement. I tested both side by side last month, and the dedicated tool won on roughly 30% of my product shots.
A Soft Landing
Beautiful design doesn’t have to feel heavy. With a little front-loaded care — soft light, clean separation, and iOS’s quiet superpower to lift a subject — the rest falls into place. If this can rescue my brain at 10 p.m., it’ll probably treat you kindly too.
Try it on your next product shot or profile photo. See how it feels when the work moves more like a gentle breath than a grind.
Until next time, keep it light, keep it lovely. — Camille
Previous posts:
How to Remove Unwanted Objects from Photos (Free, AI, No Photoshop)
Seedance 2.0 Workflow: From Raw Photo to Final Video in 6 Steps
Remove Background for Clothing & Transparent Objects (Glass, Plastic)
How to Batch Remove Backgrounds from Images (100+ Photos in Minutes)
Photo Enhancer API: Batch Enhance Images for Ecommerce Catalogs