Table of Contents
Hi, I’m Camille. The first time I brought passport photos to a DFA office, I had printed them at 2×2 inches—US size—thinking that was the universal standard. It wasn’t. Back to the photo shop I went to.
Old habits—still learning.
Once I actually read the specs properly, everything fell into place in about fifteen minutes. So let me save you that same detour.
Size & Format
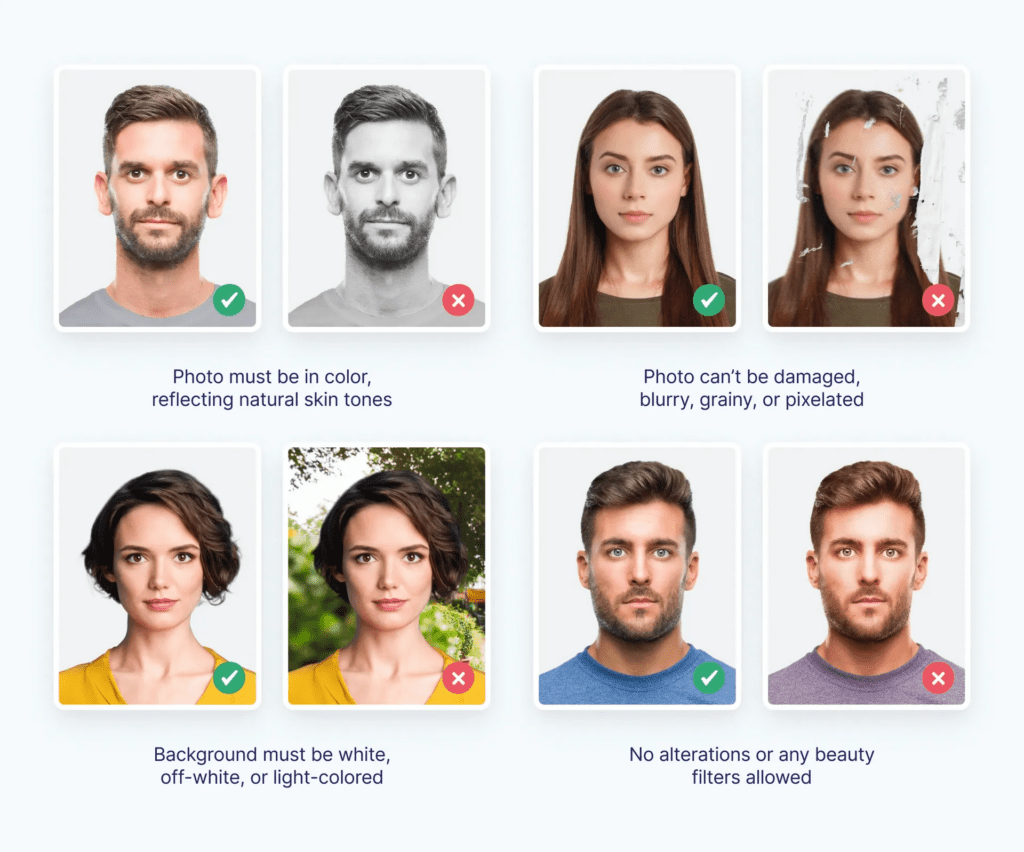
The Philippine passport photo size is 35mm × 45mm—roughly 1.38 × 1.77 inches. That’s the standard used for the DFA ePassport application, and it aligns with the ICAO biometric passport photo standard of 35×45mm adopted across most of the world outside the US.
Here’s the quick-reference table:
| Spec | Requirement |
| Dimensions | 35mm × 45mm |
| Background | Plain white |
| Face coverage | 70–80% of frame height |
| Expression | Neutral, mouth closed |
| Glasses | Not permitted |
| Head position | Front-facing, centered, no tilting |
| File format (digital) | JPEG, under 2MB |
| Resolution | 300 dpi recommended |
One thing worth knowing: the Philippine ePassport is fully ICAO-compliant, which means the photo standards aren’t arbitrary—they’re tied to international biometric facial recognition requirements. The face should measure roughly 32–36mm in height within the frame, measured from chin to crown.
There. Done. No more guessing.
Take-at-Home Checklist
Good news: you don’t need a studio. A phone, decent light, and a plain wall will do it. Here’s what actually matters.
Phone Distance and Framing
Set your phone on a stack of books, a small tripod—anything stable—at eye level. Stand 4 to 5 feet away from the camera. Too close creates lens distortion; your face reads wider and your nose is more prominent than in real life.
Frame yourself with about 10% empty space above your head, and your chin comfortably near the lower edge of the frame. Using a timer or ask someone to press the shutter—selfie distance is almost always too close.
Lighting Setup
Natural light from a window is your best friend. Position yourself directly facing the window, not beside it. Side light casts shadows across half your face, which can cause automatic rejection during biometric processing.
If shooting in the evening, place two soft lamps at roughly 45-degree angles from your face—one on each side. This mimics flat studio lighting without the cost. The goal is even skin tone across forehead, cheeks, and chin. Avoid overhead lighting; it darkens the area under your eyes and nose, and that tired-looking shadow tends to follow you around for ten years.

Dress Code & Expression
Keep the top simple and modest. The DFA requires decent clothing—plunging necklines, sleeveless tops, spaghetti straps, and see-through fabrics are not acceptable for passport photo capture. A collared shirt or any top that clearly shows the neckline reads well. Avoid white tops against a white background.
For expression: neutral, natural, closed mouth. The kind of face you make when someone asks how you’re doing and you say “fine.” The DFA specifies a frontal pose looking directly at the camera, with no rotation or tilting of the head, and a neutral expression with both eyes open and mouth closed—though a light smile without showing teeth is acceptable.
No glasses. No tinted contacts. Head coverings are allowed only for documented religious or medical reasons.
Fix Common Issues
Even with the right setup, small things go sideways. Here are the three I see come up most often.
Shadows on Background
It usually happens when you’re standing too close to the wall behind you. Move at least 3–4 feet away from the background surface so the shadow falls out of frame rather than appearing behind your head. A passport photo background removal tool handles this well in post—it replaces the background with clean white without touching your hair edges, which is where manual editing tends to go wrong.
Overexposure/Glare
Bright patches on your forehead or cheeks mean your light source is too direct. Step back slightly from the window, or hang a white sheet or translucent curtain to diffuse it. On your phone, tap your face on screen to set the exposure specifically to your skin tone rather than the brighter background.
“Oh, that’s lovely”—what you want to feel when you preview the shot. Flat, even light makes that happen faster than any editing later.
Wrong Crop
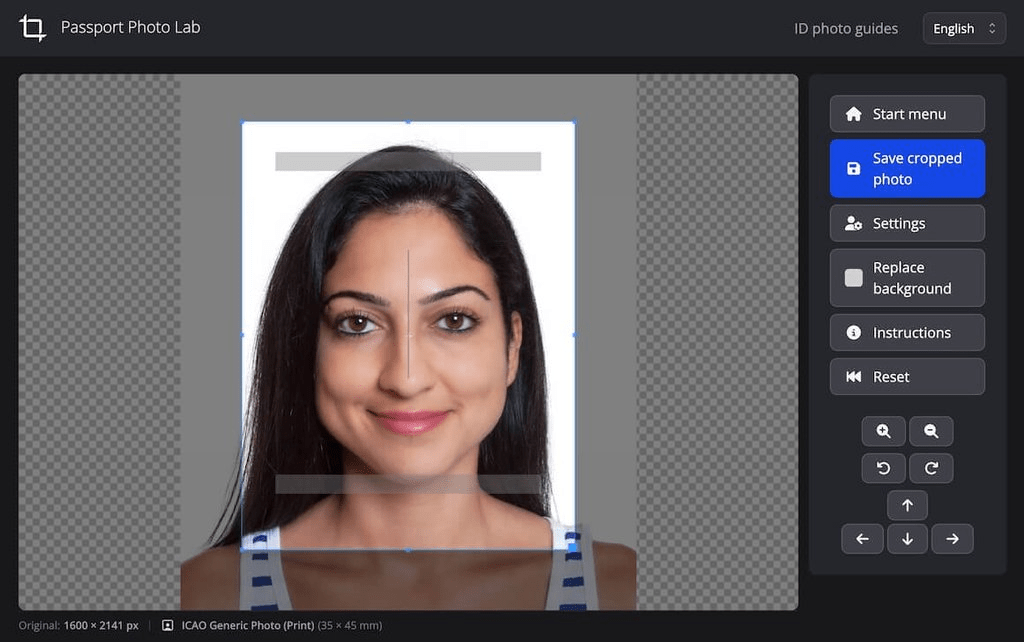
Even if your photo looks correctly framed on screen, the printed dimensions need to be precise. When visiting a photo shop, state 35mm × 45mm explicitly and confirm the head-to-frame ratio looks right in the preview. If submitting digitally, use a passport photo tool that auto-crops to Philippine DFA specs—it removes the margin for error on sizing.
Maker Workflow
Once you have a clean shot, processing it down to the right size and background is a three-step job.
Upload
Open a passport photo maker tool and upload your image. JPEG works fine for most platforms. Make sure the original photo is well-lit and clearly in focus before uploading—post-processing handles crop and background, not blur or grain.
Auto Adjust
The tool detects your face automatically, crops to 35×45mm, and replaces the background with clean white. Most tools also flag if the head position is too high, too low, or too small within the frame. Preview before downloading. Check that: the white background is uniform with no remnants of your original wall; the head is centered with appropriate space above; and the face-to-frame ratio looks right (not too zoomed, not too far away).
And just like that—done.
Download & Print
Download the processed file. For printing, ask for a 3R or 4R print and specify two copies of the 35×45mm passport photo on one sheet. Most photo shops in the Philippines (SM Photo, Kodak Express, local printing centers) can handle this on the spot.
If printing at home, set your printer to actual size—not “fit to page”—otherwise the dimensions shift and your photo may be rejected.
FAQ
Q: Does the DFA still require printed passport photos?
For Philippine ePassport applications processed at DFA offices, no printed passport photo is required—your photo is taken digitally by DFA data encoders during the enrollment step at the passport application site. However, passport photos in the 35×45mm format are still required for certain visa applications, NBI clearances, school IDs, and other Philippine government documents, so it’s worth knowing the standard regardless.
Q: Can I use a 2×2 inch photo for a Philippine passport?
No. The Philippine standard is 35×45mm. The 2×2 inch format is the US standard and is a different size. Submitting US-format photos to other agencies requesting Philippine specs will likely result in rejection.
Q: What if my background has a shadow or slight color?
A background removal tool will correct this to pure white. Just make sure your hair edges are clean against the original background—flyaways against a cluttered wall can cause detection errors.
Q: Are glasses allowed?
Colored contact lenses that disguise the natural color of your eyes are not allowed, though clear contact lenses are permitted. Prescription glasses are also no longer accepted in Philippine passport photos, in line with current ICAO biometric standards.
Q: How do I book a DFA passport appointment?
Passport appointments are free and should only be made through the official DFA appointment portal at passport.gov.ph. The DFA cautions against using fixers or third-party social media accounts, which may charge fees for what is a free service. You can also check valid IDs accepted for Philippine passport applications on the official DFA Office of Consular Affairs website before your visit.
Q: What are the pose guidelines at the DFA capture station?
The DFA’s official photo capture guidelines specify that the midpoints of your mouth and the bridge of your nose should align along a vertical center line, both eyebrows should be visible, and contrived expressions like raised eyebrows or squinting are not acceptable.
Beautiful design—and bureaucratic paperwork, for that matter—doesn’t have to feel heavy. The specs are clear, the setup is simple, and once you’ve done it once you’ll wonder what the fuss was about.
Try it on your next renewal. You might surprise yourself with how fast it goes.
Until next time—keep it light, keep it lovely.
Previous Posts:
Background Remover for IDs: When It’s Allowed and When It’s Not
How to Remove Background from a Photo — Hair, Glass & Tricky Edges Done Right
Best Free AI Photo Editors Online: 5 Tools That Actually Work (2026)