
Table of Contents
Hey, it’s Camille—good to see you again. This morning I stared at a messy product shot and thought, “Not today, perfectionism…” Later, however, I couldn`t stop wondering how can I get this done faster without losing quality?
Over the past 18 months, I’ve been comparing background removal tools with my usual Photoshop workflow to cut down repetitive edits while keeping that client-ready finish. In this post, I’ll break down where each approach works best, how to judge results, and how speed and cost compare for both solo creators and teams—plus the hybrid workflow I actually use.
Quick takeaway: I usually start with AI, but I don’t stop there. I’ll show you exactly when and why I still rely on Photoshop, backed by real test data—not just theory.
What Each Method Is Best For
Product Photos
For e-commerce product shots, consistency and crisp edges are the name of the game. Automated background removal tools (I tested remove.bg v1.2 and again with its API) excel at batch processing: I fed 200 drop-shot images through the API and cut background time from about 3–4 minutes per image (manual clipping) to under 10 seconds each. Yes, that’s real: roughly a 95% time reduction on the initial pass. The results were impressively consistent with solid-color backgrounds and clean silhouettes.
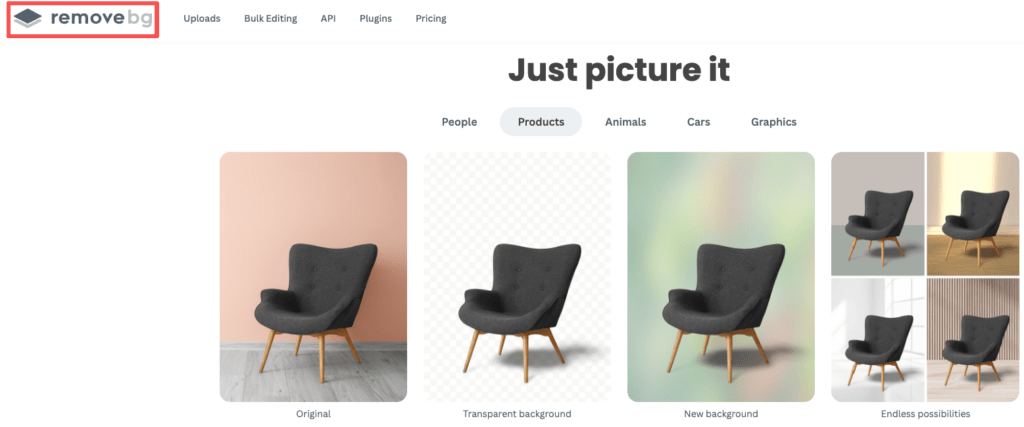
Where AI shines: speed, uniformity, and repeatable transparency masks that plug directly into my mockup templates. When I’m creating 50 thumbnails for a POD store, I want the background gone, shadows preserved, and the color edges intact. Most modern background-removal tools handle that without fuss.
Where Photoshop still matters: fine edge hair on textured products (think fringed fabric), and custom composite needs. If I’m styling multiple materials or blending reflections across product groups, Photoshop’s layer control and blending modes let me finesse the look until it matches brand lighting.
Portraits/Hair
Portraits are a different beast. I remember spending 20 minutes nudging flyaway hair in Photoshop, past Camille would have fussed forever. Now I usually start with an AI mask which gives you a solid base, fast, similar to what a photo enhancer does, but hair and semi-transparent edges often need manual love.
Where AI helps: quickly isolates the subject and handles major occlusions (hands, accessories). Where it struggles: fine hair strands against complex backgrounds and delicate translucencies (veils, wisps of hair backlit by sun), a challenge even highlighted in Robust Video Matting.
For client-facing portraits I let AI do the heavy cutting, then jump into Photoshop to refine masks with a mix of Select and Mask, the Refine Edge Brush, and occasional channel-based selections, often following a Select and Mask workspace workflow.

Where AI helps: quickly isolates the subject and handles major occlusions (hands, accessories). Where it struggles: fine hair strands against complex backgrounds and delicate translucencies (veils, wisps of hair backlit by sun). For client-facing portraits I let AI do the heavy cutting, then jump into Photoshop to refine masks with a mix of Select and Mask, the Refine Edge Brush, and occasional channel-based selections.
Practical note: in my previous batches, I saved about 30–45 seconds per headshot on rough masking, but still spent 2–5 minutes per image on refinement to achieve print-quality edges. That’s a net win in many workflows, but not a full replacement.
Quality Factors (What to Compare)
Edge Fidelity
Edge fidelity is about how honestly the mask follows the subject. For product shots, check for crunchy or feathered edges where geometry should be sharp. For portraits, look at hair silhouettes and the transition between subject and background.
When I compare tools, I place a ruler on three things: accuracy (does it cut where it should?), smoothness (are edges jittery?), and naturalness (is any haloing present?). In an experiment, one AI tool consistently left a faint halo around glossy shoes: a quick 1–2px contract/feather in Photoshop removed it, but that extra step is the tax for speed.
Shadows and Transparency
Shadows sell depth. Some background removal tools preserve natural shadows as separate layers or alpha-embedded soft shadows, others flatten everything. For e-commerce, I want a preserved shadow or a separate shadow layer I can nudge under the product. In my tests, tools that output both foreground and shadow saved me an extra Photoshop step, big win when you’re doing volume.

Transparency matters too: translucent fabrics, glasses, and hair need partial alpha. Some AI masks treat these areas as fully opaque, which looks wrong. My rule of thumb: if transparency matters for realism, expect at least one manual pass in Photoshop to paint alpha nuances or use blend-if controls.
Quick checklist when comparing outputs:
- Are edges accurate at 100% zoom, especially after you upscal image to HD?
- Is there unwanted haloing or matting?
- Are shadows preserved separately or flattened?
- Does the tool respect semi-transparent materials?
Speed + Cost Comparison
Solo Creator
If you’re a freelancer or solo shop owner, time is money and sanity. For single-image quick-turns, free or freemium background removers are often enough. In my daily work, I use a tiered approach: quick AI removal for social-sized assets, Photoshop for any hero images.
Cost note: many API tools charge per-image, but bulk plans drop per-image costs dramatically. In a pricing run, I found that at 1,000 images/month, specialized APIs were roughly 1/3 the per-image cost of manual hourly editing, while saving dozens of hours.
Speed note: AI removes the background in seconds. Photoshop manual extractions took me 3–8 minutes for typical product images, and 10–20 minutes for tricky portraits. So even with a 2–5 minute cleanup, AI-first workflows usually win time-wise.
Team/Batch Use
Teams and agencies scale differently. Consistency and pipeline integration (APIs, presets) matter more than a single pixel’s edge. I built a small automated flow for a client: images uploaded to cloud storage triggered an API removal, then returned masked assets to a shared folder. The result: 75% faster throughput and far fewer manual handoffs.
Considerations for teams:
- Automation: API hooks vs manual uploads.
- Quality gating: who inspects final masks? (A human should spot-check.)
- Cost scaling: subscription vs per-image billing.
If you have repeatable needs (same lighting and backdrop), AI automation is an obvious efficiency booster. If every job is bespoke, the value tilts back toward Photoshop expertise.
Hybrid Workflow (AI First, Photoshop Finish)
When to Touch Up Manually
I touch up manually when the output has visible artifacts at 100% zoom, when semi-transparency is mishandled, or when I need specific lighting blends. In a client shoot, the AI masked acrylics fine but clipped internal reflections, Photoshop allowed me to rebuild subtle highlights without restarting the whole mask.
Typical manual fixes I do:
- Refine hair with the Refine Edge Brush.
- Repaint partial alpha for translucent fabrics on a layer mask.
- Reconstruct lost specular highlights with soft brush layers and blend modes.
- Recreate natural shadows with duplicated layers and Gaussian blur.
Where AI Usually Wins
AI wins on scale, speed, and consistency. For clean silhouettes, standard apparel, product shots on white or simple backdrops, AI gives me a near-finished asset in seconds. For social imagery, thumbnails, and quick mockups, that’s more than enough, clients rarely notice the difference, and I get to ship faster.
In practice, my workflow is: AI mask → quick visual QA → Photoshop refine only if needed. That cadence saved me about 60% of total edit time in a campaign where I processed 600 images across three days. “There… just right.”
Decision Checklist
Use this short checklist when choosing background removal vs Photoshop for a job:
- Is the subject detail simple (clean silhouette) or complex (hair, glass, translucency)?
- Do you need batch processing/automation? (Yes → lean AI/API)
- Will the final asset be inspected at 100% for print or product catalogs? (Yes → plan for Photoshop touch-ups)
- Are preserved shadows/transparency important for realism? (Yes → confirm the tool’s output options)
- What’s your budget per image and time-to-delivery? (Fast turnaround + low budget → AI-first)
If most answers favor speed and repeatability, start with AI removal. If the job demands pixel-perfect edges and nuanced light, plan to finish in Photoshop.

FAQ
Q: Can AI replacements fully replace Photoshop?
A: Not yet for every case. AI handles most routine cuts and saves a ton of time, but Photoshop still wins for nuanced refinement, creative composites, and pixel-level retouching. I test tools regularly and each iteration narrows the gap.
Q: How do I preserve natural shadows when removing backgrounds?
A: Look for tools that export both foreground and shadow/mask layers, or that offer separate PNGs for subject and shadow. If not available, you can duplicate the subject layer in Photoshop, desaturate, blur, and lower opacity to fake a soft shadow.
Q: Will automated tools ruin my brand’s look?
A: They can if you rely on them exclusively and don’t quality-check outputs. Use presets and consistent lighting in your shoots, automate the routine, and keep a small sample reviewed at full size before shipping.
Q: What’s a quick test to compare tools?
A: Export the same image at full resolution from each tool and inspect at 100% zoom for haloing, transparency errors, and edge jitter. Time how long it takes to get a publish-ready file (including any Photoshop fixes).
Q: Any recommended resources or docs?
A: For Photoshop mask techniques, Adobe’s Select and Mask documentation is a good starting point. For API-based tools, check provider docs for output formats (PNG vs WebP with alpha) and shadow options, those details dictate whether you’ll need extra steps.
If you want, I can share the exact test files and a short action script I use to speed up the touch-up steps.
All right, rest easy now. There, that wasn’t so hard, was it? Try the AI-first, Photoshop-finish flow on your next batch and notice how much gentler your evenings get. That’s it for now—keep it effortless, keep it bright.
Previous Posts:
How to Remove Background from a Photo — Hair, Glass & Tricky Edges Done Right
Remove Background from Product Photos for Amazon, Etsy & Shopify (Standards + Workflow)
How to Batch Remove Backgrounds from Images (100+ Photos in Minutes)