Hey, guys. I’m Camille. This morning I opened a pet product shot and whispered, “Easy now” The dog was adorable. The flyaway fur? A fluffy little chaos party. If you’ve ever tried to cut out hair or fur, you know the feeling, one minute you’re cruising, the next you’re zoomed to 400% negotiating with a single translucent strand. I’ve been there (many times), and over the past year I’ve been testing ways to make hair & fur background removal feel calm and consistent.
The goal here isn’t perfection for perfection’s sake: it’s speed with integrity. I want natural edges, believable transparency, and something I can ship without a dozen micro-fixes. I tested these approaches across daily client work in Photoshop (v25.5), Affinity Photo 2 (2.5), and API-based tools like remove.bg and Clipdrop. On average, these steps save me 8–12 minutes per image compared to my old “fiddle forever” routine. Ahh, that’s nicer.
Why Hair/Fur Is Hard (Transparency + Fine Strands)
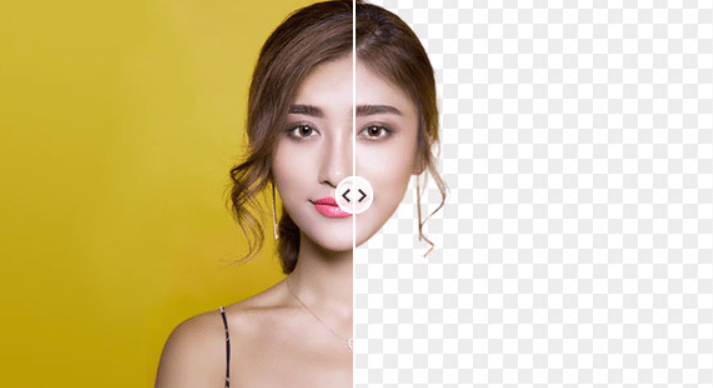
Hair and fur aren’t single edges, they’re a cloud of semi-transparent threads mixed with background color and soft light. Cameras capture that blend, and then we ask software to tell which wisps belong to the subject and which belong to the scene. Tricky.
Two things make it especially fussy:
- Semi-transparency: Real hair often lets the background peek through. If the subject stood in front of a saturated backdrop, that color can bleed into the strands. When you remove the background, you’re not just cutting: you’re un-mixing colors.
- Micro-contrast: Fine strands live in low contrast zones. If the lighting is flat, the edge detector can’t distinguish hair from the background, so you get chunky, mushy edges.
In practice, this means auto-matting works beautifully on big shapes but needs guidance where light, color, and detail meet. The good news: with a smart input setup and a tidy two-pass workflow, you can get a clean cutout with believable edges and very little hand fussing. Ooh, look at that.
Best Input Setup
A little intention at capture saves a lot of cleanup. When I nudge a shoot setup for 90 seconds, I usually shave whole minutes off the mask.
Backlight vs Front Light
Backlight (a gentle rim/edge light) separates strands from the background and creates that luminous outline software can latch onto. I aim a soft backlight 30–45° behind the subject, low intensity, just enough to kiss the edges. Front light can then stay soft and broad so skin and fur don’t get crunchy.
Front-only lighting is fine for flat product edges, but on hair/fur it often hides the edge. If I’m stuck with front light, I add a kicker or even a small bounce card behind the subject, just off frame, to tease out the silhouette.
Background Color That Helps
The best background is low-contrast to skin/fur color but not identical, think gentle separation. For dark hair, a mid-tone gray or muted warm helps: for light hair, a mid/dark cool works well. Pure white or pure black can be okay, but they tend to cause halos when you swap backgrounds later.
If I’m shooting e-commerce on the go, I carry a foldable mid-gray backdrop. It’s boring, yes, but it reduces color bleed and gives edge-finders something to chew on. There we go.
Step-by-Step Hair Cutout Workflow
This is the rhythm I use across tools. It’s fast, gentle, and flexible. On a 24MP image, it’s usually a 2–5 minute pass, then quick polish.
Auto Cutout First Pass
I always start with an automatic matte:
- Photoshop: “Select Subject,” then open Select and Mask. If available, the “Refine Hair” button is surprisingly good.
- Affinity Photo: Use “Selection Brush,” then “Refine…” on the edges. Affinity’s Refine Selection flow is clear and fast.
- API tools: remove.bg or Clipdrop do strong first passes. For developers, the remove.bg API is straightforward to integrate and returns alpha-ready PNGs.

Tip: Work at 100% view when refining, not 400%. At 400% I start sculpting imaginary pixels. Old habits, still learning.
We built Cutout.Pro because this first pass is where most of the time and frustration lives. It helps us get a clean, natural hair matte quickly, so we can spend time refining edges instead of fighting the mask.
If you want a calmer start without sacrificing edge quality, you can try it free here.

Edge Cleanup: Stray Strands & Gaps
Once the auto matte is in place, I clean without overworking:
- Use the Refine Edge/Refine brush around wispy zones only. Short strokes, lift often. If the image is noisy, lower brush strength to avoid grabbing grain.
- If color contamination is visible (red wall bleeding into hair), add Decontaminate Colors lightly (Photoshop) or use a gentle Hue/Sat adjustment masked to the edge. Small nudges. Over-decontaminate and hair turns muddy.
- If a section looks “chunky,” switch to a low-opacity soft brush on the mask and feather the transition. Think: fog, not concrete.
Time-saver: I keep a tiny library of edge micro-brushes (slightly irregular tips). They paint more organic corrections than a perfect round brush. Hehe, nice when it works.
Preview on Light and Dark Background
Before I export, I drop the masked subject on two solid layers: one near-white (like #F7F7F7) and one near-black (#0F0F0F). If it looks good on both, I trust it. If halos appear on dark, I know I need another minute on the rim: if it dies on light, it probably needs a touch of contrast in the hair midtones.
I also do a quick color check on a mid-color (soft blue-gray). You’ll catch color bleed faster on color than on gray. There… just right.
Fix Typical Hair Issues
Hair cutouts fail in the same three ways. Here’s how I fix them without spiraling into perfectionism.
Halo/Fringing
- What it is: A light rim outlining the hair, usually from the original background.
- Quick fix: Add a low-flow brush on the mask and nibble inward along the halo. Then try a tiny inside shadow: duplicate the layer, fill the mask with black, invert and blur 1–2 px, set to Multiply at 5–10%. It gives a whisper of depth that kills the glow without dark bands.
- Color edges: If the halo is colored (say green screen spill), use a targeted Hue/Sat clipped to the edge and desaturate only the greens. In Photoshop, a Selective Color adjustment at the rim can work even more gently.
“Chunky Hair” Look

- What it is: Edges look blocky: individual strands lost.
- Why it happens: Low micro-contrast or heavy-handed refining.
- Gentle fixes:
- Add micro-contrast in the hair mids with a low-radius clarity/contrast adjustment masked to the edge (think 5–10% strength). It gives the algorithm something to work with on the next refine.
- Re-run a light Refine brush pass with smaller brushes and shorter strokes. Don’t scrub.
- Paint translucency back in: on a new layer set to Overlay or Soft Light, softly paint a little light into the rim to suggest strand separation. Subtle is the secret. Oh, that’s lovely.
Missing Strands
- What it is: The auto matte ate the baby hairs and soft fur.
- Practical fix:
- Hand-rebuild a few key strands with a hair brush (custom scatter brush, thin and slightly jittered). One or two passes suggest plenty: you don’t need to repaint every flyaway.
- For pets, a light dodge on outer fur tips (5–8% flow) brings back the airy edge.
- If many strands are gone due to flat lighting, I accept a cleaner silhouette for small web uses. Past me was so serious. For print or hero banners, I’ll spend an extra minute selectively painting a handful of hero strands for realism.
Camille’s take: Looks good? Ship it.
Export Tips (PNG, Web, Print)
Export settings can make or break the final look, especially against new backgrounds.
- PNG with Alpha: My default for web and compositing. Keep color profile embedded (sRGB for web). If the edge has faint noise, export at 1.25–1.5x size and downscale in the layout tool for a cleaner perceived edge. Well, that settled nicely.
- WebP with Alpha: Smaller than PNG in many cases and widely supported. I use it for responsive sites where bandwidth matters. Test on your platform, some CMS pipelines still treat PNG more predictably.
- PSD/TIFF for Print: Keep the layer mask live. Use embedded profiles (Adobe RGB or the working print profile). For CMYK workflows, I place the masked RGB image into InDesign and convert at export rather than flattening early.
- API/Automation: If you’re batching via API (remove.bg, Clipdrop), request PNG with transparency and store a versioned ID so you can re-process with updated settings later. Little quiet happy moment.
Final preflight: Drop the masked subject on both light and dark swatches in your design doc. If it holds up, you’re good. There, done.
If it can rescue my sleepy brain at 10 p.m., imagine what it’ll do for you. Beautiful design doesn’t have to feel heavy. Try these gentle tweaks on your next hair or fur cutout and see how it feels in your hands. Until next time, keep it light, keep it lovely.
Previous posts:
Remove Background Online: Best Method for Clean PNGs (2026)
Remove Background for Product Photos: White Background for Amazon & Shopify