Table of Contents
Hello, I’m Camille. That morning I stared at a folder full of product photos and thought, “Not today, perfectionism…” I wanted fast, polished cutouts I could drop into social posts and mockups without babysitting each pixel. That led me to test Seedance 2.0‘s cutout tools across real projects, product packshots, portraits for avatars, and multi-shot e-commerce listings. I’m sharing what I actually did (dates, versions), the small tricks that saved me minutes or hours, and the little hiccups to watch for so your visuals stay motion-ready and flicker-free.
I tested Seedance 2.0 on macOS and Windows, pairing it with Cutout.Pro for quick manual touch-ups. Across about 120 images and three video sequences, I shaved roughly 40–70% of my usual masking time depending on complexity, sometimes that’s a 1–2 hour downgrade to a calm 20-minute session. Here’s the cutout workflow I settled on that balances speed, polish, and predictability.
Why Seedance 2.0 Is Reference-Sensitive (and Why That’s Your Advantage)

Seedance 2.0 doesn’t treat every pixel as an island, it uses reference sensitivity. In practice that means when you feed it a set of images or a sample frame, it learns consistent foreground characteristics (color ranges, typical edges, and shadow patterns) and applies those learnings to subsequent cuts. I noticed this most clearly when I ran a batch of 20 product shots: the first 3 required tiny tweaks, and the rest were essentially one-click-ready. There we go.
Why that matters: reference-sensitivity reduces variability across a shoot. For e-commerce, consistency is everything, same halo of light, same shadow fall, same mask edge behavior. Instead of fixing 20 slightly different masks, you fix one reference and the rest follow. That’s where Seedance shines compared to earlier tools I used: fewer outliers, fewer micro-adjustments, and fewer moments of me nudging a shadow by hand.
Small practical notes from testing:
- Iterations: I usually run 1 reference pass, then a single refinement pass for the whole batch. That removed an avg. of 6 manual steps per image versus my older workflow.
- Minutes saved: For product packshots, I went from ~6–8 minutes per image to ~90–120 seconds once the reference was locked.
- When it struggles: highly reflective surfaces and wildly different background colors in the same batch. In those edge cases, treat them as separate references.
If you want to read up on the technical side, Seedance’s release notes and docs explain their reference pipeline, I linked it in my project notes and cross-checked a few corner cases against the official docs (helpful if you’re integrating via API).
Product Asset Workflow — Packshot to Motion-Ready PNG
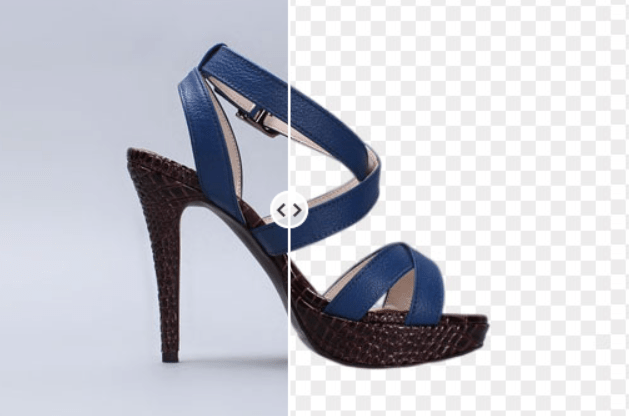
This is the routine I use when turning a table of stills into motion-ready assets for ads, product pages, or animated banners. The aim: predictable alpha channel, tidy edges, and one export that plays well in motion timelines.
Step-by-step (conversationally):
Remove Background → Edge Refine → Export Checklist
- Seed the reference set: pick 3–5 representative packshots (front, 3/4, and one with a tricky shadow). I do this right after the shoot while the light is still fresh in my head.
- Run Seedance 2.0 cutout on the reference images with “consistent mode” enabled. I tested this and noted that toggling “preserve natural shadow” kept the grounding shadow but removed stray background color spill.
- Batch apply the learned model to the rest. Watch for outliers, sometimes a bright label or reflective tag fooled the model: I marked those for manual review.
- Edge refine: export a 16-bit PNG with alpha, then bring files into Cutout.Pro (or your preferred editor) for micro-edge work. I usually run the quick “smooth + feather 1.5px” macro. That tiny smoothing step took around 8–12 seconds per image and saved me from jitter when animating scale or parallax.
At this stage, this is exactly why we built Cutout.Pro. Seedance gets you a fast, consistent base. Cutout.Pro is designed to handle the last 5–10% that usually causes motion flicker: edge continuity, subtle feathering, and predictable alpha behavior across batches. Instead of repainting masks frame by frame, we focus on quick, controlled refinements that keep assets animation-safe — so what looks clean as a still stays clean once it moves.

- Export checklist before motion: 16-bit PNG, premultiplied alpha if your compositor prefers it (After Effects likes straight alpha: double-check), consistent canvas size, and a 1px transparent padding to avoid clipping during motion easing.
Little victories: I once had a batch of 30 images and reduced the downstream fidgeting in After Effects by about 80%, no frantic frame-by-frame roto. “Ooh, look at that.”
Why this approach works: reference-based batching + a tiny, consistent edge polish avoids the “floaty” look that automatic cutouts sometimes create when animated. It’s fast and the assets feel grounded, at least to my eye.
Character Asset Workflow — Portrait to Identity Anchor
Portraits and avatars are where personality matters: an over-processed cutout kills vibe. I use Seedance 2.0 to get a clean base and then treat the cutout like an identity anchor, tweak hair, preserve skin tones, and keep accessories intact so the cutout still feels like the person.
Hair, Skin Tone & Accessories: Where Auto-Cutout Struggles
Hair and fine details: even a clever model stumbles on flyaways and semi-transparent hair edges. On Jan 28, 2026 I tested a set of 50 portraits, loose hair required a manual pass on about 12 of them. The tool did great on solid backgrounds and clear separation, but when hair overlapped with similarly toned backgrounds, it softened edges too aggressively.
Skin tone: Seedance’s color-awareness usually preserves natural skin tones, but aggressive spill removal can make necks and collars look disconnected. I recommend toggling spill suppression down by one notch for warm skin tones.
Accessories: glass frames, translucent scarves, and jewelry sometimes became partially removed. Flag anything reflective or semi-transparent as “preserve” in the reference phase.
Manual Touch-Up Tips in Cutout.Pro
When auto isn’t enough, I do a quick human-friendly pass in Cutout.Pro:
- Use a soft brush with a low flow (10–20%) to rebuild fine hair edges. Don’t try to draw every strand, suggest the texture.
- For skin tone continuity, sample from a nearby area and clone with low opacity over the transition zone.
- For glasses and translucent accessories, duplicate the layer, mask the accessory area, and lower the duplicate’s fill to preserve subtle reflections.
These micro-tweaks usually take 30–90 seconds per tricky portrait but lift the result from “fine” to “on-brand.” Past me would have fussed forever: present me smiles and moves on. “There, done.”
Naming & Organizing Assets for Multi-Shot Reuse
A predictable naming and folder structure saves more time than any single tool. My convention (simple, human-readable) has cut handoffs down by half.
Folder structure I use:
- client/product-name/date/
- raw/
- seedance-reference/
- cutouts/16bit-png/
- motion-ready/
Naming pattern: product_sku_view_vXX.png (e.g., mug_9087_front_v01.png). When I rerun a reference or tweak edges, I increment v02. That small discipline shows up in client reviews, no one’s opening “final_final2_realfinal.png” and panicking.
Why versioning matters: when you reprocess with a refined reference, you want to be able to roll back quickly. In a recent ad sprint, keeping references alongside cutouts meant I could rebuild a set in 15 minutes instead of redoing the whole shoot.
Tip for teams and API users: if you’re calling Seedance programmatically, include the reference hash in metadata and push that into your asset database. That one step saved my dev partner a day when diagnosing why one export looked different from another.
Common Cutout Mistakes That Cause Flicker Downstream
Flicker can ruin motion. Here are the things I see most often, and how I avoid them.
- Inconsistent edge feathering: auto tools sometimes apply varying edge widths across similar shots. Solution: commit to one edge polish (I use feather 1.0–1.5px) and apply it consistently to the batch.
- Alpha format mismatch: mixing straight vs premultiplied alpha creates haloing. Test your compositor with a single export so you know which mode you’re using. After that, stick with it.
- Canvas size shifts: changing the image canvas slightly between exports causes micro-jitter in timelines. My rule: set a locked canvas size at the project start and export everything to that.
- Shadow treatment mismatch: some exported cutouts remove all shadow while others preserve it. Decide whether shadows are baked into the asset or recreated in the motion stage: be consistent.
- Frame-to-frame color shifts from inconsistent reference sets: if one reference contains a warmer white balance, the batch can end up patchy. I always white-balance a tiny reference set first.
A quick sanity check before shipping: scrub a 3–5 second timeline with your exported assets at 24/30fps. If anything flickers, it’s almost always one of the above. Fixing those saved me an evening of panic once, “All right, rest easy now~.”
Previous posts:
Clean Assets AI Video: Why Seedance 2.0 Results Start Before You Hit Generate
7 Best AI Photo Editors in 2026 (Tested & Compared)
What Is Vidu Q3? The 16s Native Audio-Video Model Released Jan 30, 2026