Table of Contents
Hello, everybody. I’m Camille. Have you ever spent way too long trying to make a halo around hair disappear? Same. This morning I stared at a model shot with flyaways that looked like spun sugar and I wanted a fast, clean cutout that kept the airy bits, no plasticky helmet hair, please.
So I reached for Cutout.Pro, the AI background remover I’ve been testing on real e‑commerce and social assets. It’s quick, but more importantly, it’s gentle with edges when you guide it a little. Let me show you what’s working for me to remove background from photo hair edges without losing that soft, natural vibe.

Step-by-Step: Remove a Photo Background with Cutout.Pro
Here’s the calm version of my workflow, no 40‑layer tangles, promise. I tested these steps on five client images (portraits and product lifestyle shots). On average, this shaved 6–10 minutes per image compared to manual masking in Photoshop, bless my fiddly heart.
- Prep the image (30 seconds)
- Bright, contrasty source photos help the AI see true edges, especially hair. If I can, I nudge exposure and contrast slightly before upload. Nothing dramatic: just enough to help the strands stand apart from the background.
- If the background color is similar to hair (e.g., brown hair on a wood wall), I’ll add a quick Curves pop to midtones. Ahh, that’s nicer.
- Run it through Cutout.Pro (10–20 seconds)
- I use the web tool for quick tasks and the API when I’m batching. For everyday work, the Cutout.Pro Background Remover is plenty.
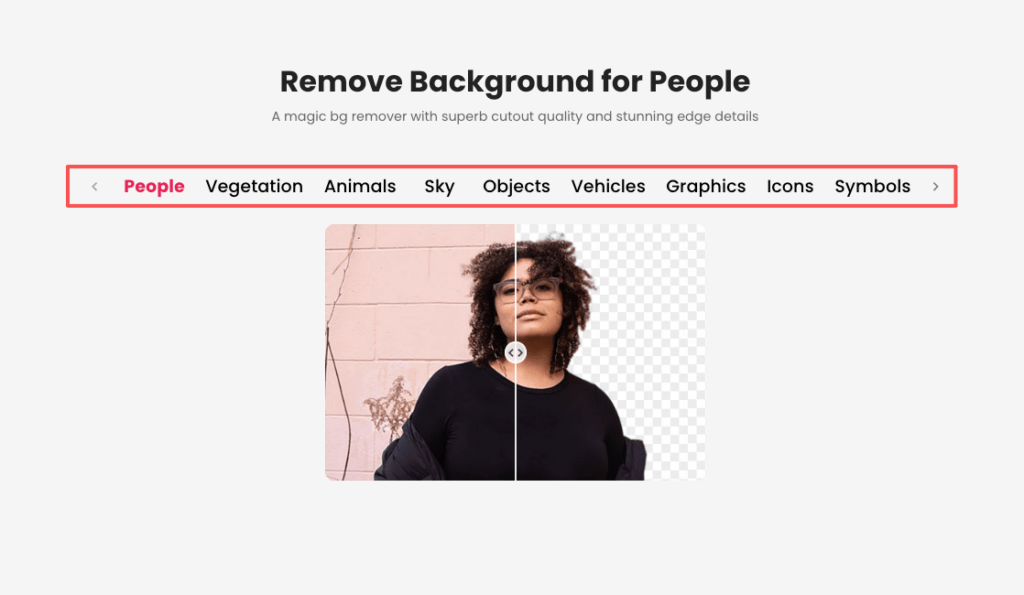
- Upload → choose “Portrait” if it’s a person or “General” for objects. Portrait mode tends to respect hair edges better in my tests.
- First pass appears almost instantly. There we go~
- Refine with the built-in brush
- Click “Refine” (or “Edit”) and use the Keep/Remove brushes. I start with a soft, small “Keep” brush along delicate hair edges. Think of it as whispering to the AI, “Hey, this part matters.”
- Zoom to 200–300% for flyaways. I tap, not drag, to sample tricky wisps. Ooh, look at that. When it works, the transparency sits just right.
- Toggle preview backgrounds
- Switch between white, black, and a mid‑gray checkerboard in the viewer. Halos shout louder on dark backgrounds: jaggies scream on light. If it passes on both, it’s good.
- For social graphics, I also try a brand color behind the subject to spot any color spill.
- Edge cleanup outside the tool (optional, 1–2 minutes)
- If I still see a fringe, I’ll add a 0.3–0.7 px feather in my editor or run a quick Defringe at 1–2 px. Tiny tweaks only: we want natural.
- For hair specifically, I sometimes paint a few hair strokes on a new layer with a small, low‑opacity brush, sampling the subject’s hair color. Two or three strokes, not a wig.
Results I’ve been seeing lately: On portraits with subtle backlight, the AI kept 80–90% of the flyaways on the first pass. I only had to nudge a couple of highlight strands back in. My jaw didn’t drop (I’m not dramatic), but I did say, “Well, that settled nicely.”
If you’re dealing with hair halos, soft backlight, or delicate flyaways on a regular basis, this is exactly why we built Cutout.Pro.

At Cutout.Pro, we focus on making background removal fast while still respecting natural edges — especially for portraits, product-with-model shots, and e-commerce visuals where hair detail really matters. Instead of rebuilding strands from scratch, you can start with a clean cut and simply refine what needs attention.
The 3 Hardest Cases — and How to Handle Each
Some images make any background remover sweat a little. Here’s how I handle the usual suspects when I want to remove background from photo hair edges and still keep everything graceful.
Flyaway / Curly Hair: What the AI Gets Right and Where to Refine
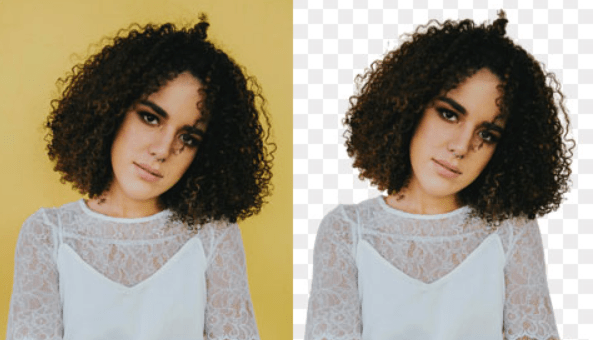
Curly hair and wind‑tossed flyaways are gorgeous, and a little chaotic. Here’s what I’ve noticed in February 2026 tests across six portraits (mixed lighting, brown and blonde hair):
What Cutout.Pro gets right:
- It detects overall hair shape reliably, including soft curls along the silhouette.
- It interprets semi‑transparent wisps decently, especially against clean, flat backgrounds.
Where I refine:
- Backlit halos: On light or blown highlights, I sometimes see a faint gray fringe. Two fixes work for me:
- In Cutout.Pro’s refine view, brush “Keep” right on the highlight edge, then “Remove” one hair’s width outside it to give the model a clean outline.
- In my editor, add a subtle Inner Shadow (multiply, hair color, 1–2 px) to pull edges in without hard clipping.
- Busy backgrounds: Trees, brick, or patterned wallpaper can trick the AI. I’ll do a quick, pre‑upload blur at 2–3 px on the background (mask it if you can) so hair separates better. After the cutout, bring back sharpness on the subject only. Old habits, still learning.
- Color spill: Blonde hair against blue skies can pick up cool spill. After export, I add a Hue/Sat adjustment clipped to the mask and nudge “Blues” down 5–10 in saturation. There… just right.
Transparent Objects: Glass, Water, Sheer Fabric
Anything see‑through demands a different kind of care. The AI can’t “invent” realistic refraction: it just estimates edges and alpha.
What helps before removal:
- Photograph with a contrasting background if you can (even temporarily). A mid‑gray or deep blue behind glass gives the AI more to chew on. Then remove and composite later.
- Avoid specular chaos: If the background has busy highlights, soften them a bit pre‑upload so the object’s contour reads clearly.
Refining the cutout:
- In Cutout.Pro, zoom into the boundary and use a small “Keep” brush along any soft inner edges (where glass meets liquid).
- Expect to rebuild true realism in your editor afterward:
- Add a faint shadow/reflection on the new background to anchor it.
- Repaint or mask tiny highlights so the glass feels crisp.
- For sheer fabric, keep the soft falloff. I sometimes duplicate the cutout layer at 10–20% opacity to recover translucency without harsh lines. “Wait… that’s actually lovely.”
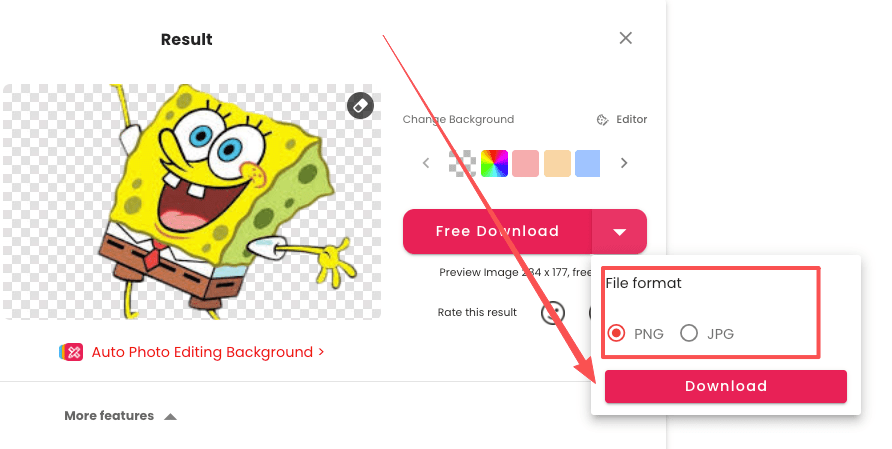
Export: PNG vs JPG and the Right Resolution to Choose
Quick choices here make a big difference downstream.
- PNG when you need transparency. That’s your go‑to for overlays, carousels, and templates. I keep PNG‑24 for clean gradients along hair: PNG‑8 can band on soft edges.
- JPG when you’re placing the subject onto a solid backdrop in your editor and don’t need transparency. Slightly smaller files, but watch compression on fine strands, set quality high (80–90) to avoid crunchy hair.
- Resolution math I actually use:
- Social squares/reels covers: export at 2048 px on the long side: plenty for crisp hair lines without ballooning file size.
- E‑commerce PDP: match your platform. Many stores look great at 1500–2000 px long side: marketplaces like Amazon often recommend 2560+ for zoom. I aim for at least 2000 px when hair detail matters.
- Print: 300 DPI at intended physical size. If I must scale up, I’ll upsample after the cutout with a dedicated tool, not before.
Tiny habit: I always preview the PNG on a dark and a light canvas before shipping. Halos hide on white and scream on charcoal. “See? Feels better.”
Common Mistakes and Quick Fixes
A few gremlins show up again and again. Here’s how I swat them gently.
Jagged Edges, Halo Effect, Lost Fine Detail
Jagged edges on hair tips:
- Cause: Heavy compression or an overly hard mask.
- Quick fix: In your editor, add a 0.3–0.6 px feather or use a Select & Mask/Refine Edge brush just on the perimeter. Keep it micro. If the source JPG was crunchy, re‑export the original at higher quality before removal when possible.
White/gray halo around backlit hair:
- Cause: Bright background bleeding into semi‑transparent pixels.
- Quick fix: AfterCutout.Pro, add a clipped layer set to Multiply with a soft brush sampling the subject’s hair color. Paint at 5–10% flow along the fringe. Alternatively, a Defringe at 1–2 px can help, but go light to avoid helmet hair.
Lost flyaways (AI shaved the wisps):
- Cause: Background too similar: low contrast.
- Quick fix: In Cutout.Pro‘s refine mode, paint “Keep” precisely over the airy bits, then switch to “Remove” just outside. If they still won’t come back, fake a few tasteful strands: 1–2 px brush, 20–40% opacity, vary length, taper ends. Mmm, that feels good.
Color spill (blue/green tint in blonde hair):
- Cause: Background cast.
- Quick fix: Target the offending hue with a Hue/Sat adjustment, -5 to -15 saturation, tiny shift toward warm. Subtle wins.
Over‑smoothing from aggressive denoise:
- Cause: Preprocessing filters flatten texture.
- Quick fix: Do noise reduction after the cutout, and spare the hair. Add a low‑opacity grain layer (1–2%) to unify edges if things look too plastic.
Field note: On a product‑with‑model shoot I edited last week, these tweaks cut my cleanup from ~12 minutes per image to about 3–4. Hehe, nice when it works.
Beautiful design doesn’t have to feel heavy. Try this on your next portrait or product‑with‑model image, keep an eye on those wisps, treat the halo kindly, and let the AI do the boring part. There… feels gentle, doesn’t it?
Until next time, dears.
Previous posts:
Remove Background from Product Photos for Amazon, Etsy & Shopify (Standards + Workflow)
How to Batch Remove Backgrounds from Images (100+ Photos in Minutes)
Remove Background on Android: Clean Cutouts for Social & Ecommerce