No Photoshop)
How’s it going guys? This is Camille. Last Tuesday, I had a flat lay shoot go sideways in the best possible way. I’d spent about forty minutes arranging a skincare product on marble — perfect angle, soft diffused light, the whole deal. Then I zoomed in on the final export and spotted it: a price-tag sticker peeking out from under the bottle cap, cheerfully ruining everything. My old instinct would have been to reach for the clone-stamp tool and lose another hour. Instead I had the whole thing fixed in under three minutes, and honestly the result made me do a small, quiet happy dance at my desk.
That moment is what this post is about. Not magic, just the right tool used the right way.
Why Manual Selection Tools Fail for Most People
The Lasso & Fill Problem — Time vs. Quality
The classic advice — “just use the lasso tool and content-aware fill” — sounds simple until you’re actually doing it on a complex background. Content-aware fill in Photoshop works beautifully on flat, repeating textures like grass or sky. On anything with depth, gradients, or partially occluded objects, it tends to smear, repeat patterns awkwardly, or leave ghost edges that are somehow more noticeable than the original problem.
There’s also the time math: selecting, feathering, filling, checking, patching, repeat. For a single image that’s annoying. For a batch of twenty product photos, it’s genuinely exhausting. According to Adobe’s own benchmark data on Content-Aware Fill, the tool performs best on uniform backgrounds — which is rarely what e-commerce photography looks like.

What AI Object Removal Does Differently
Modern AI removal tools don’t just look at what’s immediately around the selected area. They analyze the full image context — depth cues, texture continuity, lighting direction — and synthesize a fill that matches the scene rather than copying nearby pixels. The underlying technique, based on inpainting models derived from diffusion research, has matured significantly. A paper from the CVPR computer vision conference showed that diffusion-based inpainting now outperforms traditional patch-based methods on complex backgrounds by a substantial margin in user preference tests.
In practice, this means cleaner fills, better edge blending, and — crucially — consistent results even when you’re not a retouching expert.
What You Can Realistically Remove (and What Not to Try)
Best Cases — Wires, Stickers, Watermarks, Photobombers
These are the sweet spots:
| Object Type | Why It Works Well |
| Thin wires and cables | Narrow footprint, easy for AI to reconstruct background beneath |
| Price tags and stickers | Flat objects on a surface — background is predictable |
| Watermarks (light overlay) | Semi-transparent, background data still present underneath |
| Background photobombers | Surrounded by continuous background, easy to synthesize |
| Small props and dust specks | Low complexity, minimal context disruption |
Tricky Cases — Overlapping Objects, Reflective Surfaces
Be realistic about these:
Overlapping objects — If a hand is gripping a product, or one item casts a hard shadow across another, the AI doesn’t know what the hidden surface looks like. Results vary from “surprisingly good” to “abstract art.” You’ll likely need a touch-up pass.
Reflective or transparent surfaces — Glass, polished metal, and glossy packaging are notoriously difficult. The reflections contain environmental information that’s nearly impossible to reconstruct convincingly. Use object removal here only for very small elements (a tiny smudge, a single highlight artifact), not large areas.
Motion blur — If the object you want to remove is blurred (a passing pedestrian, a swinging arm), the fill will be correct but the boundary blending can look slightly off. Slow down and fine-tune the selection.
Step-by-Step: Remove Unwanted Objects with Cutout.Pro
Cutout.Pro’s AI Object Remover helps the user to remove unwanted objects by handling the whole workflow in a browser — no installation, no account required for the free tier.
Upload → Select Area → AI Fill → Preview
- Go to the Object Remover tool and click Upload Image. Drag in your file (JPG, PNG, or WebP up to 25 MB).
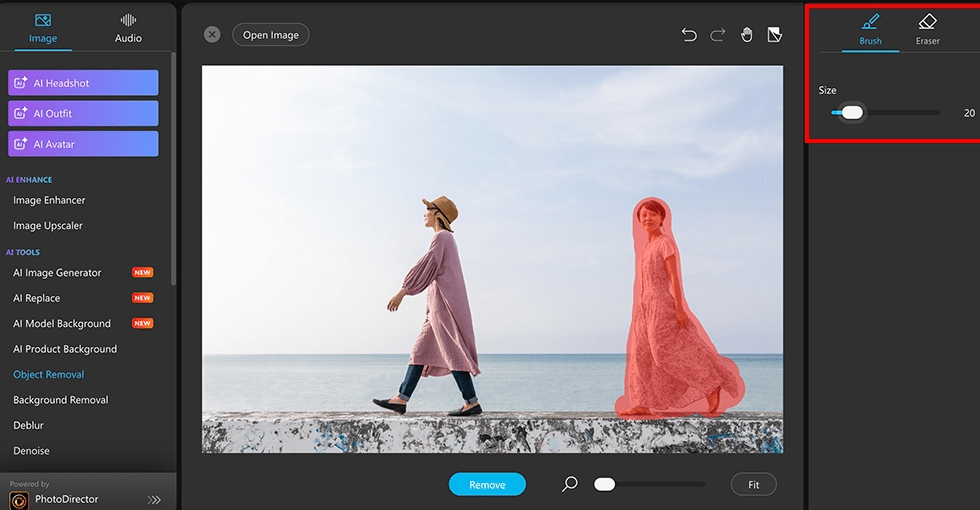
- Use the brush tool to paint over the object you want removed. You don’t need pixel-perfect accuracy — paint slightly into the background area for better edge reconstruction.
- Click Erase and let the AI process (typically 3–8 seconds for a standard image).
- The preview shows the result at full resolution. If it looks clean, move on. If there’s an artifact, use the undo and re-paint with a slightly different selection.
There’s no complicated settings panel to navigate. That’s intentional — the model handles heavy lifting.
Fine-Tuning Selection for Cleaner Edges
A few things I’ve learned from running this in product batches:
- Brush hardness matters. A slightly soft selection edge (available in the brush settings) tends to produce smoother blending than a hard-edged mask.
- Don’t over-select. Painting over a huge area gives the AI less background context to work with. Keep the selection as tight as possible while still covering the whole object.
- Multiple small passes beat one large one. For a tangled bundle of cables, removing them in 2–3 smaller sections often produces better results than selecting the whole bundle at once.
Export Settings (PNG vs JPG, Resolution)
| Format | When to Use | Notes |
| PNG (lossless) | Product shots, images going into further editing | No compression artifacts; larger file size |
| JPG (high quality) | Social media, web publishing, final deliverables | Use 90–95% quality to preserve detail |
| Original resolution | Always, if the source was high-res | Don’t let the tool downscale unless you need a specific size |
For e-commerce platforms like Amazon or Shopify, PNG at original resolution is almost always the right call — you want clean edges and no generational quality loss.

Product Photo Use Cases
Removing Price Tags and Stickers from Packshots
This is probably the most common use case I see among the small business owners and sellers I talk to. You receive stock from a supplier with pricing labels already applied, or you’re shooting existing retail inventory. Re-shooting cleanly isn’t always possible — especially for seasonal or limited-run items.
The AI fill on a sticker sitting on a flat surface is genuinely impressive. Even on curved packaging (a shampoo bottle, a wine label), it handles the curvature and texture correctly most of the time. I’ve processed batches of 30+ packshots this way without a single one needing a manual touch-up.
Bless my fiddly heart — past Camille would have cloned each one by hand.
Clearing Props and Cables from Flat Lays
Flat lay photography almost always involves visible cables (for powered products), props that were moved mid-shoot, or production debris (lint, crumbs, accidental shadows from a reflector arm). These are exactly the scenarios where AI removal shines: the background is flat and predictable, the objects have a defined edge, and the fill doesn’t need to reconstruct complex three-dimensional information.
For large-scale e-commerce operations, this is where the Cutout.Pro API becomes genuinely useful — you can batch-process hundreds of images programmatically rather than going one by one through the browser interface.
When to Combine Object Removal with Background Removal
The Two-Step Workflow for E-Commerce Images
Sometimes you need both — and the order matters.
Step 1: Remove unwanted objects first. Clean the image while you still have the original background as context. This gives AI the best possible information for reconstruction.
Step 2: Remove the background. Once the image is clean, use a dedicated background removal tool to isolate the product against white or transparent.
If you do it in reverse — background first, then object removal — you lose the contextual information that makes AI inpainting work well, and you’ll often get unnatural fills. The two-step approach also plays nicely with automation: both tools have API endpoints that can be chained in a single workflow script.
Here’s a basic example of how you might chain both steps using the Cutout.Pro API in Python:
import requests

API_KEY = "your_api_key_here"
headers = {"APIKEY": API_KEY}

# Step 1: Object removal
with open("product_raw.jpg", "rb") as f:
    response = requests.post(
        "https://www.cutout.pro/api/v1/matting",
        headers=headers,
        files={"file": f},
        data={"type": 7}  # type 7 = object removal
    )
obj_removed = response.content

# Step 2: Background removal
response2 = requests.post(
    "https://www.cutout.pro/api/v1/matting",
    headers=headers,
    files={"file": ("cleaned.png", obj_removed)},
    data={"type": 1}  # type 1 = background removal
)
final_image = response2.content

with open("product_final.png", "wb") as f:
    f.write(final_image)
FAQ
Q1: Can AI removal handle reflections on glass?
Not reliably, no. Reflections on glass surfaces involve complex optical information — the AI can remove a small element in the reflection, but it can’t reconstruct what should be reflected in that space. For product shots with glassware or mirrors, plan your shoot to minimize unwanted reflections at capture time, rather than trying to fix them in post.
Q2: Will the filled area look natural?
For the use cases listed above — stickers, cables, small background objects — yes, the fill typically looks natural without any manual touch-up. The quality degrades as the removed area gets larger relative to the image, or when the background is highly complex (patterned fabric, dense foliage). As a rough guideline, if the object covers less than 15–20% of the image area, you’re generally in good territory.
Q3: Does it work on videos too?
Cutout.Pro’s object removal is currently image-only. For video object removal, you’re looking at frame-by-frame processing or dedicated video inpainting tools — a more computationally intensive task. The underlying AI research for video inpainting is advancing quickly; expect more accessible video tools to emerge through 2026.
Q4: Is there a free tier?
Yes. The free tier allows a limited number of object removals per day at standard resolution. For high-volume or high-resolution work, paid plans unlock batch processing, API access, and priority queue. Check the current Cutout.Pro pricing page for up-to-date tier details.
Q5: How many objects can I remove per image?
There’s no hard limit on the number of removal passes per image. You can run multiple rounds — remove one element, then go back and remove another. Each pass processes independently. In practice I’ve done 4–5 removal passes on a single flat lay image with clean results throughout.
Previous Posts:
Background Removal vs Photoshop: Speed, Quality, and Best Use Cases
Remove Background from Product Photos for Amazon, Etsy & Shopify (Standards + Workflow)
Remove BG API (Python): Fast Integration + Retry & Queue Tips