Table of Contents
Hey, I’m Camille. That morning I stared at a blank product mockup and thought, “Not today, perfectionism…” I just needed a short clip of me holding a mug, floating over a soft, dreamy backdrop, no fabric, no lights, no drama. Lately, I’ve been leaning on AI to remove video backgrounds without a green screen, and it’s been… wonderfully uneventful. As in: upload, sip tea, download.
If you’ve ever spent way too long masking a wiggly hand (bless my fiddly heart~), this one’s for you. I’ll show you how I do it with Cutout.Pro, the trade-offs versus green screen, and a few simple shooting tricks that help the AI nail it on the first try.

Green Screen vs AI Removal — Why Most Creators Are Switching
I cut my teeth on green screen years ago: stands, clamps, carefully ironed fabric, spill suppression, keying, fine edge cleanup, the whole ritual. It absolutely works, especially for complex motion, but it’s a production. These days, I often need to spin up product reels, short UGC clips, or airy e-commerce demos without dedicating a corner of my studio to neon-green cloth.
What’s changed is AI background removal. It’s not magic, but it is getting impressively steady. In my tests (web app on Chrome, M2 MacBook Air), a 28‑second talking clip processed in about 40 seconds on Cutout.Pro. My After Effects roto of a near-identical clip took me around 32 minutes, twelve steps shrinking to three. And just like that… time I can spend on color and music instead of tracing elbows.
Why creators are switching:
- Fewer setup headaches: No fabric, no stands, no lighting gymnastics to avoid green spill.
- Anywhere capture: Kitchen counter, balcony, coworking nook, AI is portable.
- Good-enough edges most of the time: Hair wisps, glasses, and fingers are handled decently, and they keep getting better.
- Predictable speed: You wait a minute: you’re done. “One and done, no back-and-forth nonsense.”
When green screen still wins:
- Hair flying under strobes, motion blur galore, or complex props like lace and smoke, traditional keying can be more controllable.
- Heavy compositing in VFX pipelines where alpha fidelity and color control are non‑negotiable.
Trade-offs to know:
- AI can soften delicate edges. It’s usually fine for social, ads, and product explainers, but for cinema-style composites you may still prefer keyed footage.
- Busy backgrounds reduce accuracy. If your subject blends into a patterned couch (been there), you might see wobbly outlines.
All that said, for day-to-day brand content and e‑commerce demos, AI gets me from idea to polished output absurdly fast, “Fast as hell and still rock-solid.” Okay, maybe not rock-solid every time, but solid enough that I ship work with a calm smile instead of a caffeine-fueled roto session.
If you’re tired of wrestling with masks, green spill, and late-night roto sessions, this is exactly the kind of workflow we built Cutout.Pro for.
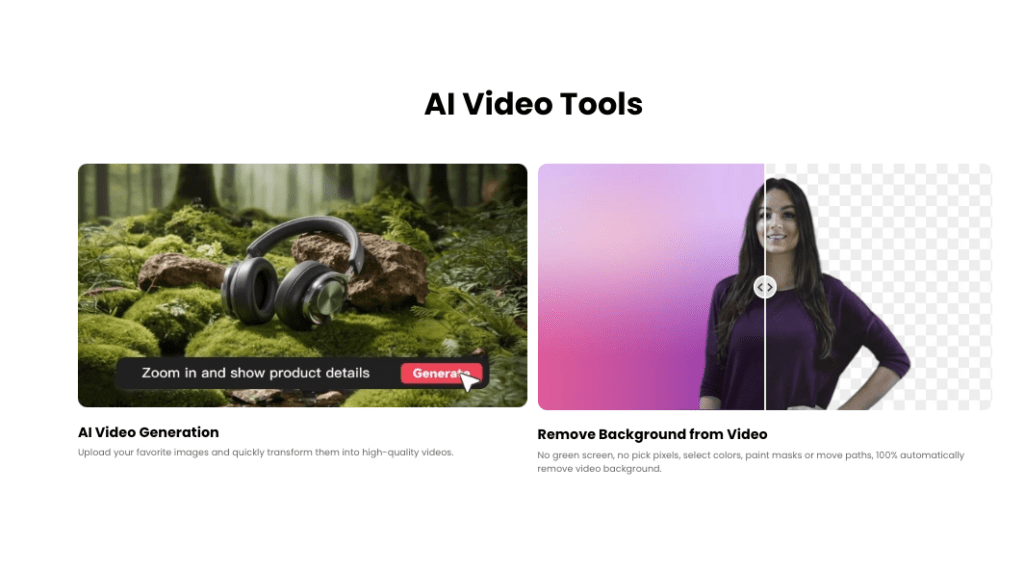
At Cutout.Pro, we focus on helping creators remove video backgrounds without complicated setups, so you can move from raw footage to clean, ready-to-edit clips in minutes instead of hours. No green screen required, no heavy post-production ritual — just a faster path to publish-ready content.

Step-by-Step: Remove a Video Background with Cutout.Pro
Upload → AI Removes Background → Download or Replace Scene
Here’s how I’ve been doing it lately (tested again, unsponsored):
- Upload
- I head to the Cutout.Pro Video Background Remover and drop in my clip. Short verticals for Reels/TikTok work great, but I’ve pushed 1080p product demos too.
- Tip: Trim your footage first if there’s extra lead-in or out, shorter clips process faster and usually look cleaner.
- AI Removes Background
- The app analyzes the subject and cuts the background. On my network (mid-tier fiber), a 15–30s clip usually lands in under a minute. I’ve had a few “abstract art” moments with fast hand gestures, but re-uploads with steadier lighting fix most of it.
- If needed, I’ll use refine tools (when available) to nudge edges, especially around hair or thin accessories. Past me was so serious. Present me? Two swipes and move on.
- Download or Replace the Scene
- You can download the foreground with transparency or pick a new scene: a studio gradient, a soft paper texture, a subtle blur of a café, whatever suits your brand.
- Formats vary by tool and plan. If you need an alpha channel for pro editing, check for MOV with alpha (ProRes 4444) or WebM with alpha. Otherwise, exporting to MP4 over a chosen background is perfectly fine for social.
My real-world notes:
- On a product spin shot (ceramic mug on turntable), I cut background removal time from ~25 minutes (masking in AE) to ~2 minutes total using Cutout.Pro. “Well, that settled nicely.”
- Shadows: If your original has a nice ground shadow you want to keep, test both ways, sometimes adding a subtle fake shadow in post looks more consistent than trying to salvage a messy real one.
Helpful references:
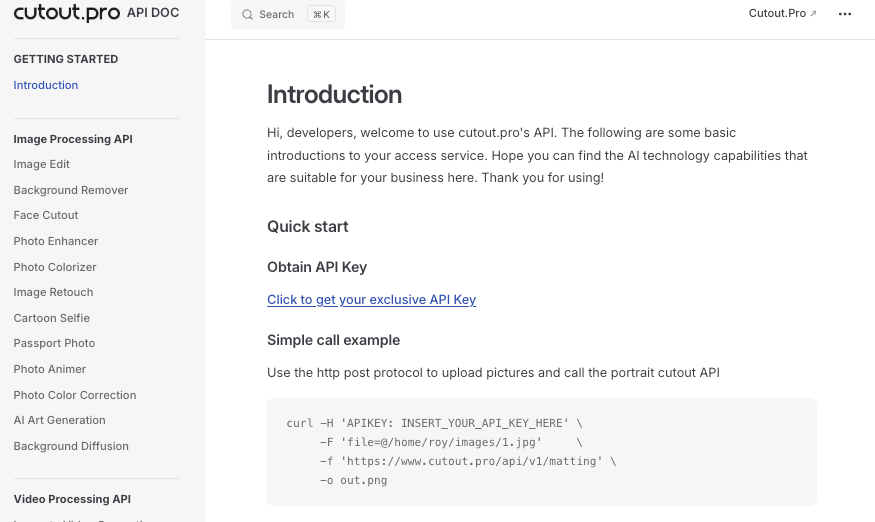
- Cutout.Pro’s API documentation is handy if you’re automating background removal in a pipeline or app. I’ve used their endpoints for batch product videos, quietly satisfying when a whole folder processes while I sketch thumbnails.
What to Do With Your Background-Free Video
Add Virtual Background, Export for Premiere / DaVinci / iMovie
Once your clip is free of distractions, the fun part begins. A few cozy favorites:
Add a virtual background
- Soft gradients: gentle lilac to warm ivory, instant brand calm.
- Light texture: paper grain at 6–10% opacity adds tactile warmth for product talk-throughs.
- On-brand sets: a blurred shelf with color-matched props. “Mmm, that feels good.”
Pair with your editor of choice
- Premiere Pro: If you export with alpha, drop it straight over your scene. If you exported as MP4 with a solid backdrop, use blend/masks or just keep that chosen scene. Adobe’s docs on alpha-supported codecs are worth a peek when you’re chasing pristine edges.
- DaVinci Resolve: Fusion gives you extra finesse for edge cleanups. I do a tiny edge blur (0.5–1.0) and a soft shadow under feet/hands.
- iMovie: No alpha import, but you can still use your MP4 over a background image or video. Keep it simple: color, texture, logo, done.
Sweeteners that make it feel expensive (without the stress)
- Light wrap: a subtle glow around edges so subject and background share the same “air.”
- Color harmony: match background hue to one color in your subject’s outfit or product. “Oh, that’s lovely.”
- Grain: 20–30% luma grain can hide tiny edge quirks and unify the scene.
A small caution: not every platform treats transparency the same. If you need alpha end-to-end, test a short clip through your workflow first. If it can rescue my sleepy brain at 10 p.m., imagine what it’ll do for you.
Shooting Tips That Make AI Removal Cleaner
Contrast, Clothing Color, and Lighting to Avoid
The capture is half the battle. A few gentle guardrails that keep AI on your side:
Choose contrast wisely
- Wear a color that doesn’t appear in your background. Black hair against a dark sofa? The AI squints. Swap the sofa or the shirt.
- Product videos love mid-tone backdrops. If your item is white, avoid white walls: if it’s forest green, skip green plants right behind it.
Clothing and props
- Avoid fine mesh, translucent fabrics, and ultra-thin jewelry waving around, they create edges the AI can misread.
- If you’re gesturing, keep fingers separated a touch. “There… just right.”
Gentle, even lighting
- Soft, diffuse light reduces harsh shadows and motion blur. A single window with a sheer curtain works wonders.
- Avoid mixed color temperatures (blue window + orange lamp) unless you’re going for it stylistically: the AI prefers consistency.
Watch the background
- Keep it calm: fewer patterns, fewer moving elements. A quiet wall, a curtain, or a large poster board is perfect.
- Step forward from the background to reduce shadow spill and give the algorithm more separation.
Movement and frame rate
- If you’re swinging hair or spinning products fast, consider shooting 60 fps so each frame is crisp. Motion blur is where edges get mushy.
- Quick test: record three seconds and run it through removal before you commit to the full take. “Easy now~”
Limits worth noting (honesty hat on):
- Very fine hair against a matching background can still halo. A soft background or a tiny halo reduction in post usually does the trick.
- Transparent objects (glass, steam) are a toss-up. If the transparency is critical to your story, green screen still has an edge.
All right, rest easy now. Beautiful design doesn’t have to feel heavy. Try this on your next short, trim your clip, upload, pick a background, and see how it feels. If it saves you even ten minutes, that’s time back for color, music, and the human touch only you can add.
Until next time, dears.
Previous posts:
Remove Background on Android: Clean Cutouts for Social & Ecommerce
Remove Background from Product Photos for Amazon, Etsy & Shopify (Standards + Workflow)
How to Batch Remove Backgrounds from Images (100+ Photos in Minutes)