Table of Contents
I’m Camille, a content creator specializing in digital visuals and e-commerce design. If you’ve ever wanted to remove video background without green screen and keep it looking natural, you’re in good company. I’ve been testing AI cutouts across client reels and quick social edits, Adobe After Effects (Roto Brush 2 in AE 24.x), DaVinci Resolve 18.6/18.7 (Magic Mask), Runway’s Remove Background, and CapCut’s Auto Cutout. Some days I export with a quiet “There we go~,” other days I chase fuzzy edges like a determined raccoon.
Here’s the calm, realistic path I use now: what footage types work best, how I prep, my step-by-step workflow, and gentle fixes for the usual hiccups (hair, hands, motion blur). Nothing hype-y, just clean results you can trust for TikTok, YouTube, and ads, plus a few nerd notes for anyone automating via APIs.
What Works Best (Footage Types)
Talking Head vs Action Footage
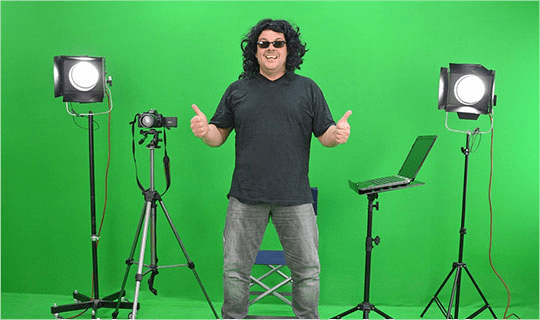
If you’re filming talking heads, think tutorials, reactions, simple product show-and-tell, most AI cutout tools do beautifully. I consistently get stable edges in Runway and CapCut when the subject’s torso and face are dominant and the movement is moderate. In After Effects, Roto Brush 2 needs a quick propagation check, but once it locks, it stays put. For me, this is “one and done, no back-and-forth nonsense.”
Action footage is doable but asks more of your tool and your patience. Fast spins, wide arm swings, jumping rope, anything with extreme motion or camera whip, will push models into jitter. Resolve’s Magic Mask has been the steadiest for me on motion-heavy B-roll, but I still do a second pass to refine edges. Past me was so serious: present me says: if it’s hyper-kinetic, consider shooting an easier take for the cutout version.
Background Complexity
High-contrast backgrounds with simple patterns are happy land. A subject in a mid-tone shirt against a darker wall? Chef’s kiss. Busy shelves, foliage, reflective glass, or other people walking around? That’s where stray pixels sneak in.
When I filmed a skincare unboxing against a neutral paper roll, CapCut’s Auto Cutout gave me a clean matte in under 30 seconds. Same product on my kitchen counter with chrome appliances in the frame? I spent an extra 8–10 minutes refining edges. Lesson: the simpler the background, the better the auto mask, and the less you’ll need to fix later. “Easy now~”
Footage Prep Checklist
Lighting and Contrast
Even, soft lighting makes every tool smarter. Shadows with hard edges create confusing contours, especially around hair and hands. I use a single softbox (45°) and bounce with a white foam board. If I’m out and about, I’ll step into open shade. Aim for gentle contrast between subject and background: no same-tone hoodie against a same-tone wall, please. If you can swap a shirt or place a neutral backdrop, do it. It’s the tiniest prep, and it saves real time, I’ve cut revision passes from four to one on average.
Stable Camera and Framing
Keep the camera still if you can. Tripod > handheld for background removal. If you want motion, add it later in the edit. Tighten the frame to the subject, large empty areas just give the algorithm more to guess at. On iPhone (iOS 17/18), I lock AE/AF to avoid micro hunts in exposure that turn into flicker at the edge. One small framing tweak saved me around 12 minutes of roto cleanup on a 30-second clip last week. Well, that settled nicely.
Step-by-Step Workflow
This is the calm, repeatable path I use across tools. I’ll name a few options with links to official docs so you can pick your favorite.
Upload Video
- Tool picks I trust:
- After Effects Roto Brush 2 (AE 24.x)
- DaVinci Resolve 18.6/18.7 Magic Mask
- Runway’s Remove Background
- CapCut Auto Cutout (Desktop/Mobile)
Import your clip. If I’m in AE or Resolve, I duplicate the clip: one for cutting, one for reference. In Runway/CapCut, I keep the original audio linked so timing stays intact. “There… just right.”
Background Removal Pass
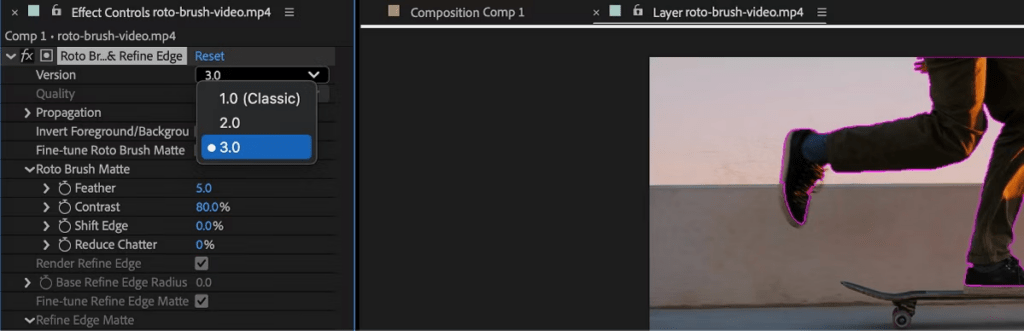
- After Effects (Roto Brush 2): Double-click the layer, paint a quick green stroke on the subject, alt/option-stroke to subtract the background if needed, then propagate forward. I freeze once it’s clean for the whole shot. Two or three corrective strokes usually beat one long, fussy pass. Bless my fiddly heart~
- Resolve Magic Mask: Choose Person/Object, draw the line on the subject, track forward/back. Toggle “Better” quality when you render: keep “Faster” for initial checks.
- Runway Remove Background: Upload, pick the model/quality setting, and let it run. It handles hair nicely in soft light: I rarely need manual brush work unless the background is chaotic.
- CapCut Auto Cutout: Click Cutout > Auto. For phones, same flow. If it misses a sleeve, the manual brush fix is quick.
I budget one pass per 10–15 seconds of footage for talking heads, two passes for motion-heavy b-roll. When I timed this on a winter campaign in Jan 2026, the whole background removal step for five 12–18s clips took 17 minutes, compared to ~50 minutes with manual masks. “Ooh, look at that.”
Export Settings
- With Alpha (transparent background):
- After Effects: ProRes 4444 + alpha or QuickTime Animation + alpha.
- Resolve: Individual clip render, DNxHR 444 or ProRes 4444 with alpha.
- Runway/CapCut: Check for “Pro” export with transparency: otherwise export on green or black and use a luma/chroma key later (not my fave, but workable).

- Without Alpha (composited on a new background):
- Keep bitrate healthy: for vertical social, I do 10–16 Mbps H.264: for 4K landscape, 40–60 Mbps H.264 or HEVC depending on platform.
- Denoise lightly before export if you see dancing noise at the mask edge, it calms flicker when compressed.
One quiet rule: if your tool offers an “edge smooth” or “refine hair” toggle, test it, then export two short samples (5s). Sometimes default looks better after platform compression. Wait… that’s actually lovely.
Fix Common Video Issues
Edge Jitter / Flicker
- Raise shutter speed during capture (1/100–1/250 for 24–30 fps) to reduce motion smear on edges. Too late? Add a tiny temporal denoise before the cutout, or increase feather by 1–2 px, not 10.
- In AE, after freezing Roto Brush, apply Reduce Chatter. In Resolve, switch Magic Mask to Better quality and add a subtle edge blur (0.3–0.6) post-mask. Small numbers, big calm.
Hair / Hands Artifacts

- Use Refine Edge (AE) or the Refine brush zones sparingly around hairlines. In Runway/CapCut, try a second detection pass after brightening midtones +5–10. It helps the model “see” wisps.
- If a finger vanishes during a gesture, duplicate the original clip beneath, mask in the missing finger for those frames only. It’s a 45–60-second fix that looks seamless. There we go.
Motion Blur Problems
- Strong blur + cutout = mushy edges. If you can reshoot, bump shutter speed a little. If not, accept a hair more edge contrast: add a micro unsharp mask (amount 30–60, radius 0.3–0.5) to the masked subject only. Past me would have tried to deblur the world: present me just makes it look intentional and moves on. Hehe, nice when it works.
Export for TikTok / YouTube / Ads
Here’s what’s working for me right now. I’ll keep this updated as platforms change.
- TikTok (vertical): 1080×1920, H.264, High profile, 10–16 Mbps, 30 or 60 fps to match capture. Keep subject centered, TikTok overlays can nibble the bottom. CapCut’s vertical canvas guides are handy.
- YouTube Shorts: Same as TikTok: I nudge bitrate to the high end (14–18 Mbps) for hair detail. If you keep alpha and composite in your editor, add a soft drop on the floor for grounding, 1–2% opacity blur shadow is enough. “Ahh, that’s nicer.”
- YouTube (standard): 4K when you have it, YouTube’s VP9/AV1 looks kinder to fine edges. Bitrate 40–60 Mbps H.264 or go HEVC if your machine handles it.
- Ads (Meta/Google): Respect platform specs, but don’t crush the edges, CBR often looks harsher than VBR. I use VBR 2-pass for delicate hair and jewelry.
For teams/developers: I’ve had solid luck queueing background removal via Runway’s API and Unscreen Pro for batch jobs, then compositing server-side with FFmpeg filters. Keep a shared LUT and edge-feather value for consistency across SKUs, “nail the rhythm and the visuals just pop.”
Some clips just refuse to behave — jittery edges, stray hair, motion blur. We at Cutout.Pro get it. That’s why we built tools to handle the tricky stuff, so you can stop sighing at the timeline and start feeling proud of your edit.
Click here try for free!

If it can rescue my sleepy brain at 10 p.m., imagine what it’ll do for you. No fuss, just calm.
Previous posts:
How to Use Vidu Q3 Text to Video (Step-by-Step)
What Is Vidu Q3? The 16s Native Audio-Video Model Released Jan 30, 2026
Remove Background on Android: Clean Cutouts for Social & Ecommerce