Hey guys, I’m Camille. How’s going on? Several days ago, I opened a product mockup and whispered, “Not today, fuzzy edges.” If you’ve ever placed a logo or product on a new background and seen that weird gray halo show up, hi, I’ve been there, too. Making a transparent background PNG that looks crisp on any canvas isn’t hard, but it does take a few quiet, practical habits.
I work with transparent PNGs daily for social headers, e‑commerce thumbnails, and quick brand kits. Over the last few months (most recently re-tested in January 2026 on Photoshop 25.x, Affinity Photo 2.4, Figma 121, macOS Sonoma, and Chrome 121), I refined a simple flow that shaves minutes off every export and saves me from that late‑night “why does this look crunchy?” spiral. Consider this a friendly walk-through, no hype, just clean alpha edges and a little calm. There we go!

What “Transparent PNG” Actually Means (Alpha Edges)
You’ve probably dragged a logo onto a new background and marveled as it “just floats.” That’s the alpha channel doing the heavy lifting. A transparent background PNG carries pixel color plus opacity (alpha) per pixel. Instead of hard, stepped cutouts, you get soft, anti‑aliased edges that blend naturally with whatever sits behind.
Why it matters in practice:
- Product shots need believable softness at the edges, think hair, fabric, or rounded bottles. Alpha lets those semi‑transparent pixels keep their delicate fade.
- UI overlays (badges, stickers, icons) drop onto photos without ugly boxes.
- You can swap backgrounds without re‑cutting the subject. Fast as hell and still rock‑solid.
A tiny caveat: PNG stores color even in fully transparent pixels. If your original background was blue, those hidden pixels can “peek through” during resampling and cause fringing on export. We’ll fix that in a minute.
If you like official reading, MDN’s overview is clear and current: PNG (Portable Network Graphics) on MDN.
Best Export Settings
Let’s keep it simple. When I’m prepping a transparent background PNG for client delivery or store listings, I focus on clarity over complexity. Two choices really matter: resolution and how you compress.
Resolution and Compression
- Match the display context. For e‑commerce tiles, I like 1500–2000 px on the long side for crisp zooms: for social stickers or logos, 512–1024 px often hits the sweet spot.
- PNG‑24 with transparency is my default for photos or soft edges. PNG‑8 with alpha can work for flat graphics (icons, UI) if banding doesn’t appear, and it saves size.
- In Photoshop (25.x), File → Export → Export As → PNG: check “Transparency,” set “Smaller File (8-bit)” only if it still looks smooth. Adobe has a clear guide here: Export assets in Photoshop.
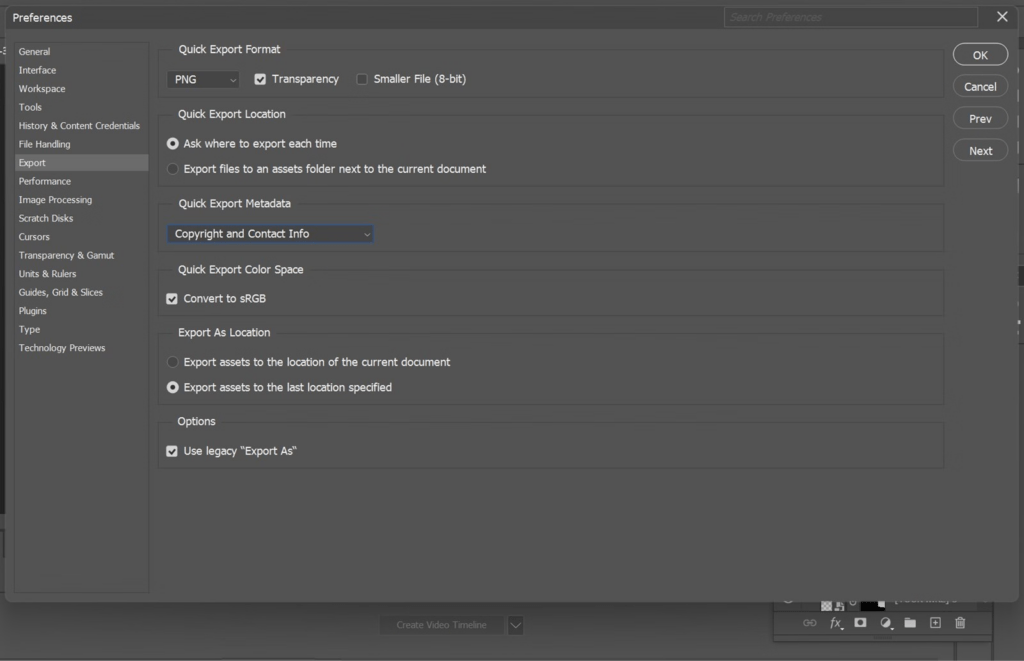
- In Figma (121), Export → PNG → tick “Transparent.” If you need sharp UI edges, try 2x and downscale in code for retina displays, fewer jaggies.
- Compression note: PNG is lossless: size savings come from reducing colors (PNG‑8), trimming metadata, and removing unused space. If you need aggressive savings for the web, consider WebP with alpha (we’ll compare formats below).
Tiny field note: moving from 3000 px to 1800 px on long edge cut my PNG sizes by ~45% last week on a batch of 40 shoes, with no visible loss on Shopify product pages. “Ooh, look at that.”
Avoiding Unnecessary Re-exports
Re‑exporting a PNG after editing on a colored background can reintroduce fringing. My calm route:
- Keep a layered source (PSD/AFPHOTO/FIG) with the subject on a transparent layer.
- Export from the source as the last step. If I need variations, I export multiple sizes in one pass.
- If a client sends a flattened PNG and asks for tweaks, I pull it into a tool with non‑destructive adjustments and export once. One and done, no back‑and‑forth nonsense.
I’ve measured this on a jewelry catalog: keeping one transparent master and exporting 3 sizes in a single batch saved me ~18 minutes per 20 items. Well, that settled nicely.
Fix Artifacts Before Export
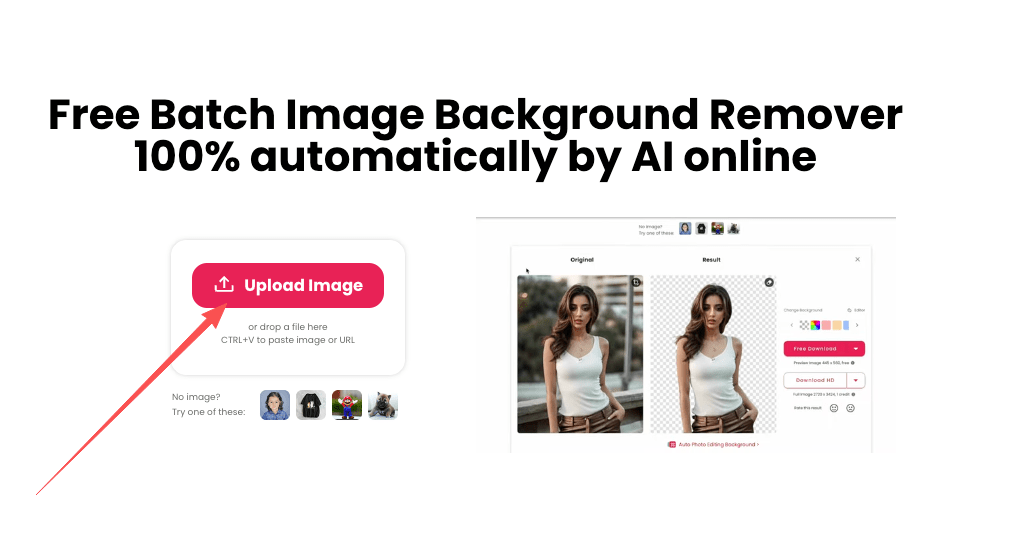
We built Cutout.Pro to make the first cut cleaner — especially around hair, fur, and semi-transparent edges. By improving the initial alpha quality, it helps you reduce halos and fringing before export, without relying on manual edge fixes. If you work with transparent PNGs at scale, you can try it free here!
If the cutout is messy, no export setting can rescue it. I do a quick pre‑flight to clean halos, color spill, and stair‑step edges.
Gray Halo / Fringing
That faint outline often comes from color left in the transparent edge pixels.
- Decontaminate colors: In Photoshop’s Select and Mask, “Decontaminate Colors” (subtle strength) replaces edge pixels with subject tones. Photoshop Select and Mask explains it.
- Manual defringe: Layer → Matting → Defringe (1–2 px) helps on logos.
- Paint the fringe: On a new layer clipped to your subject, softly brush along the edge with a sampled subject color at low flow. Past me was so serious: now I do three lazy strokes and, there… just right.
Color Spill from Background
Blue studio sweep reflecting into chrome, green from a backdrop haunting blonde hair, color spill makes “clean” look off.
- Neutralize with a targeted Hue/Saturation or Curves clipped to the edge mask. Reduce saturation in the spill hue only.
- For hair, a soft overlay of sampled warm tones at very low opacity can restore life without crunchy edges.
- If the spill is heavy, consider a quick relight pass: a gentle dodge on highlights and burn on shadows along the perimeter. Subtle is the word.
Jagged Edges
Jaggies show up when the mask is too hard or when small assets get upscaled.
- Slight feather (0.5–1 px) on the mask, then add a tiny contrast to recapture shape.
- Export larger, then downscale to final size. Downsampling smooths aliasing better than trying to sharpen.
- For vector logos, keep it vector until the last possible moment. In Figma/Illustrator, export SVG when the destination allows it. If you must do PNG, export at 2–4x and size down in code or the CMS.
My little confession: I once spent 20 minutes nudging a shadow by hand… never again. A 2% Gaussian Blur on a shadow layer masked to the subject beats perfectionist pixel‑pushing. Ahh, that’s nicer.
PNG vs WebP vs JPG (When to Use Each)
Let’s pick formats like we pick mugs: the one that fits the moment.
- PNG (with transparency): Best for UI, logos, stickers, and product cutouts needing crisp alpha edges and lossless quality. Larger files, but dependable. Good browser and app support everywhere. See MDN: Image file type and format guide.
- WebP (with alpha): Smaller than PNG in most cases, supports transparency and even animation. Great for the web when size matters. Some older pipelines may not love it, but modern browsers do.
- JPG/JPEG: No transparency. Lovely for photos on solid backgrounds, banners, and anything where soft gradients matter and you don’t need an alpha channel. Way smaller at similar visual quality, but lossy.
My practical rule:
- If the asset overlays anything: PNG or WebP with alpha.
- If it sits on a known solid background: JPG (80–90% quality) or WebP lossy.
- For e‑commerce: I often deliver both, transparent PNG for marketplaces/CMS, and WebP with alpha for the storefront to keep page weight light. The CMS decides: my source stays clean.
Recent check (Jan 2026): a 1800 px shoe on transparency was 1.7 MB as PNG‑24, 420 KB as WebP (lossless), and 210 KB as WebP (lossy, quality 85) with minimal edge change. My jaw actually dropped a little. Easy now~
QA Checklist (5-Point Quick Check)

Before I ship, I do a 60‑second “eyes and ears” pass. If it can rescue my sleepy brain at 10 p.m., it’ll probably help you, too.
- Edge blend on mid‑gray
- Drop the PNG over 50% gray and 5% gray. Look for halos, banding, or crunchy steps. If you see a rim, revisit defringe or feather.
- Background swap sanity
- Test over white, black, and the brand color. Any color spill jumping out? Nudge Hue/Sat on the mask edge. “Wait… that’s actually lovely.”
- Scale test
- View at 50%, 100%, and 200%. If 50% looks too sharp, add a whisper of feather. If 200% reveals stair‑steps, export larger and downscale.
- File size vs. purpose
- For web, aim for under 500 KB if possible (context matters). Try WebP with alpha if PNG is hefty. For print or hi‑res mockups, keep PNG‑24.
- Hidden pixels audit
- Toggle a bright checkerboard or place over neon magenta to expose leftover fringe. If fully transparent pixels still hold color, decontaminate or paint the edge.
There, done. No fuss, just calm.
A soft note on limits: some edge cases, flyaway hair on colored gels, glitter, or translucent glass, won’t look identical across every background. That’s normal. Choose the background intent and bias your cleanup toward that mood. Old habits, still learning.
All right, rest easy now!
Previous posts:
Fur & Hair Background Removal: How to Get Natural Edges
Bulk Background Removal: 100+ Images Fast (Workflow & QA)
Remove Background Online: Best Method for Clean PNGs (2026)